Node-level tabs
When you click on a node in the network map of a project in the CoBaseKRM web client, a bottom pane is displayed with the following tabs for node-level features:
Wiki tab for a node
The Wiki tab for a node lets you create and edit content on a wiki page for a node of a project's network map. The wiki editor features an input field where you can add text and use common heading and text formatting styles. You can also add images and hyperlinks.
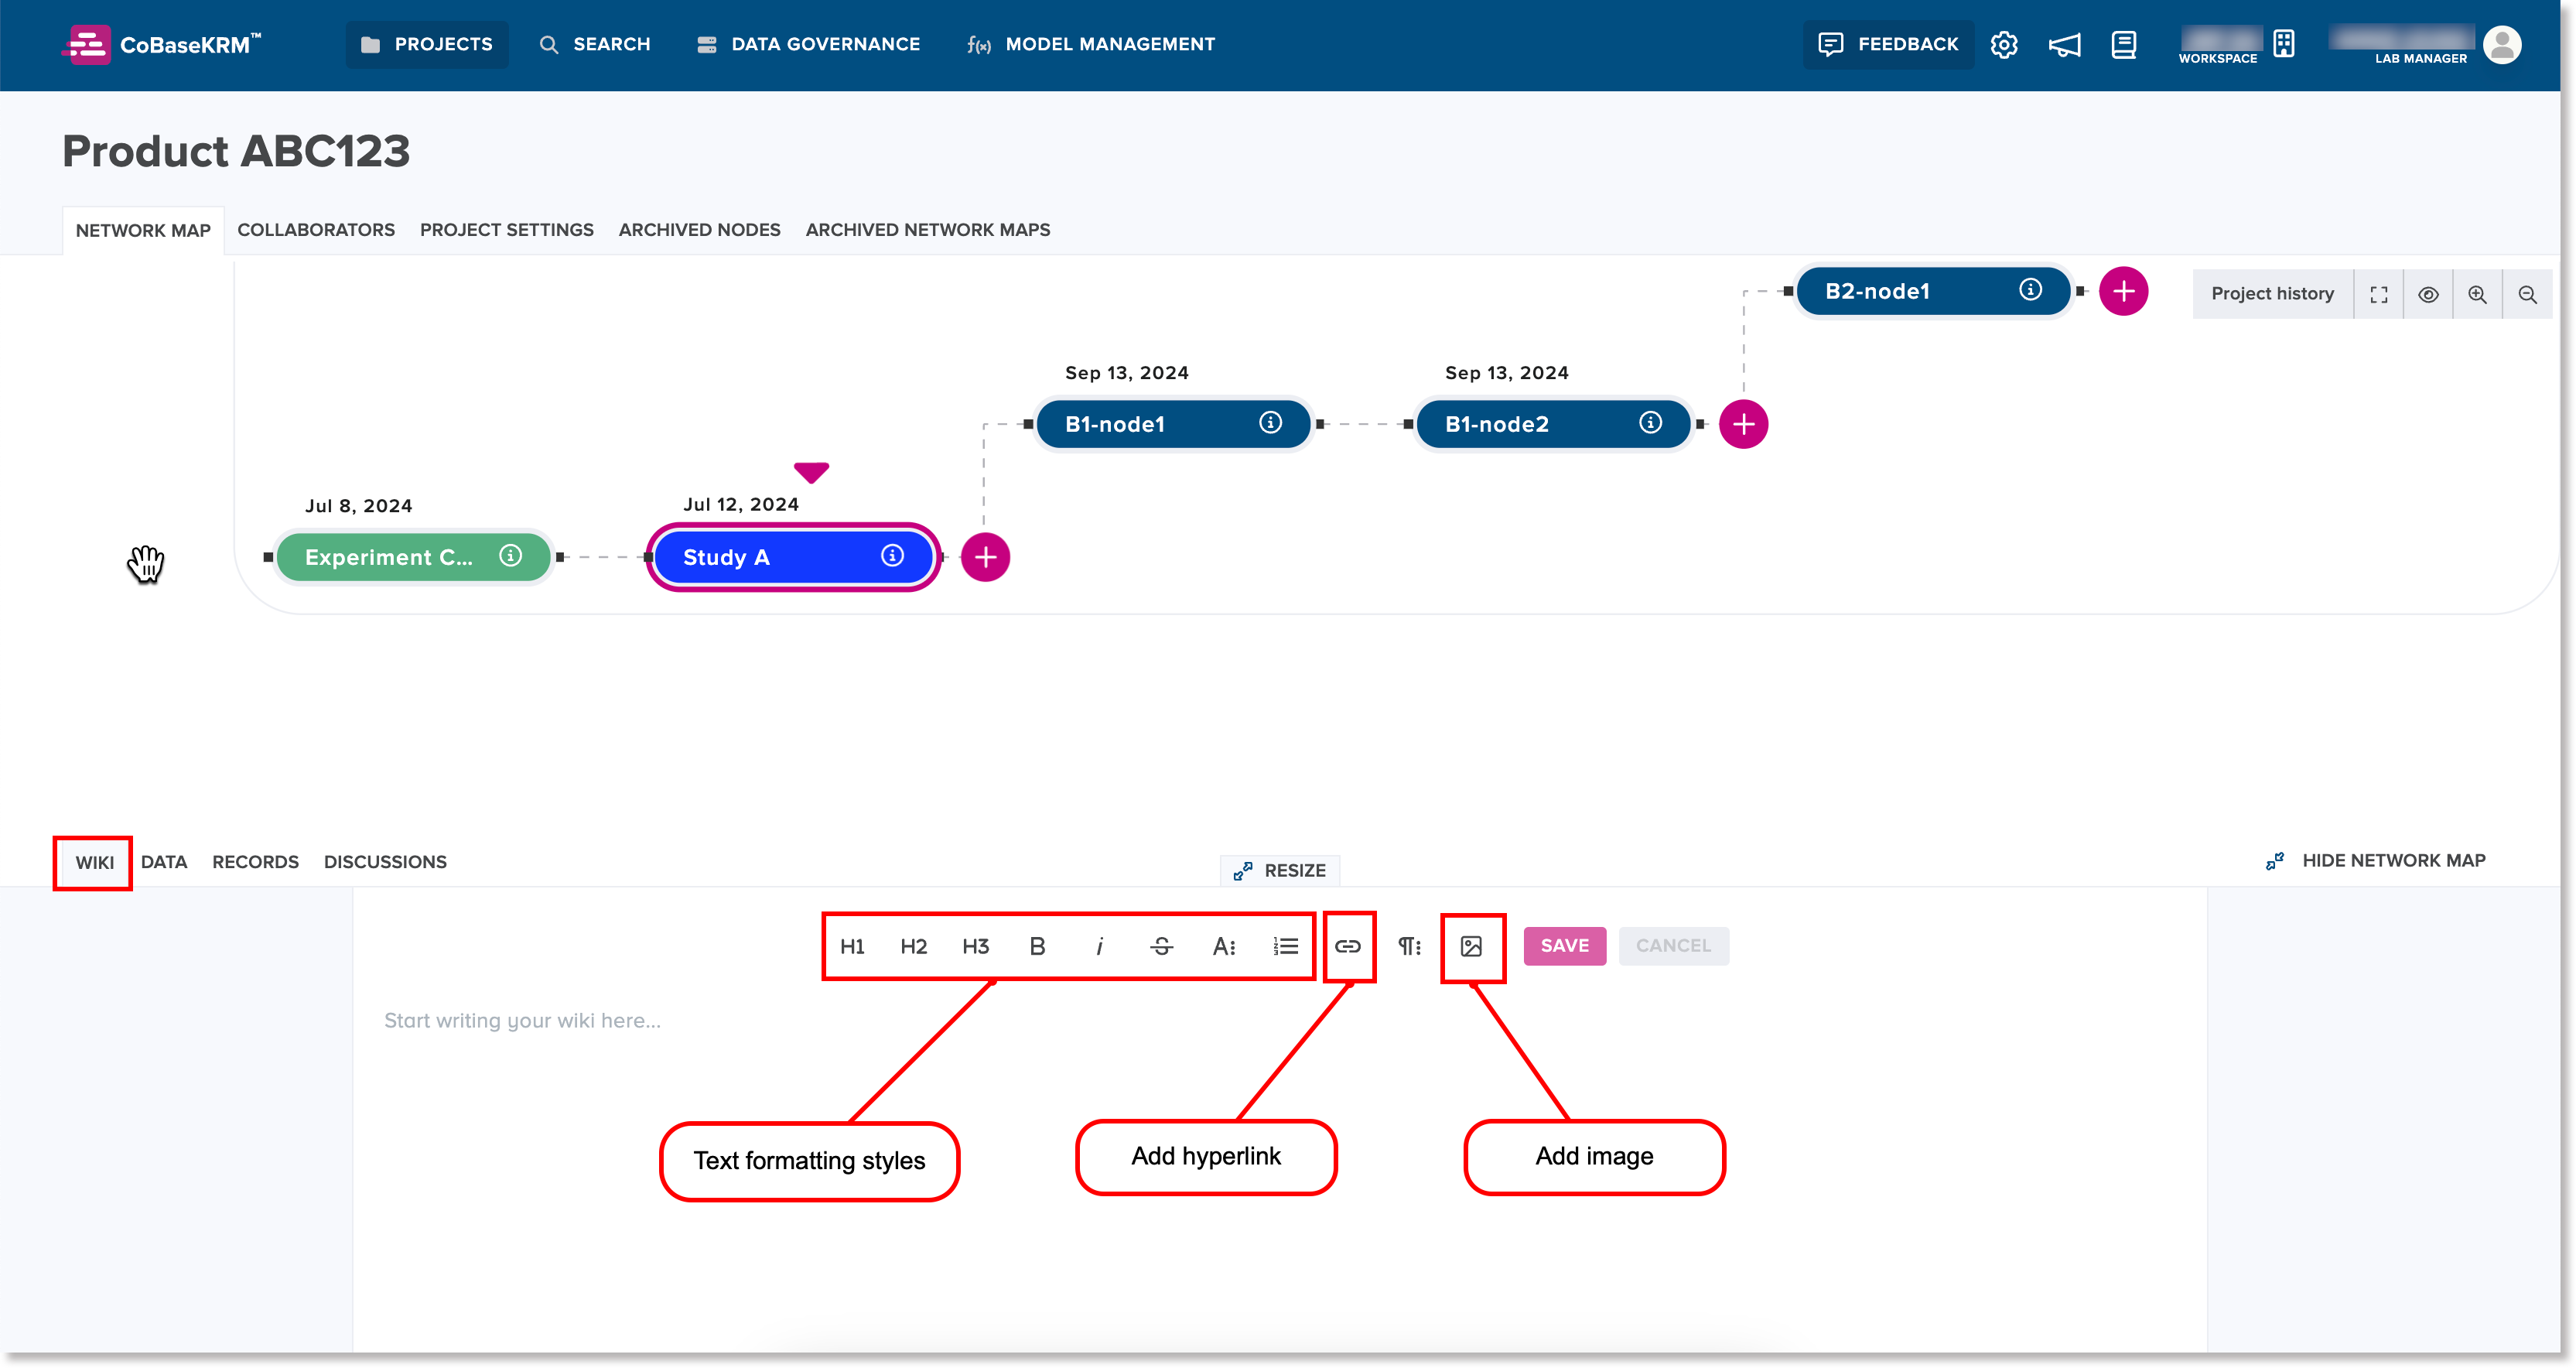
To create on the Wiki tab for a node:
-
Place your cursor inside the wiki editor and add text, images, and/or hyperlinks, as needed.
Note
To cancel any changes you have made in the wiki editor and start over in editing the wiki, click or tap Cancel.
-
Click or tap Save.
Data tab for a node
The Data tab lists records of all of the existing observations in view-only format that are associated to a node.
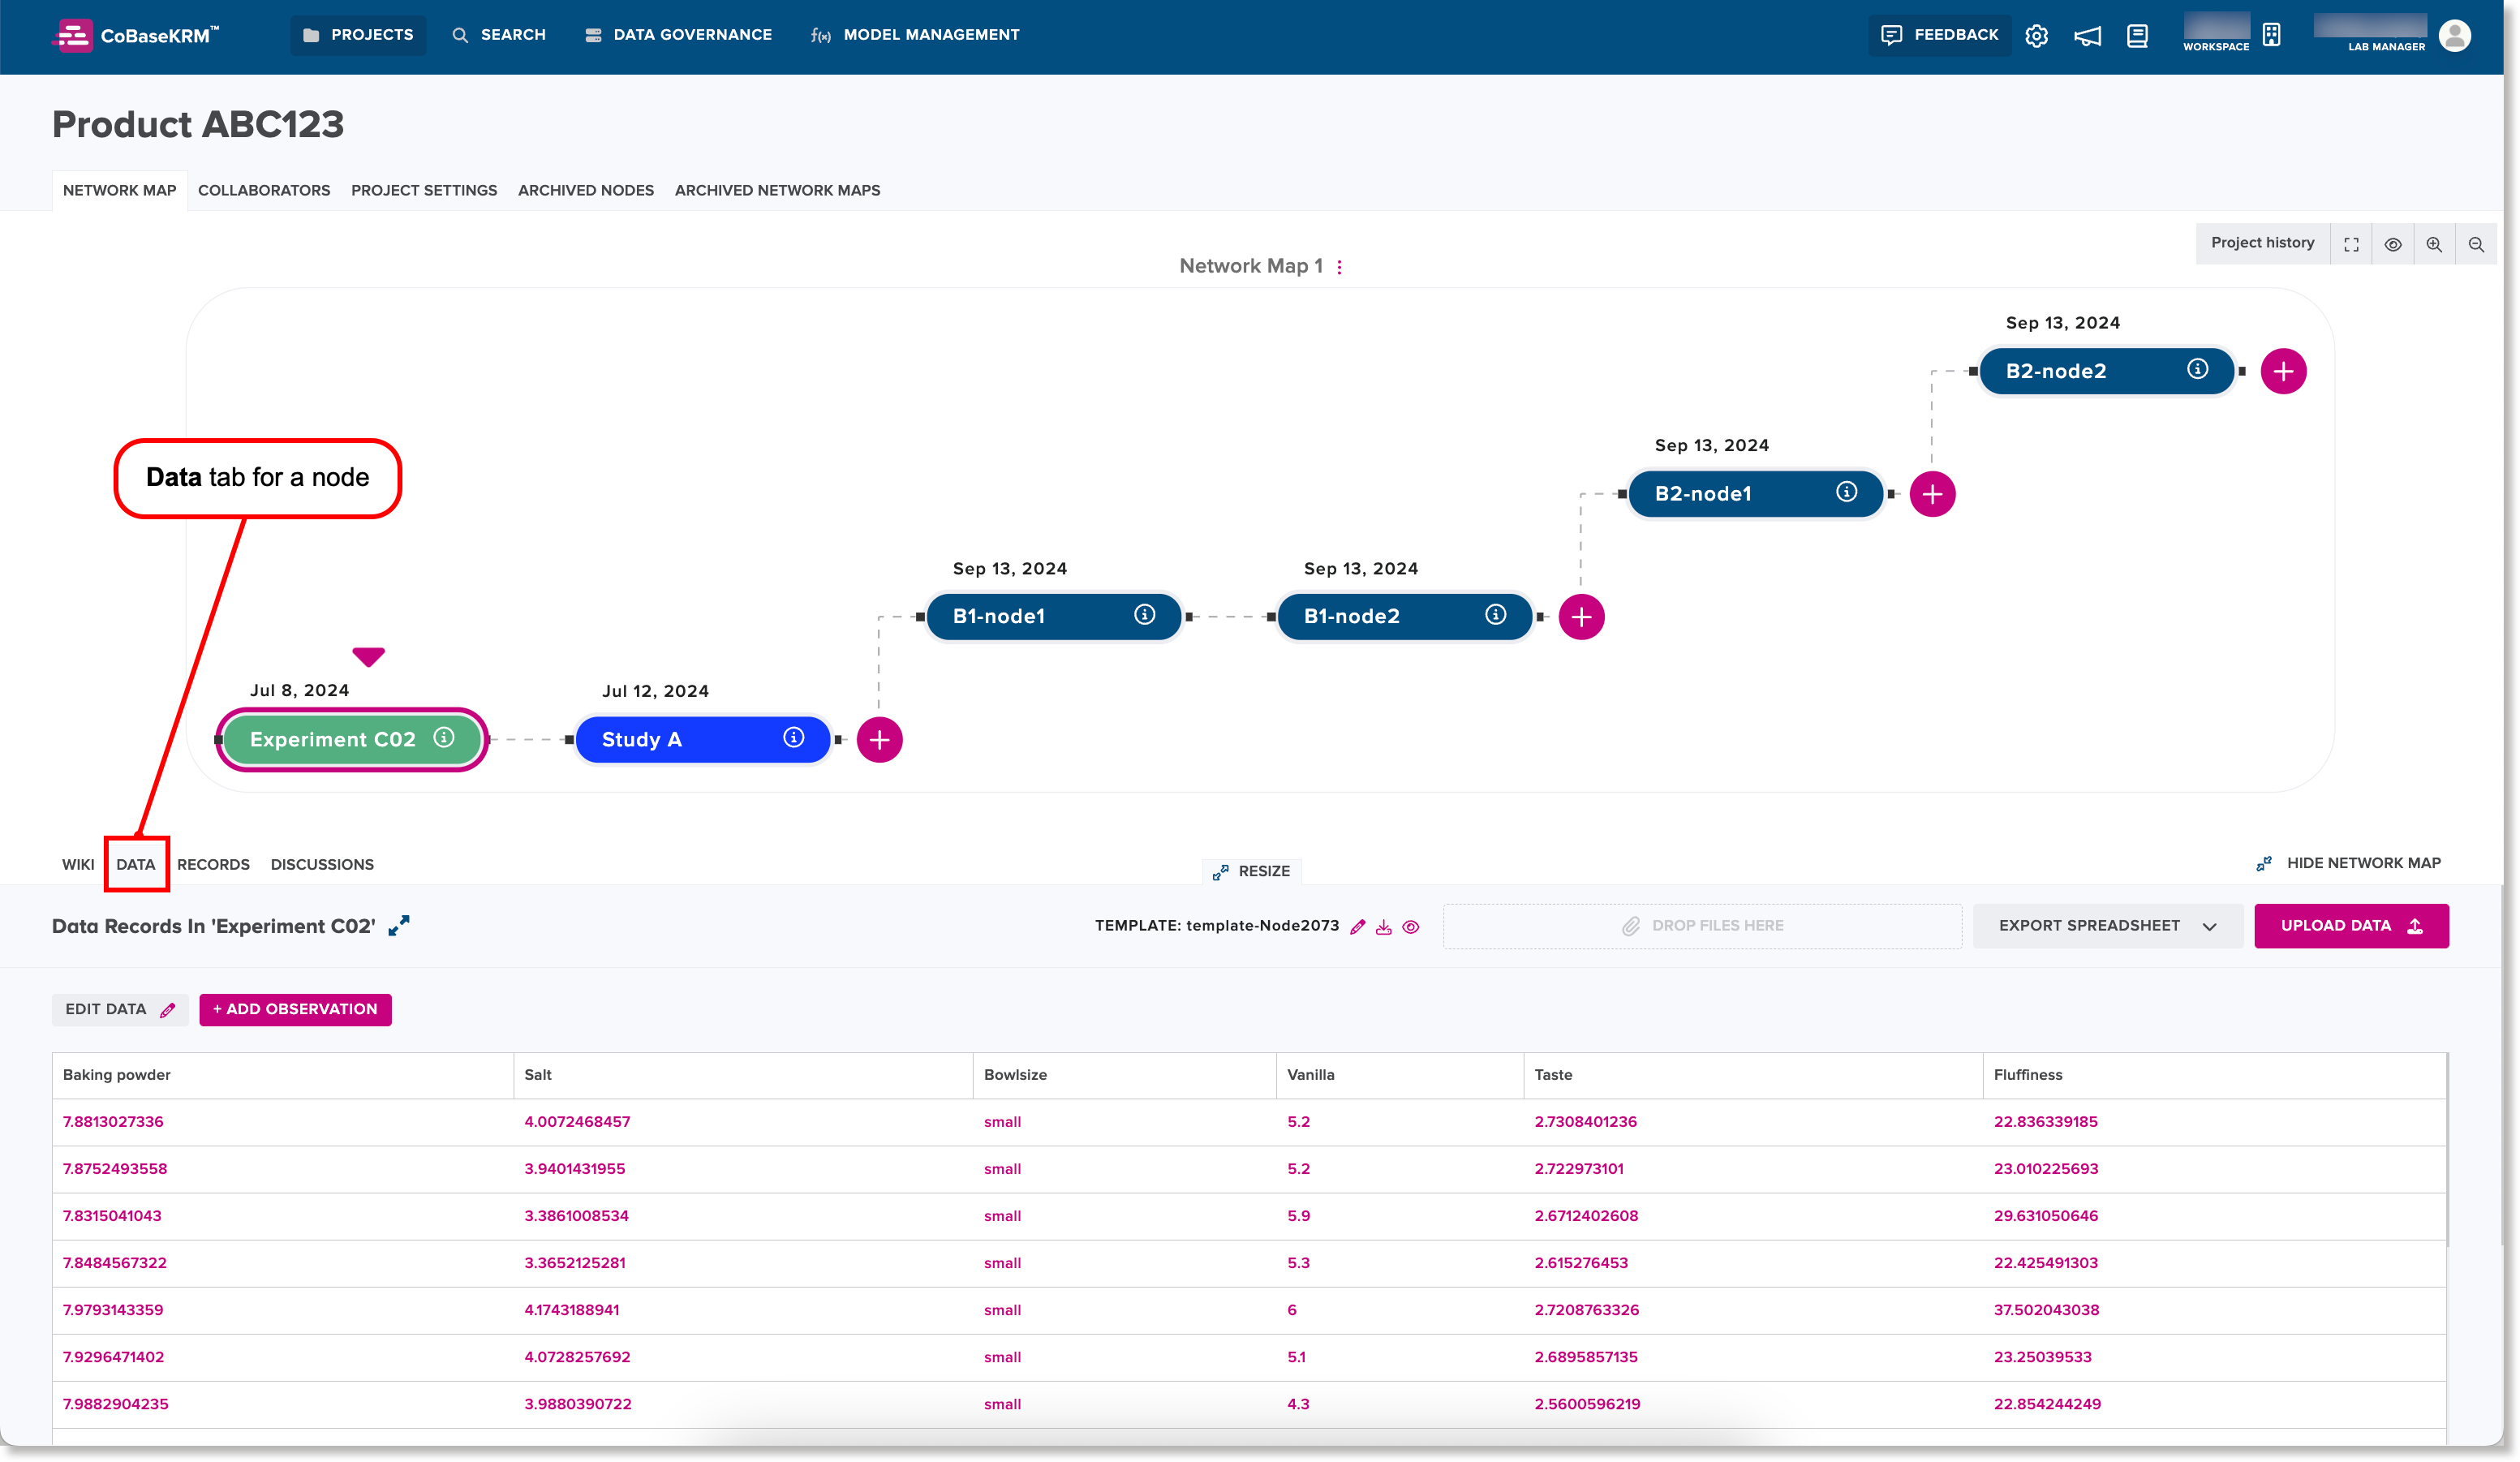
When you hover your cursor over a column heading for a parameter on the Data tab, a tooltip appears, showing more details and metadata about the parameter.
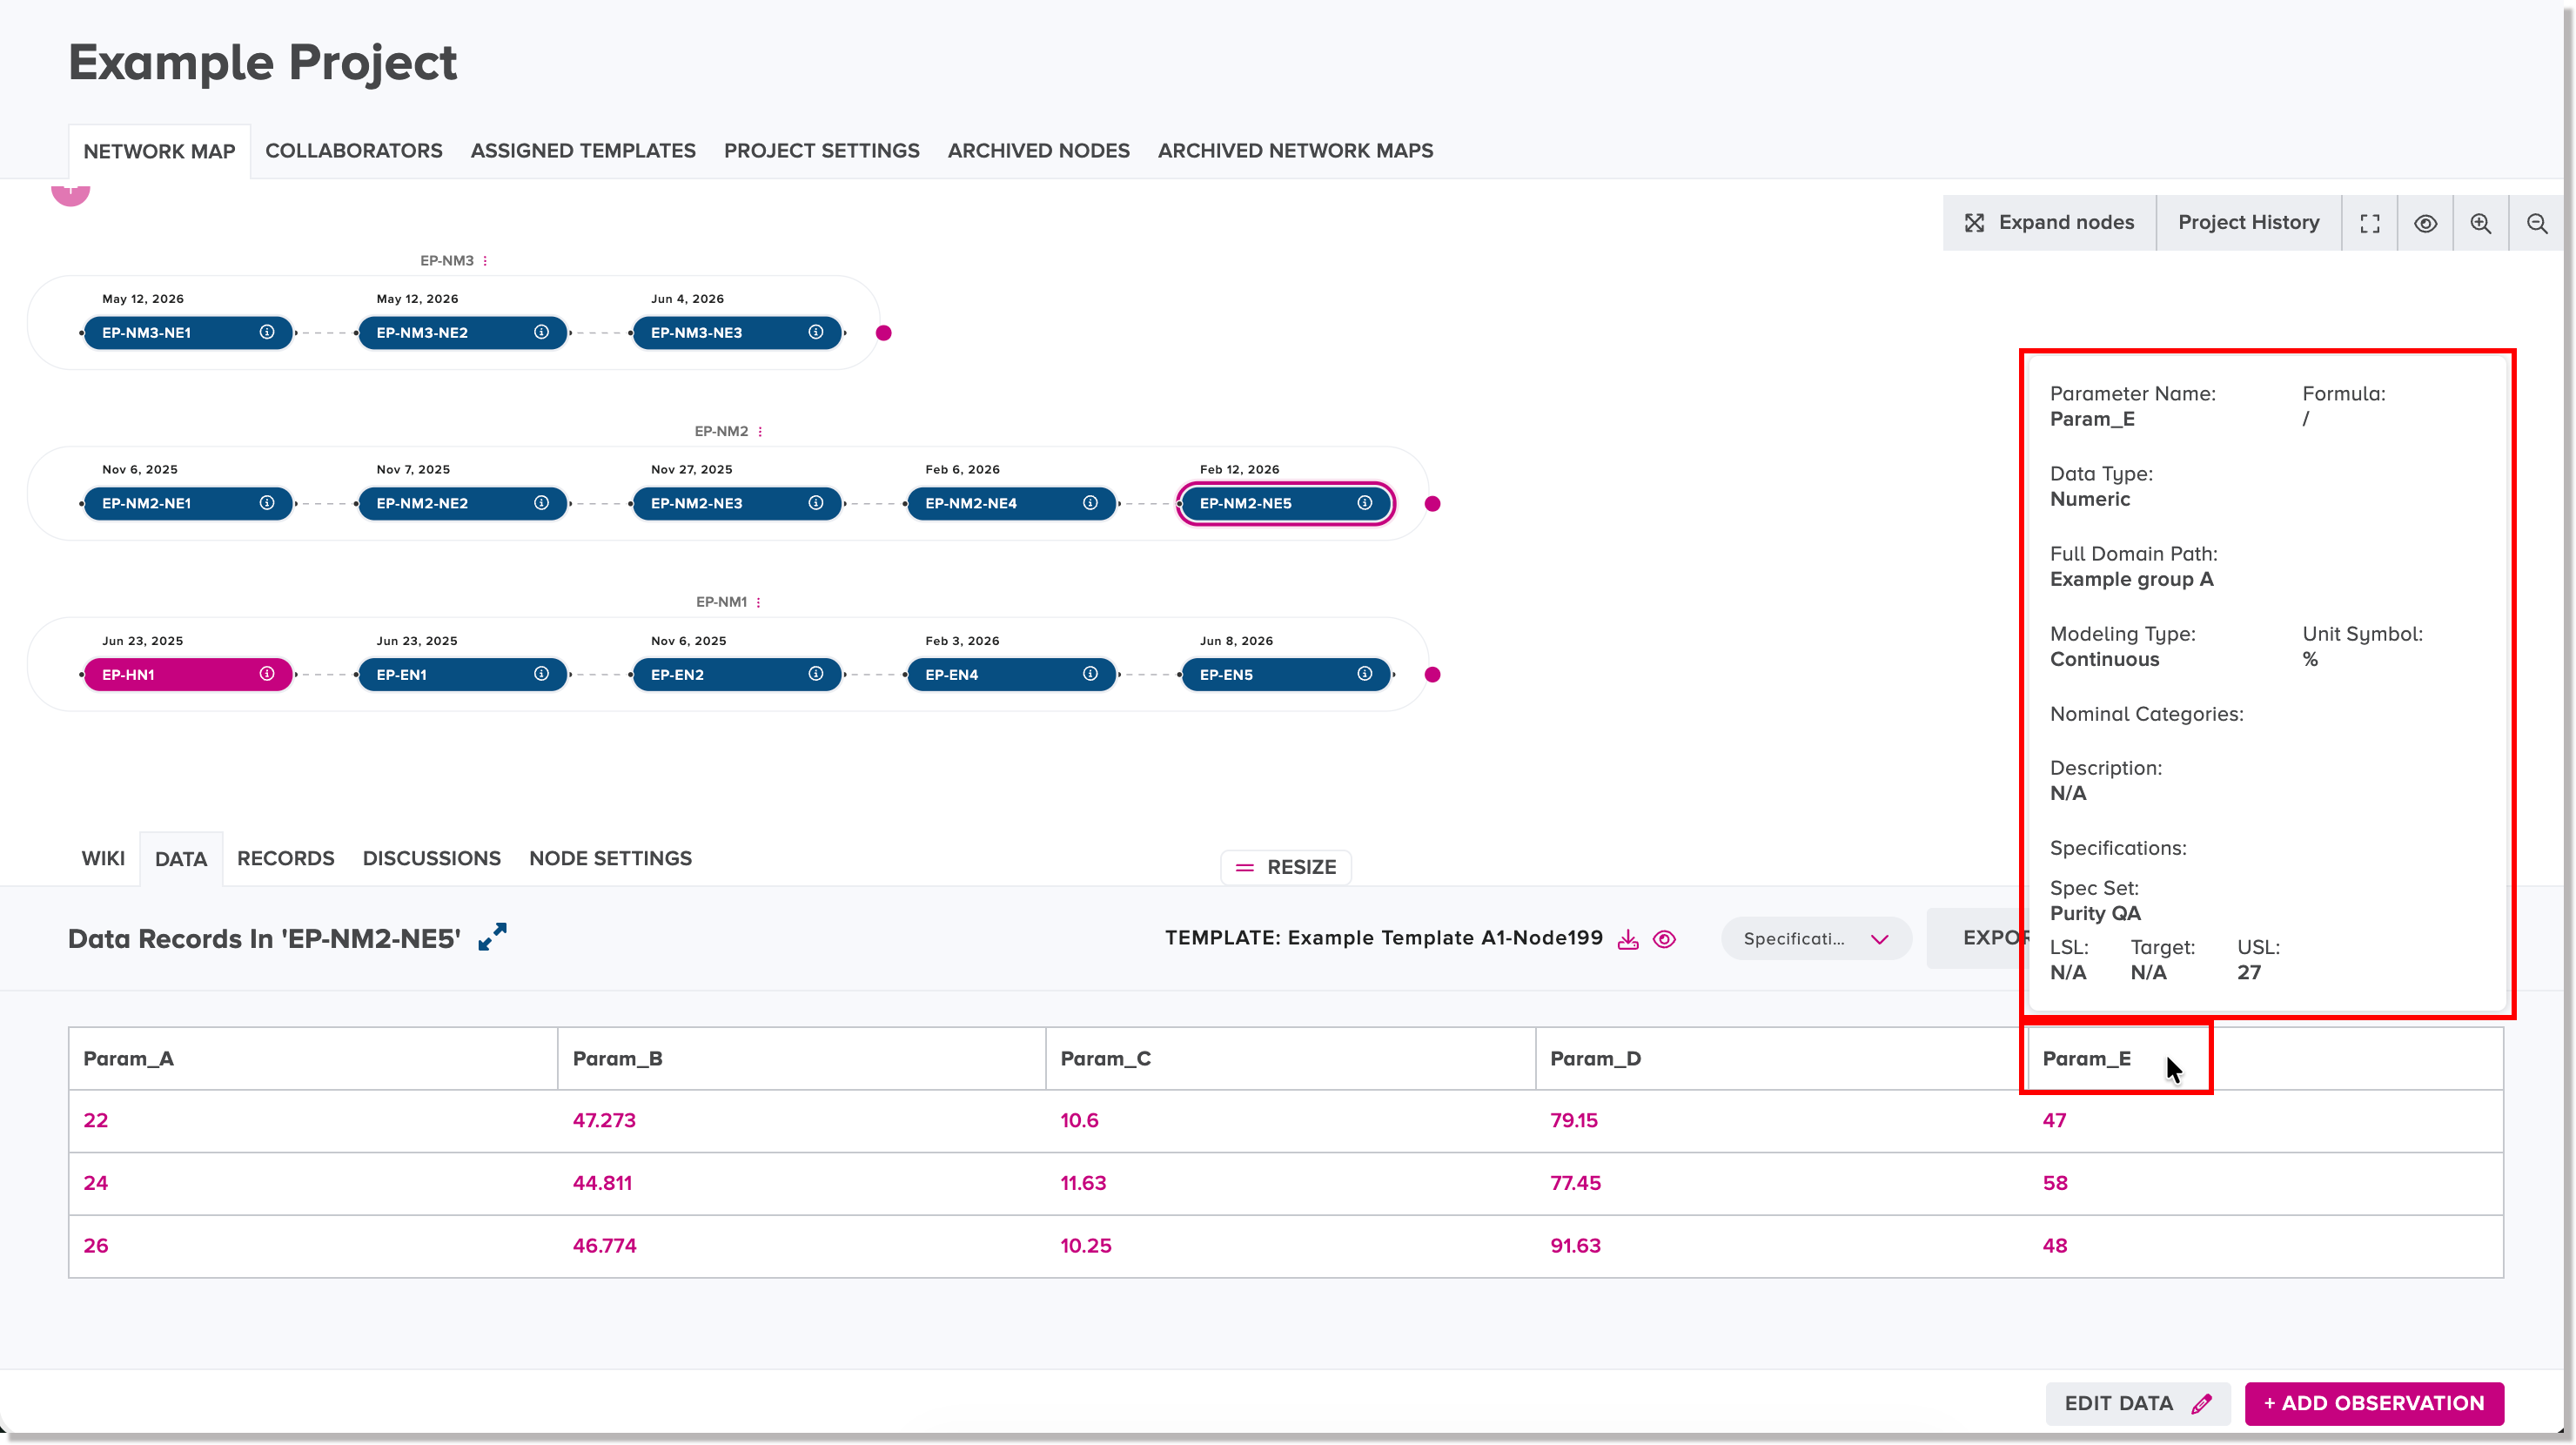
The main features on the Data tab for a node are:
-
Upload a data table and supplementary files to the given node
-
Export a spreadsheet of existing observations related to the given node
-
Compare observation values of parameters with selected specification ranges
View record details of a parameter value in an observation
If you want to view details of a parameter value in an observation, click or tap the cell containing a parameter value on the Data tab for a node. The Data Point right panel appears.
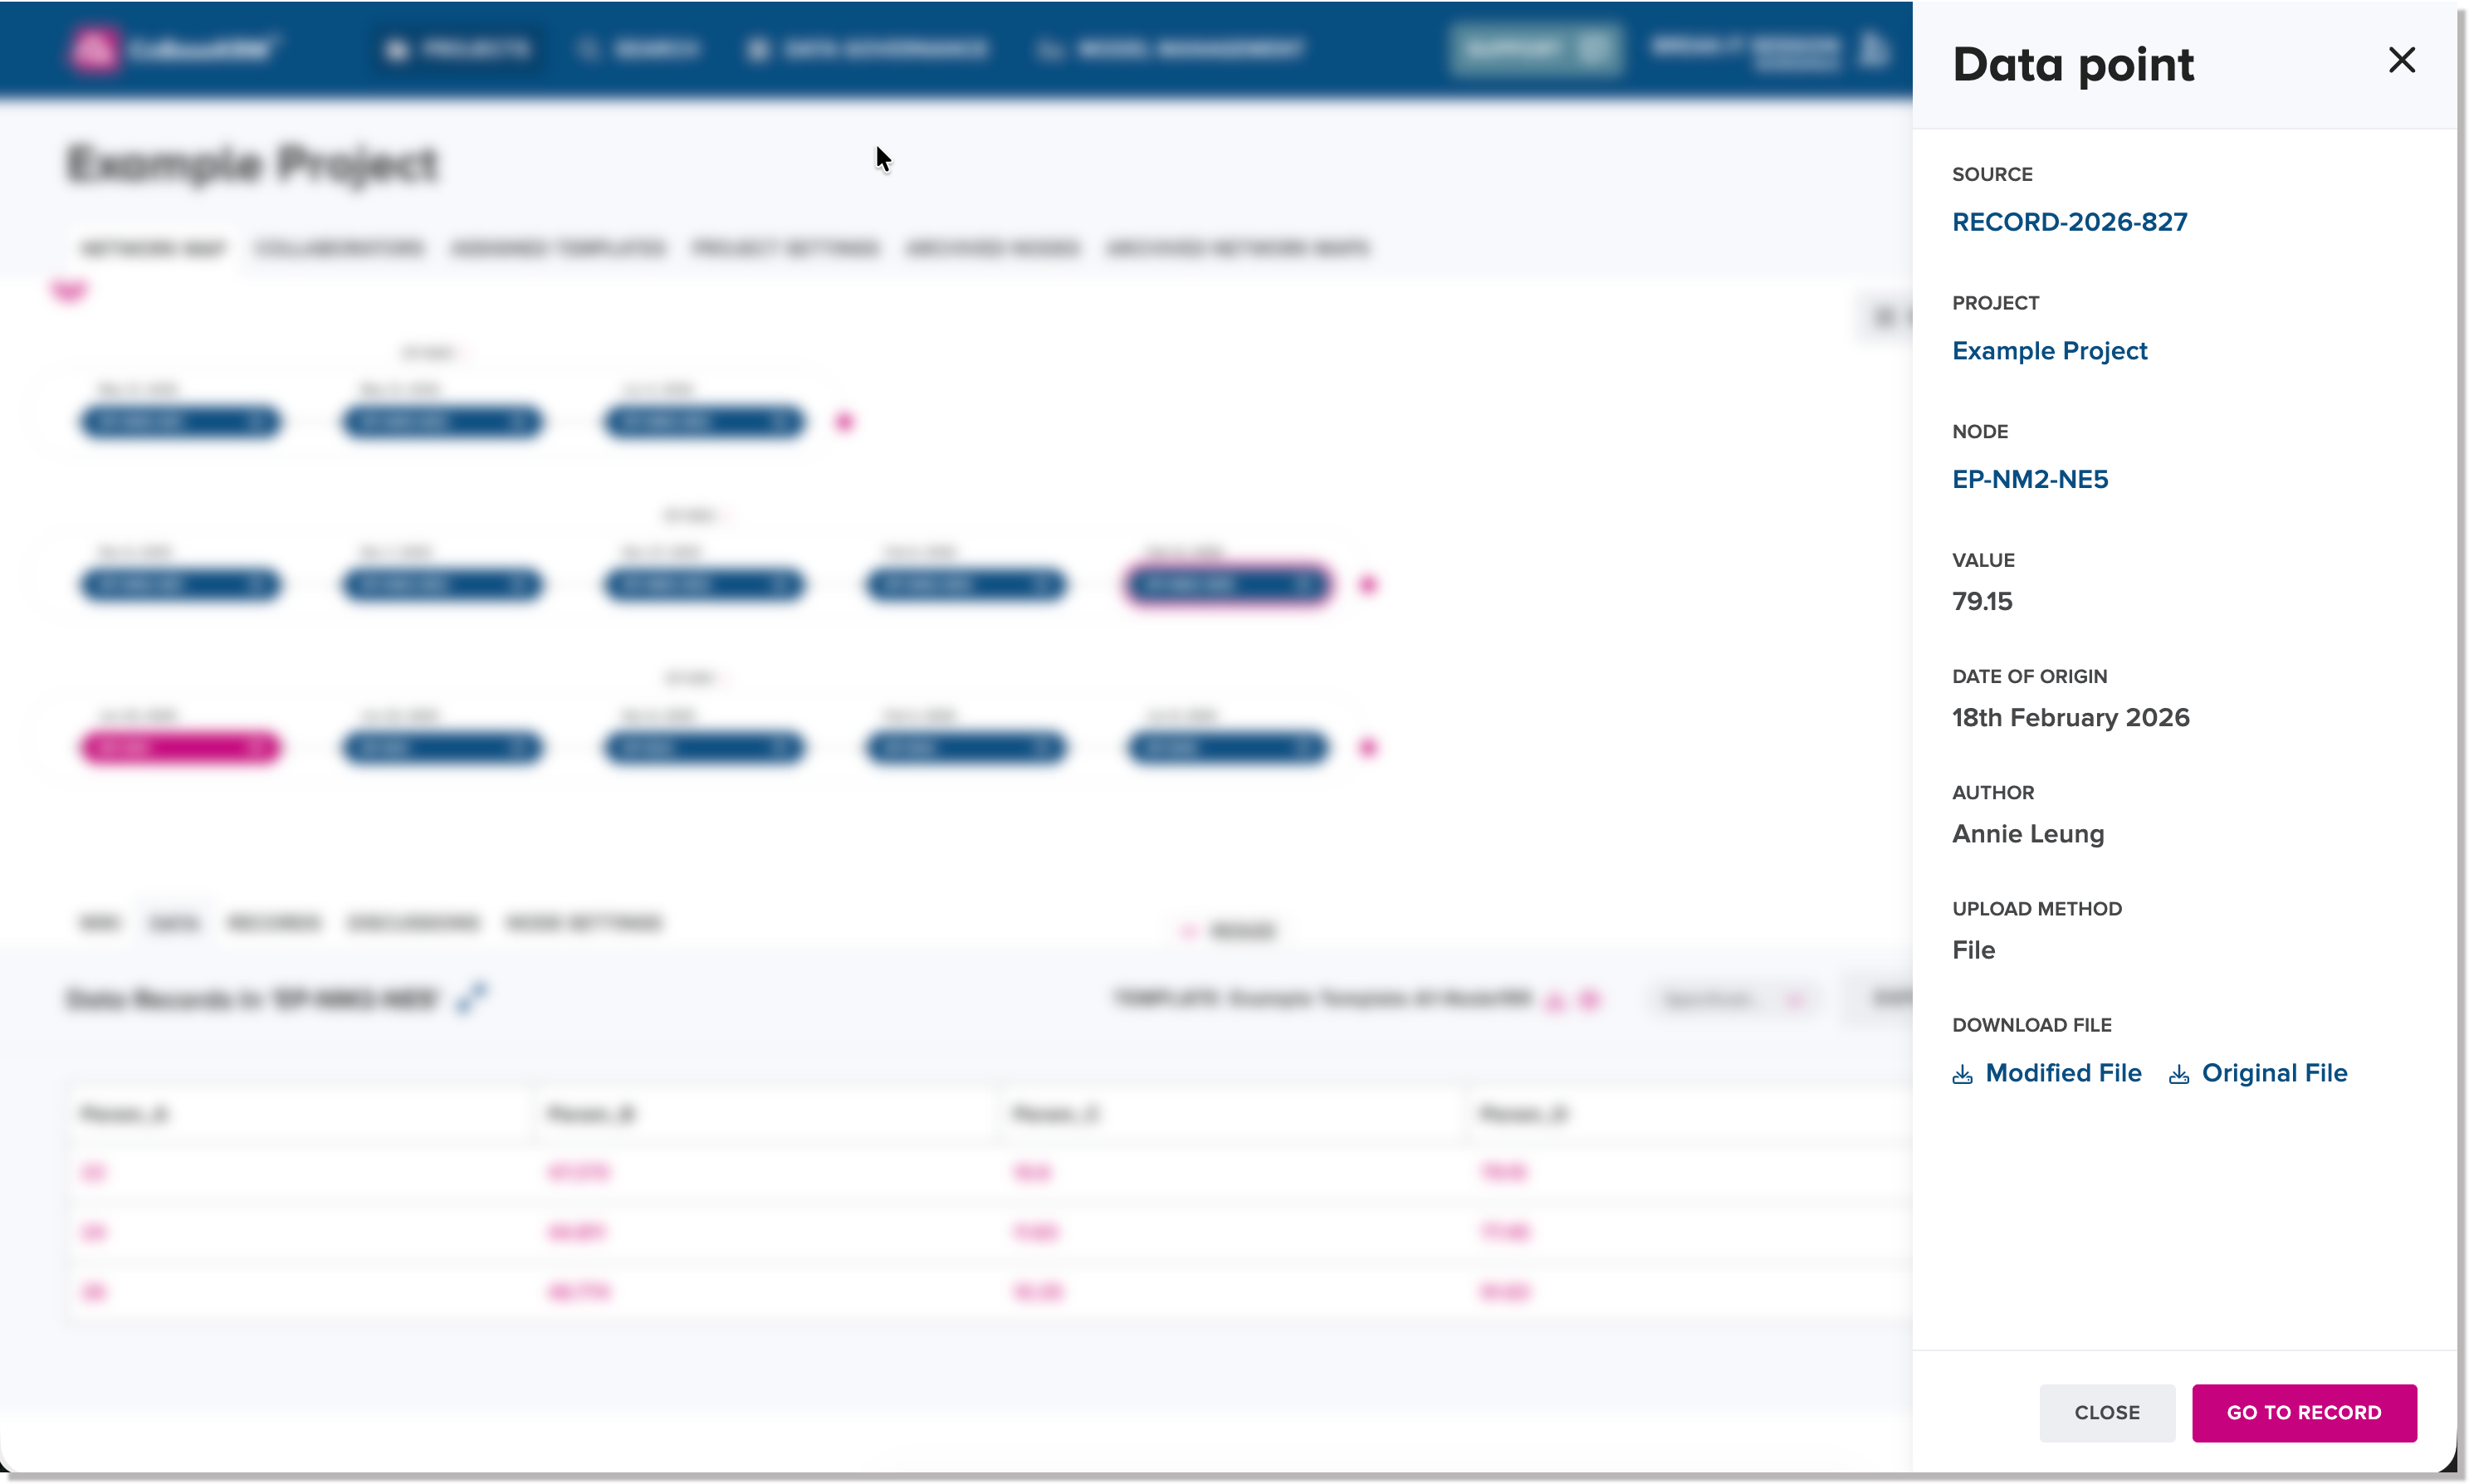
The Data Point right panel lists the following details for a parameter value:
-
Source field - the record ID assigned when the observation was uploaded to the database
-
Project field - the related project name
-
Node field - the related node name
-
Value field - the parameter value
-
Date of Origin field - the date on which the observation was uploaded to the database
-
Author field - the username of the user who uploaded the observation
-
Upload Method field - the method by which the observation was uploaded
Also supported in the right panel are the following functions:
-
Download Modfied File - download the latest version of the modified file in CSV file format containing the observation data point value
-
Download Original File - download the original file in CSV format containing the observation data point value
-
Go to Record button - navigate to the Records tab for the same node so that you can view the corresponding record containing the observation data point value
Edit parameter values of an observation
To edit parameter values of an observation related to a node:
-
On the Data tab for a node, click the Edit Data button.
The rows of observations in the data table become editable.
-
Edit parameter values, as needed.
Note
To cancel editing, click or tap Cancel.
-
To save your changes, click or tap Save Spreadsheet.
E-signature collection may be required
If the electronic signature collection feature has been enabled for your workspace, the button will be labeled Sign & Save Spreadsheet. When you click or tap the Sign & Save Spreadsheet button, the Electronic Signature dialog appears.
You are required to fill in the input fields and click or tap Sign & Complete in this dialog to confirm that you are authorized to perform the given action. Once you have input the required details, the system will allow you click or tap Sign & Save Spreadsheet to save the edit.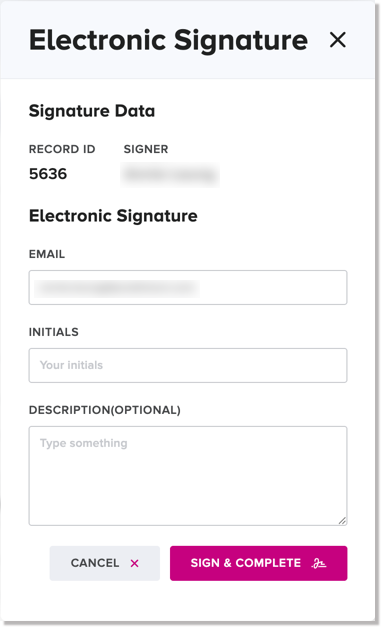
The web client saves the edit and creates a new record accordingly. The view becomes read-only once again.
Add a new observation to a record
To add a new observation to a record:
-
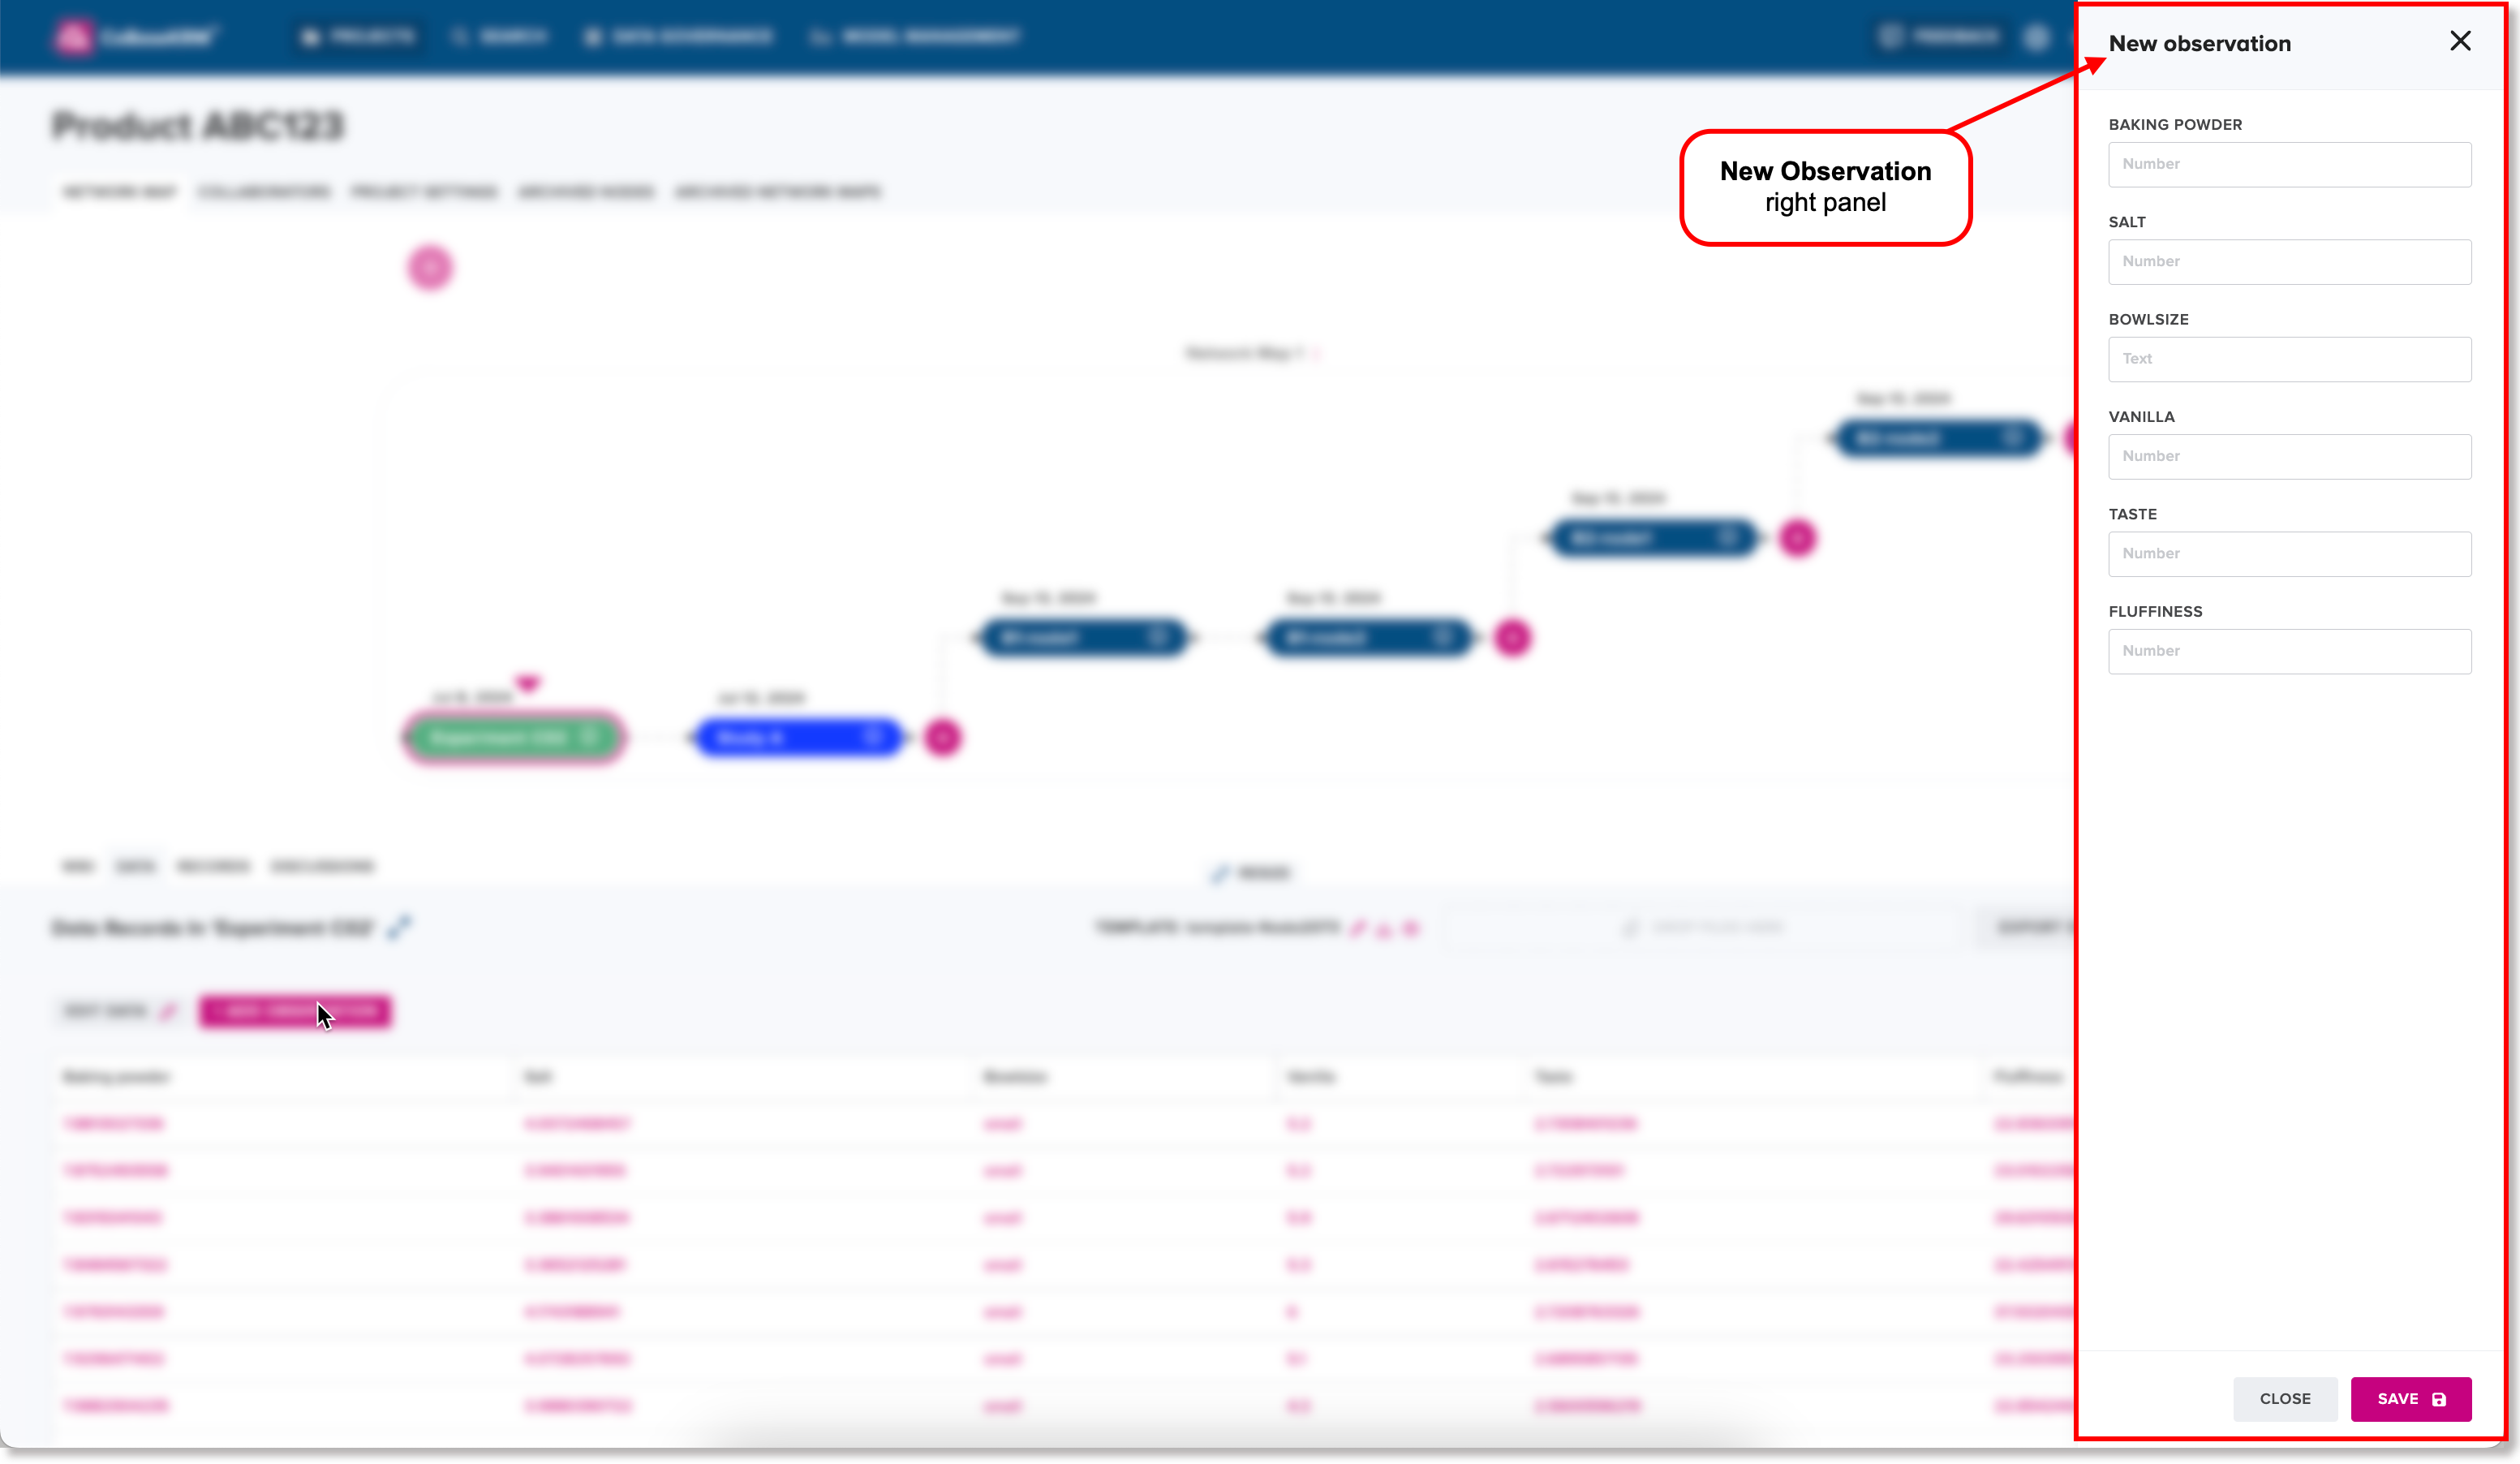
On the Records tab for a node, click or tap the Add Observation button.
A right panel appears to let you input the parameter values of the new observation.
-
In the parameter fields, input values that have a numeric data type.
-
Click or tap Save.
Add a journal card to an observation
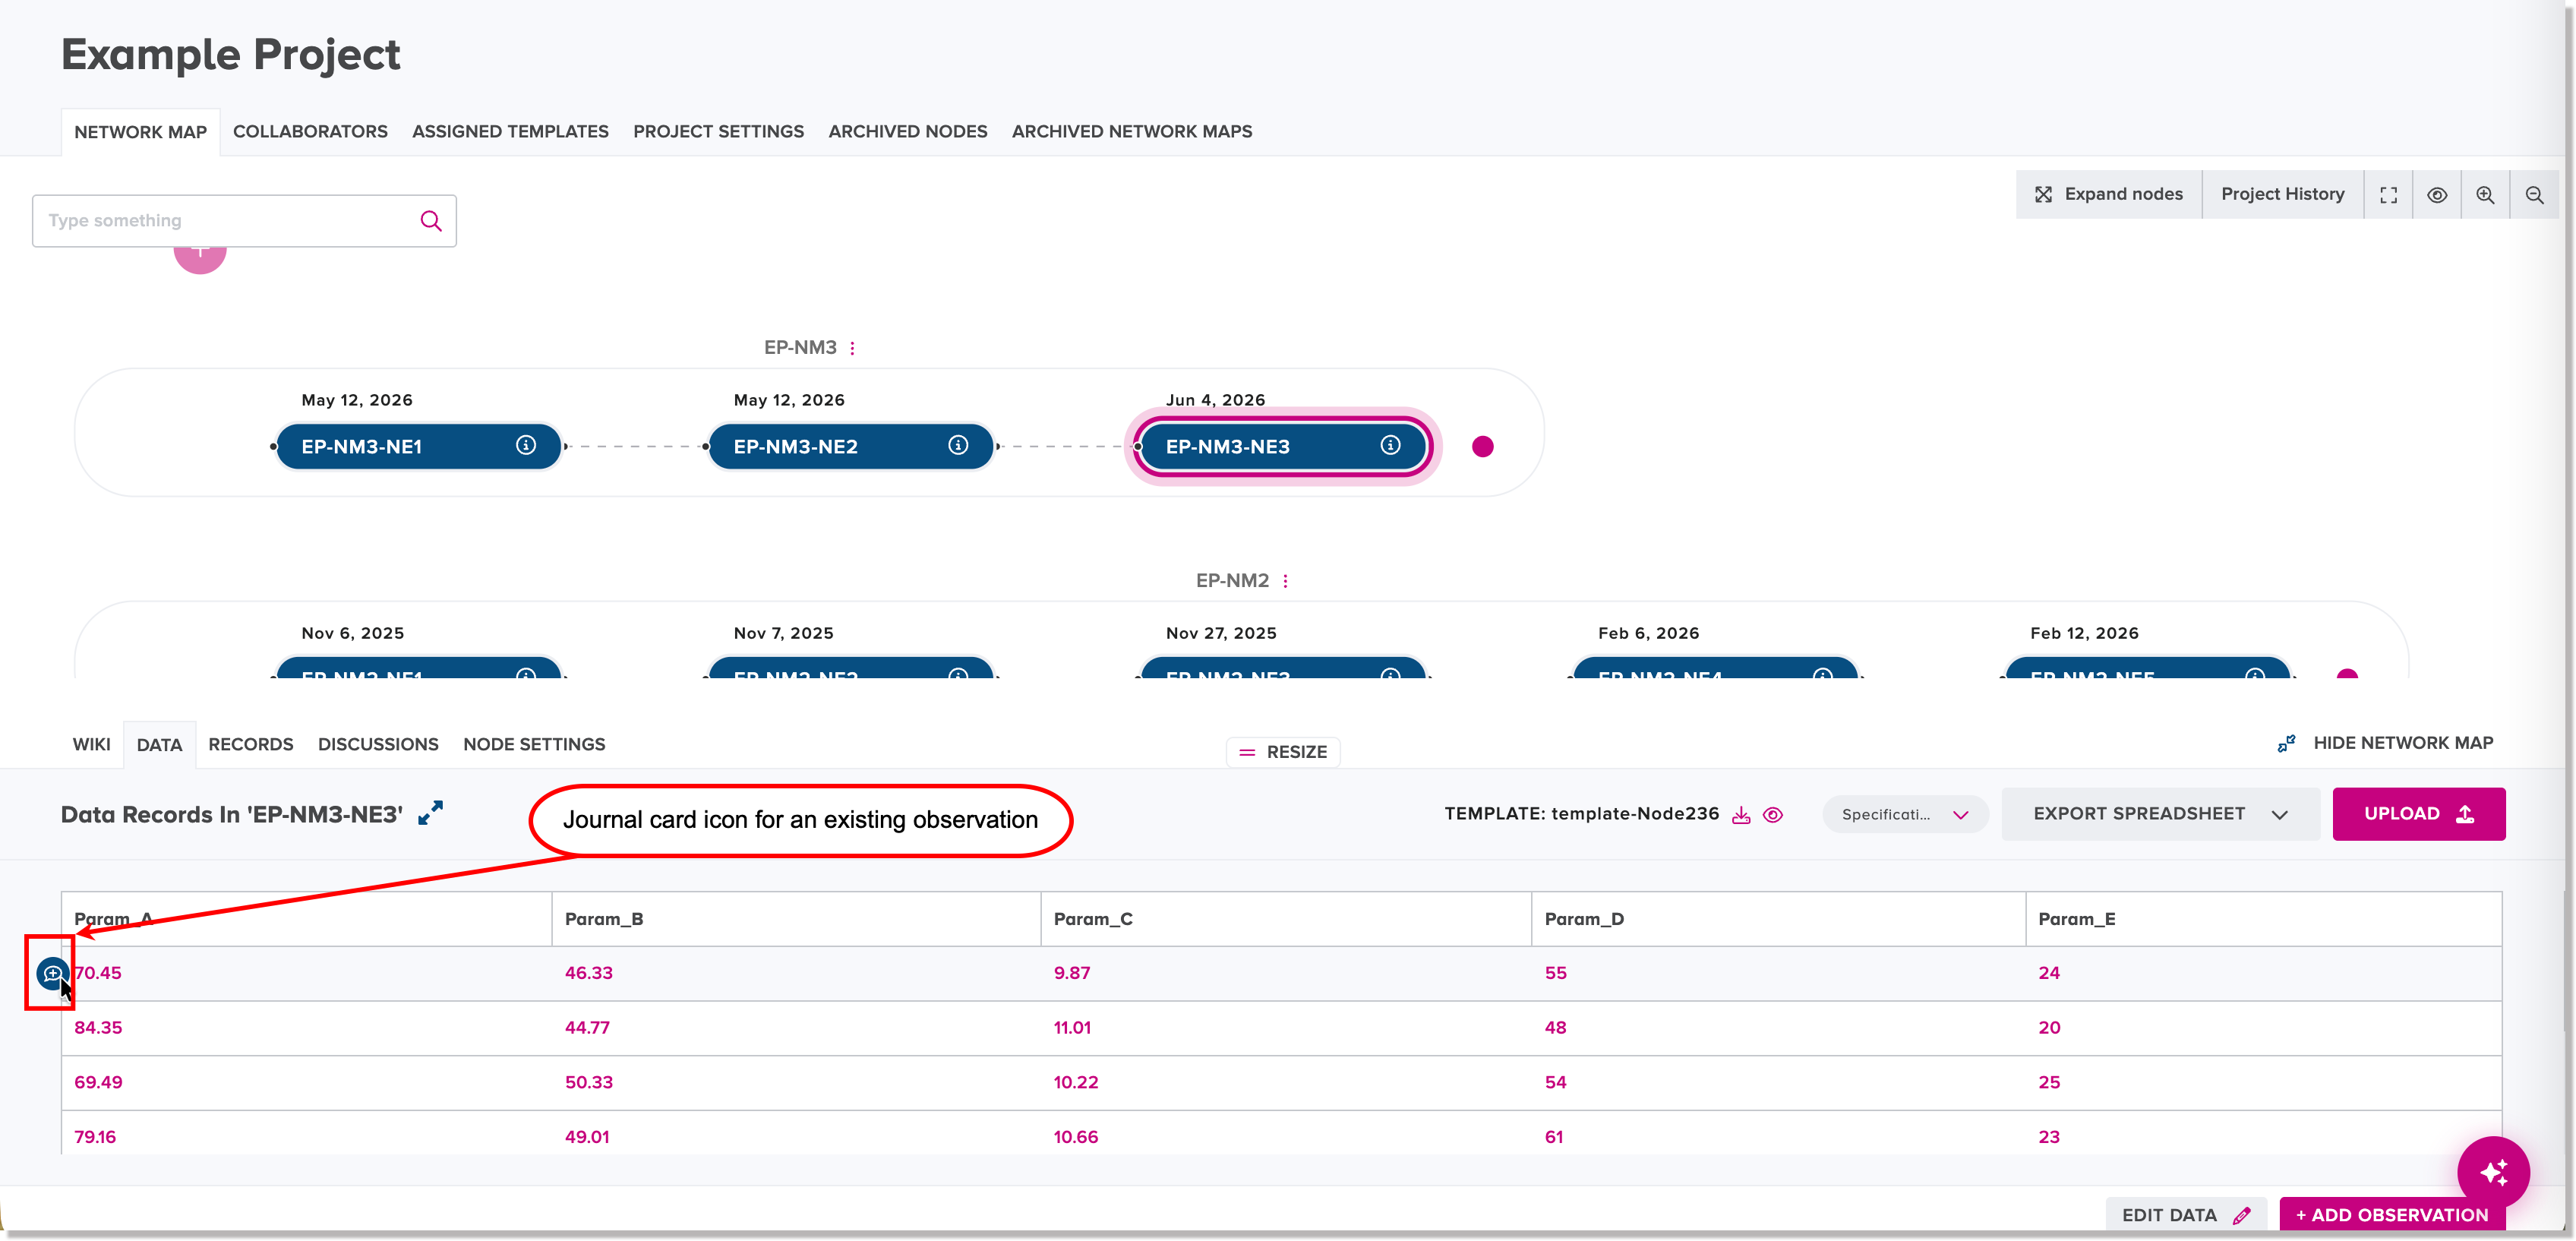
You can add a journal card to an existing observation on the Data tab for a node in the web client.
To add a journal card to an observation:
-
On the Data tab for a node, hover your cursor to the left of an existing observation and click the journal card icon that appears.
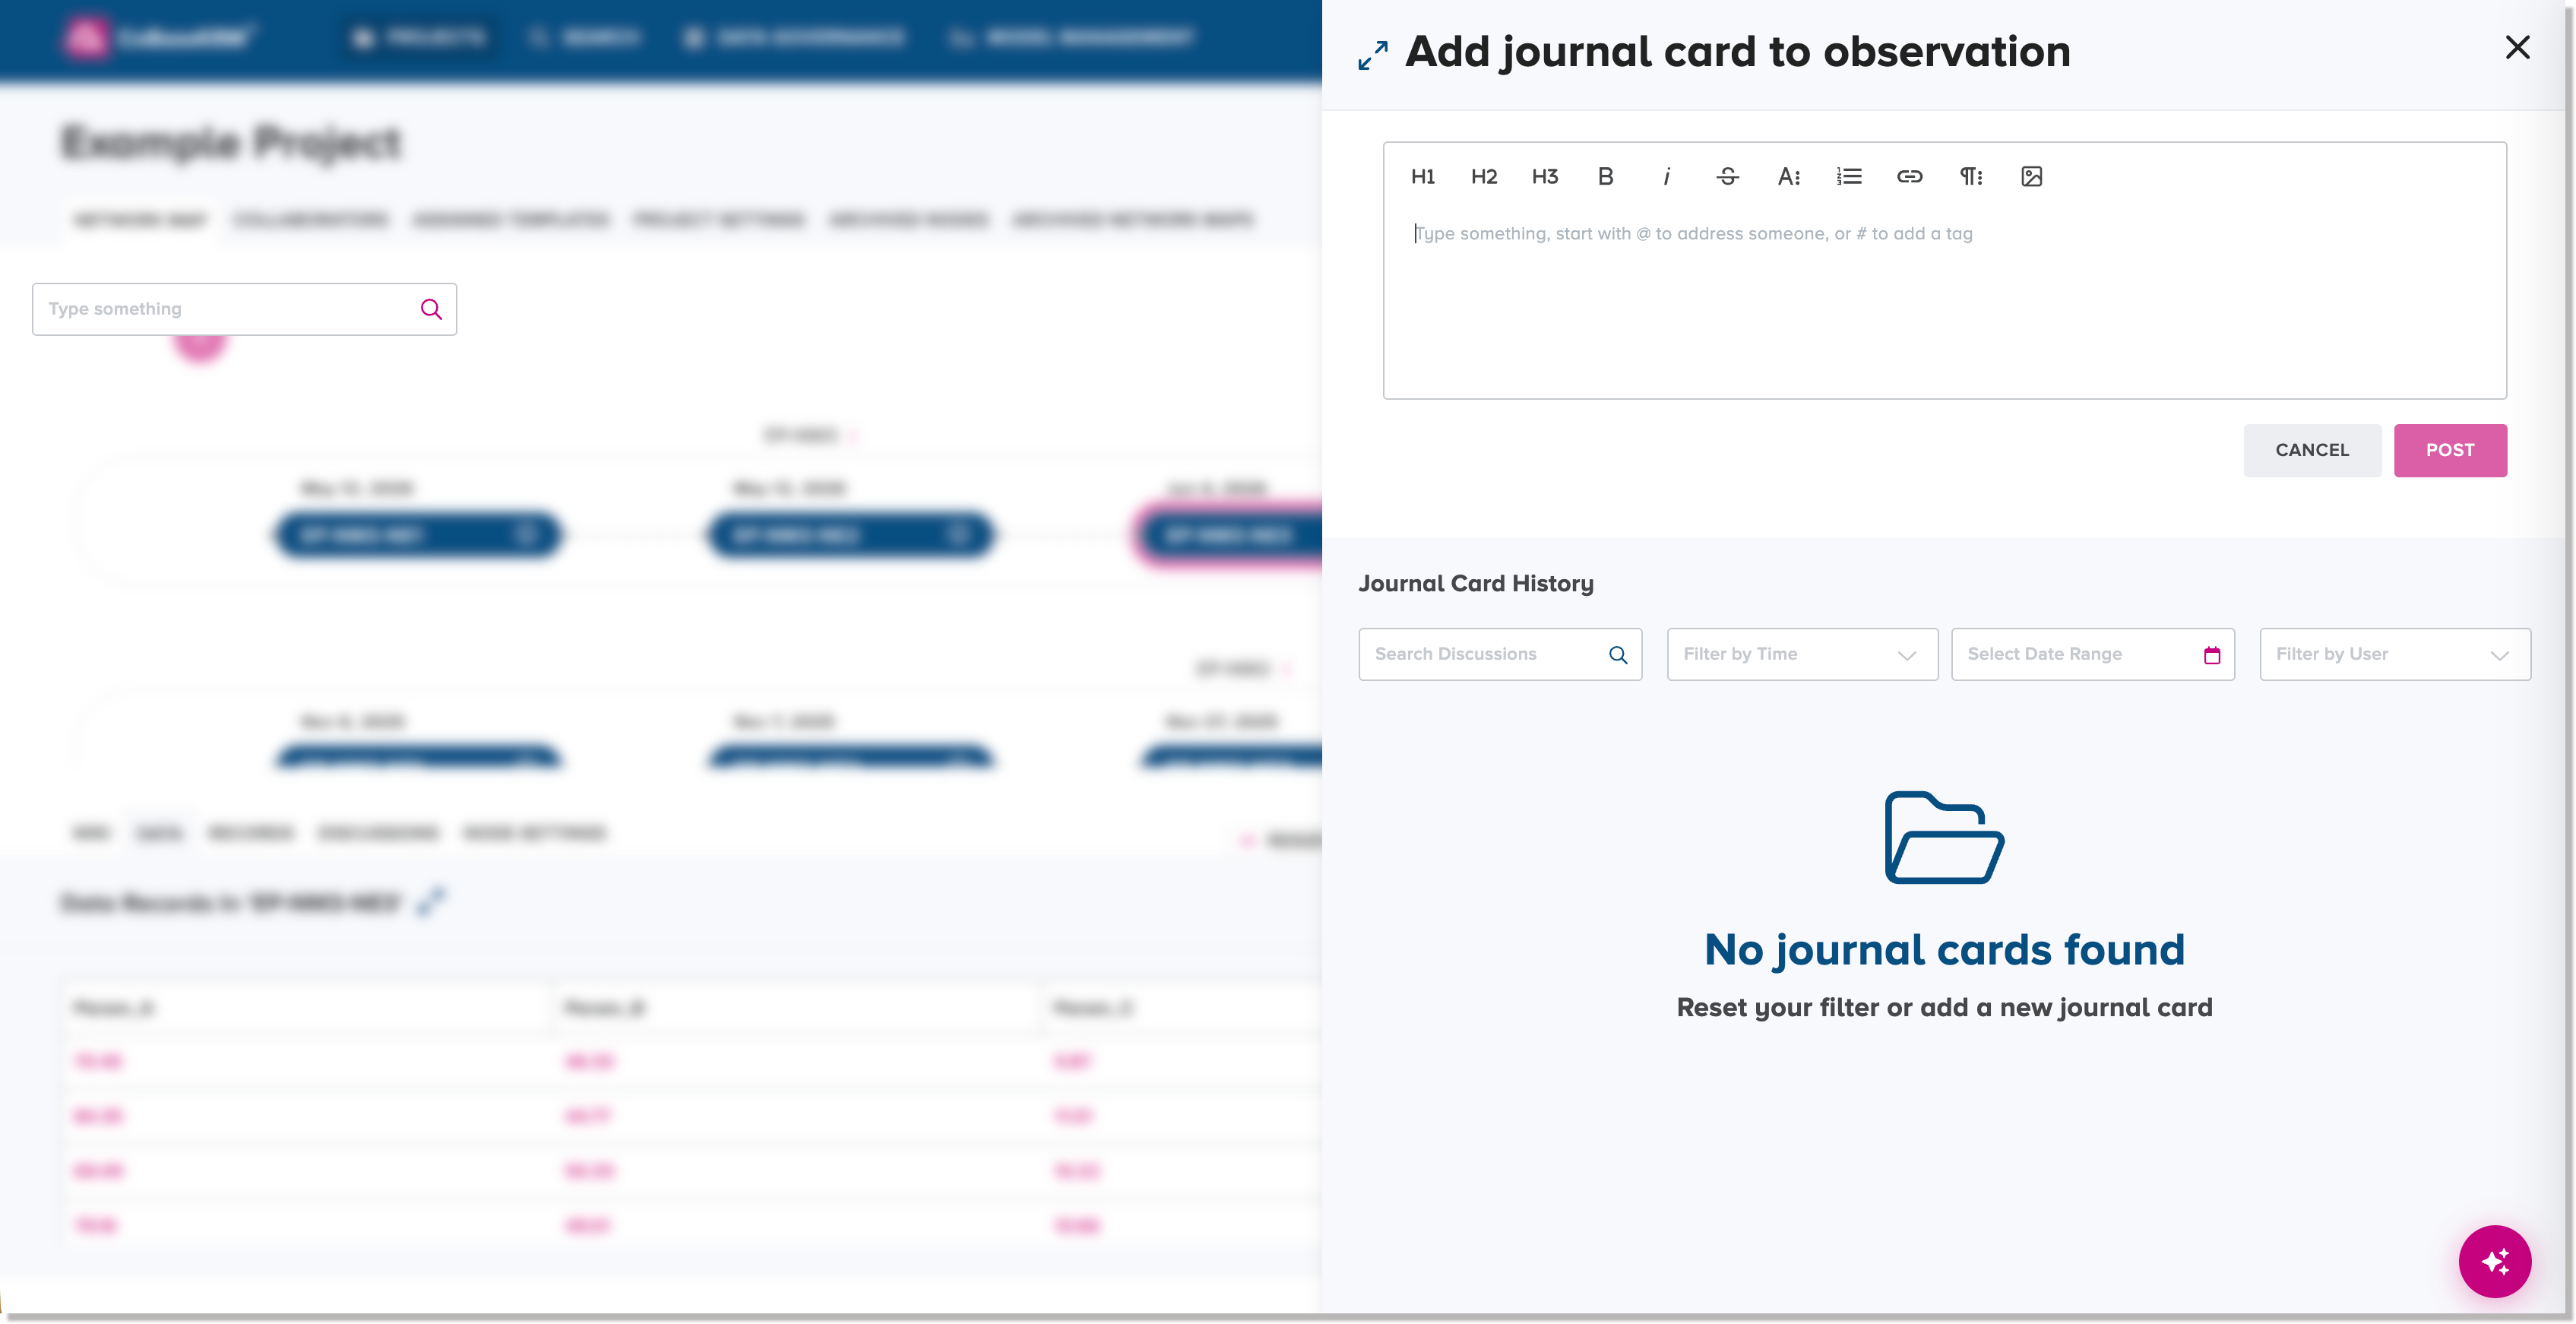
The Add journal card to observation dialog appears.
-
Click or tap inside the journal card editor to type your journal card.
- Use the toolbar to format your text.
- Use the image icon to add files to a journal card.
- To mention a user, type the "@" (at) character to display a list of usernames associated to the project and select a username.
- To add a tag, type the hash (#) character to display a list of tag names and select a tag.
-
Click or tap Post.
The journal card is added to the journal card history for the observation.
Export a spreadsheet of observations related to a node
To export a spreadsheet of existing observations from the Data tab for a node:
-
Click or tap the Export Spreadsheet button.
A drop-down menu appears, where you can select the file format of the file to be exported.
-
Choose the preferred file format from the menu:
- Excel (.xlsx), or
- comma-separated values (.csv)
The exported file in the selected file format is saved to your local Downloads directory.
Compare observation values of parameters with selected specification ranges
On the Data tab for a node of a network map, you can select one or more specification sets from a drop-down menu to show how observation values of parameters for a given node compare with acceptable specification ranges.
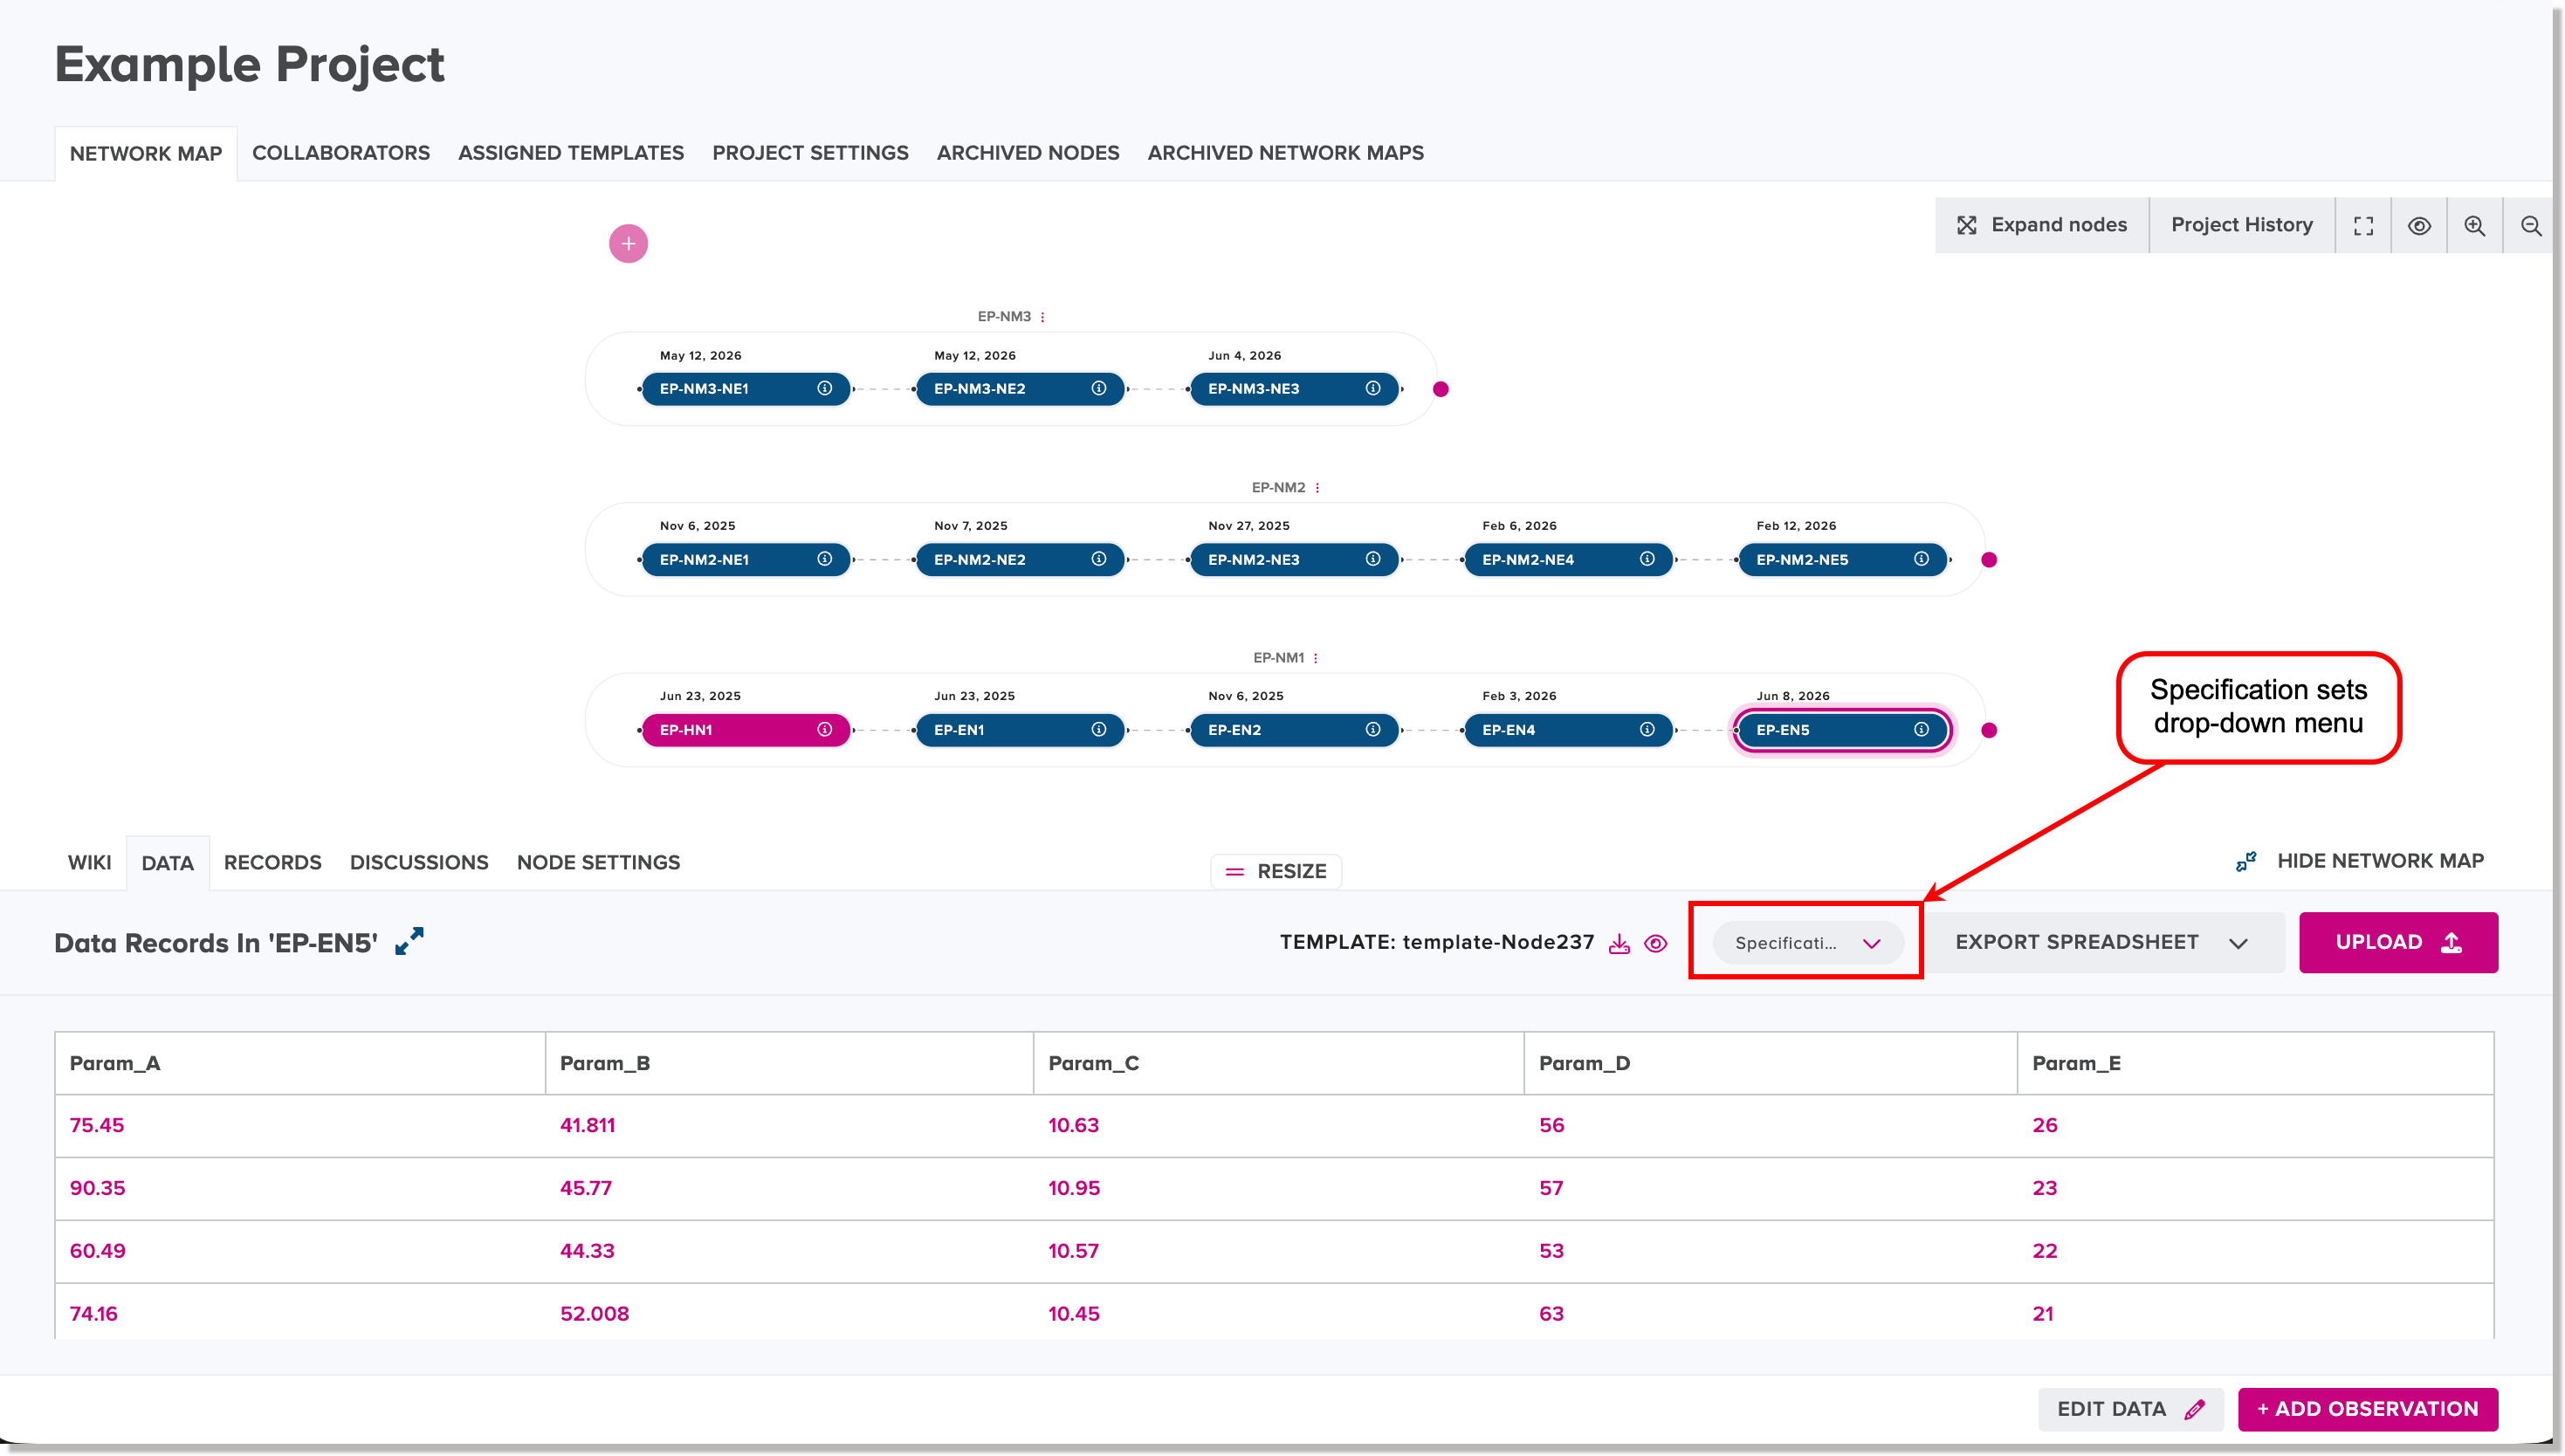
When you select multiple specification sets, the web client takes the lowest of all lower specification limits and the highest of all upper specification limits and displays one aggregated specification range, which is visually represented by a light-blue capsule for each applicable parameter.
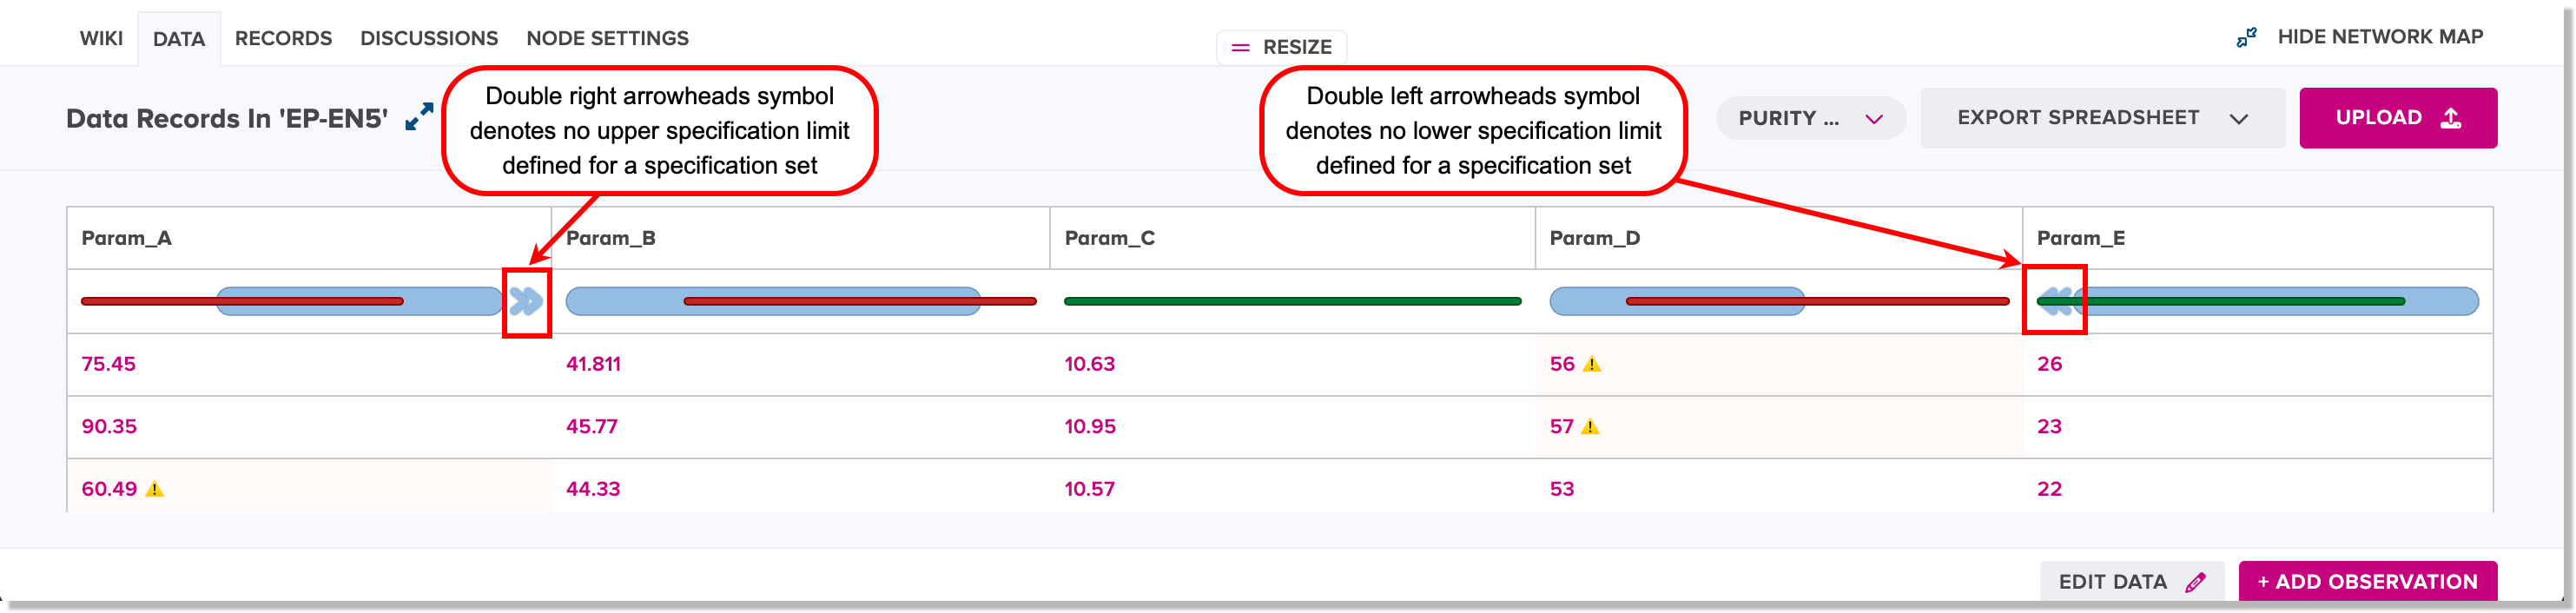
If an aggregated specification range has no defined lower limit, double arrowheads are shown on the left side of the grey capsule. If an aggregated specification range has no defined upper limit, double arrowheads are shown to the right of the grey capsule.
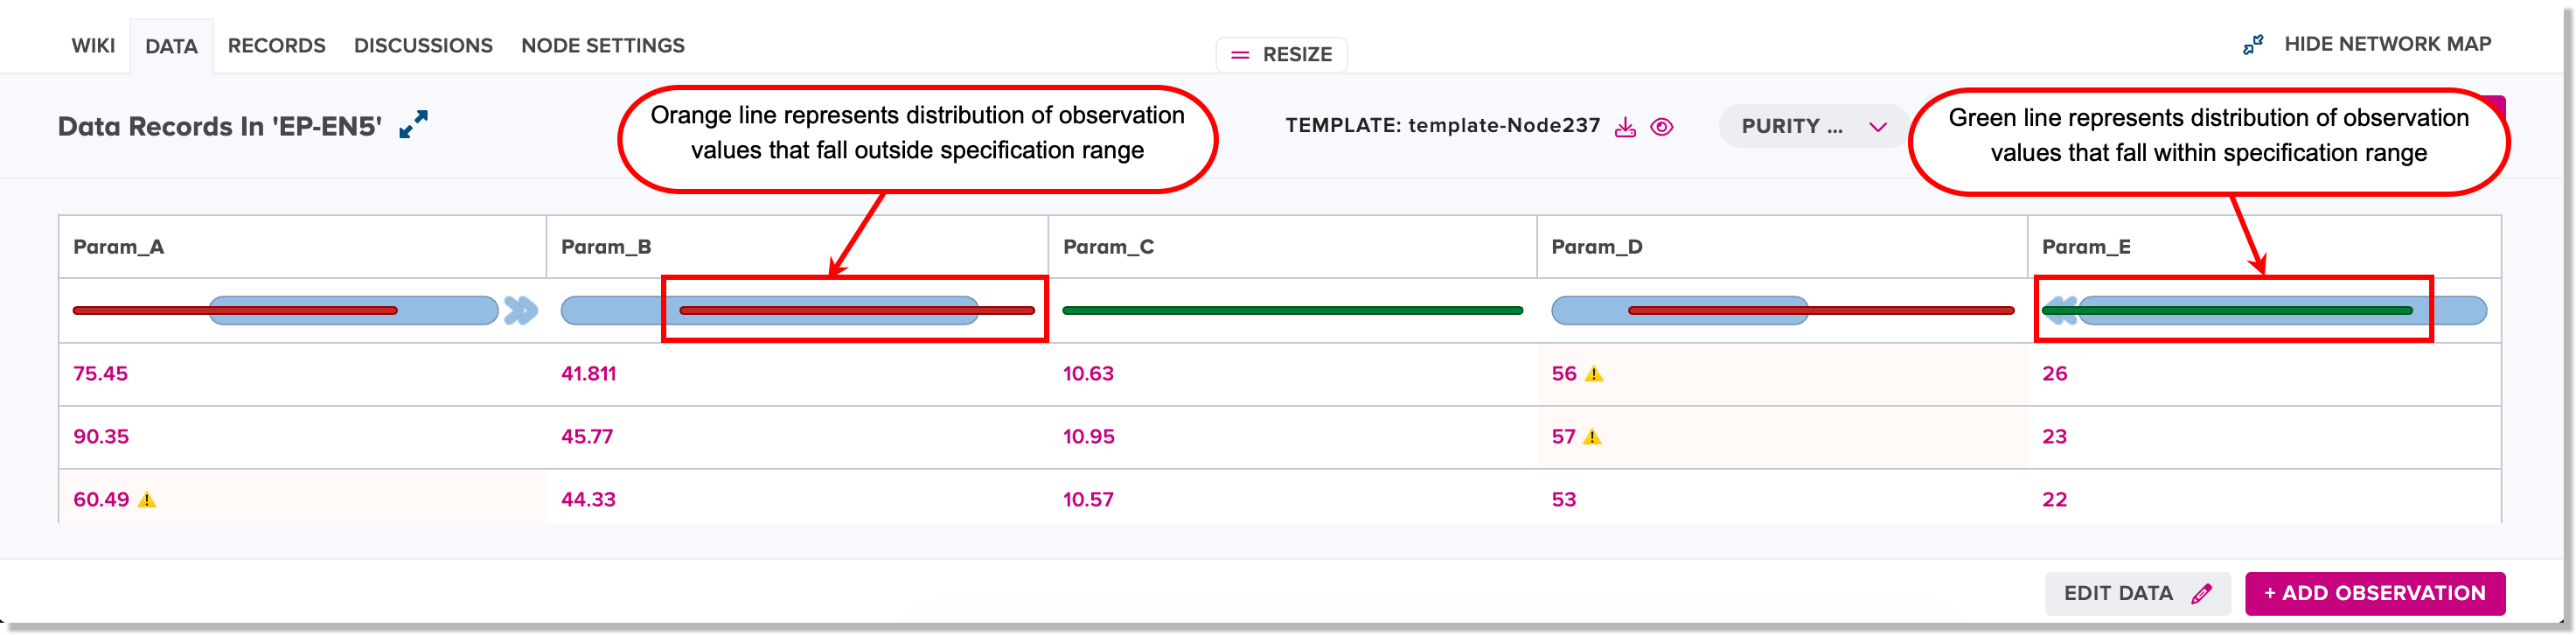
The distribution of observation values for each parameter that has all or some values falling outside the specification range is shown as an orange line. Conversely, the distribution of observation values for each parameter that has all values falling within the specification range is shown as a green line.For example:
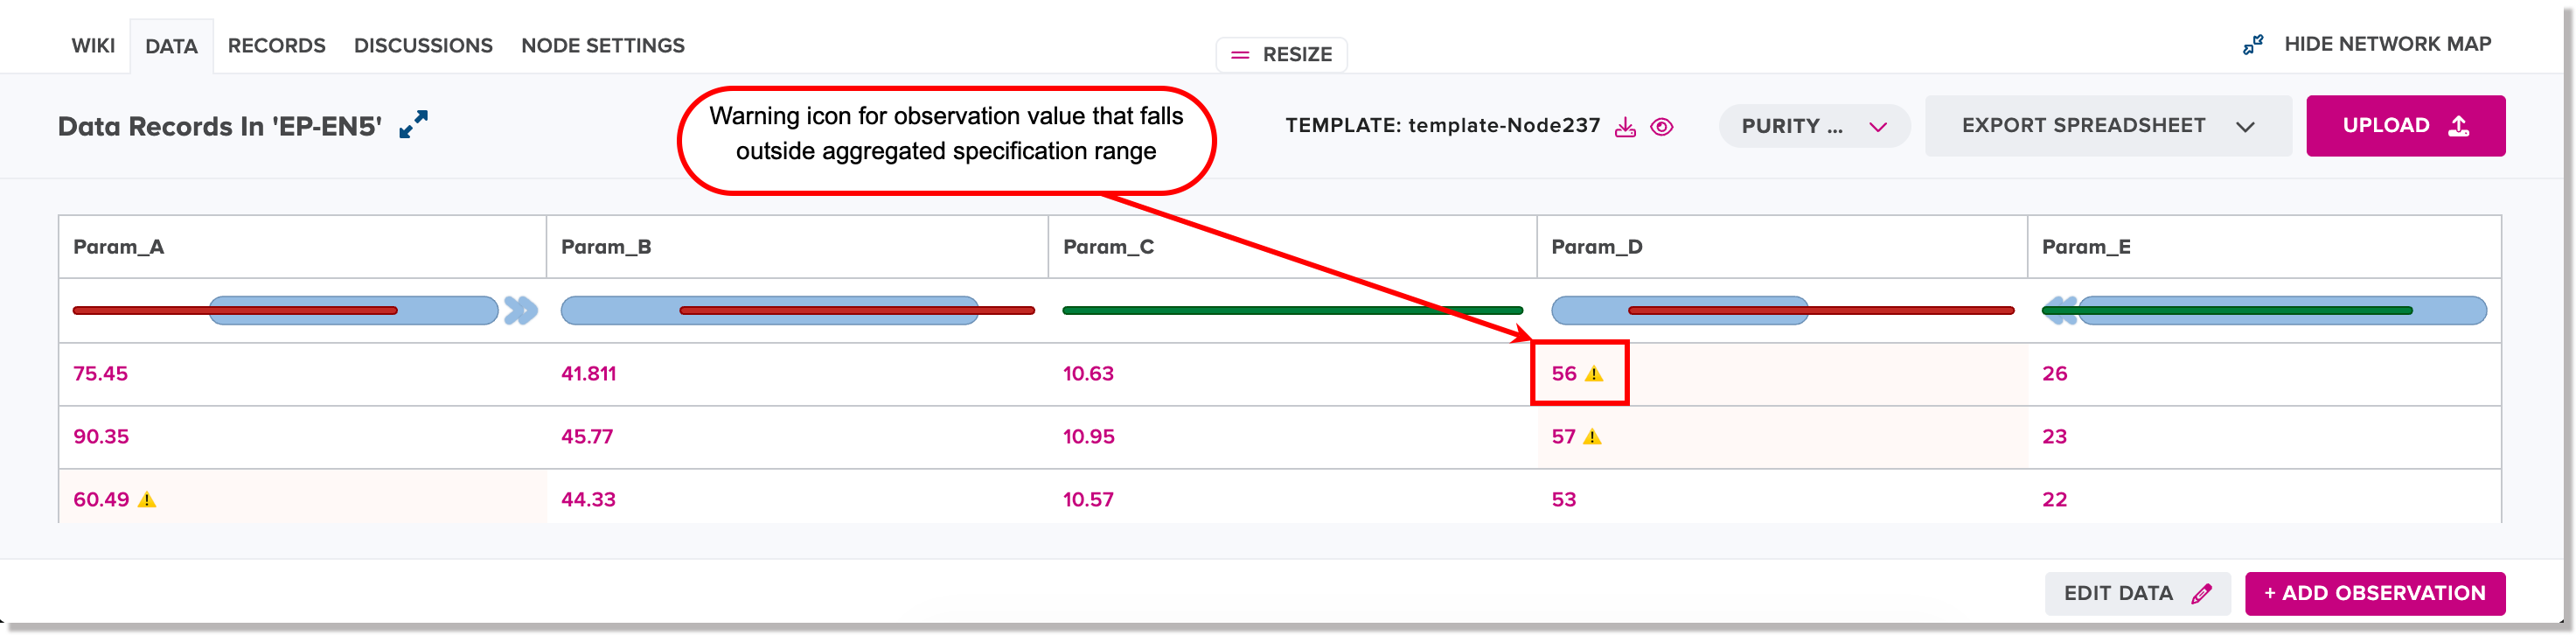
A warning icon is displayed beside any observation values that fall outside an aggregated specifiction range for a parameter.
If you hover your cursor over an observation value for a data point, a tooltip appears, showng the range of observation values as well as selected specification ranges.
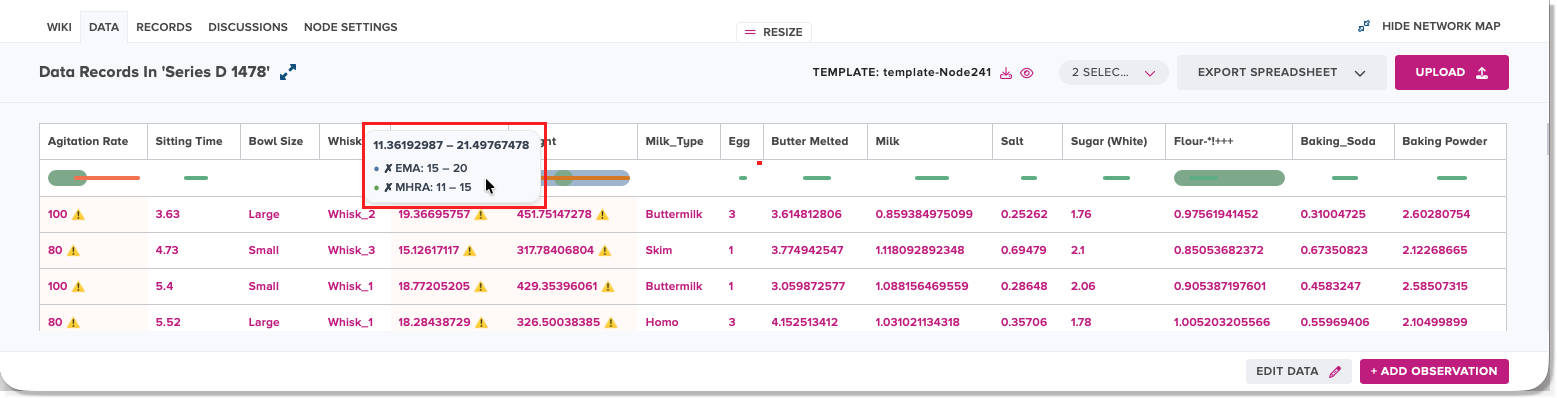
To remove a selected specification set from a comparison, click or tap the drop-down list of specification sets and unselect the corresponding specification set name. If necessary, the grey capsule representing the updated, aggregated specification range is reconfigured accordingly.
Records tab for a node
The Records tab for a node contains in a list of records that indicate historical changes to uploaded observations and supplementary files.
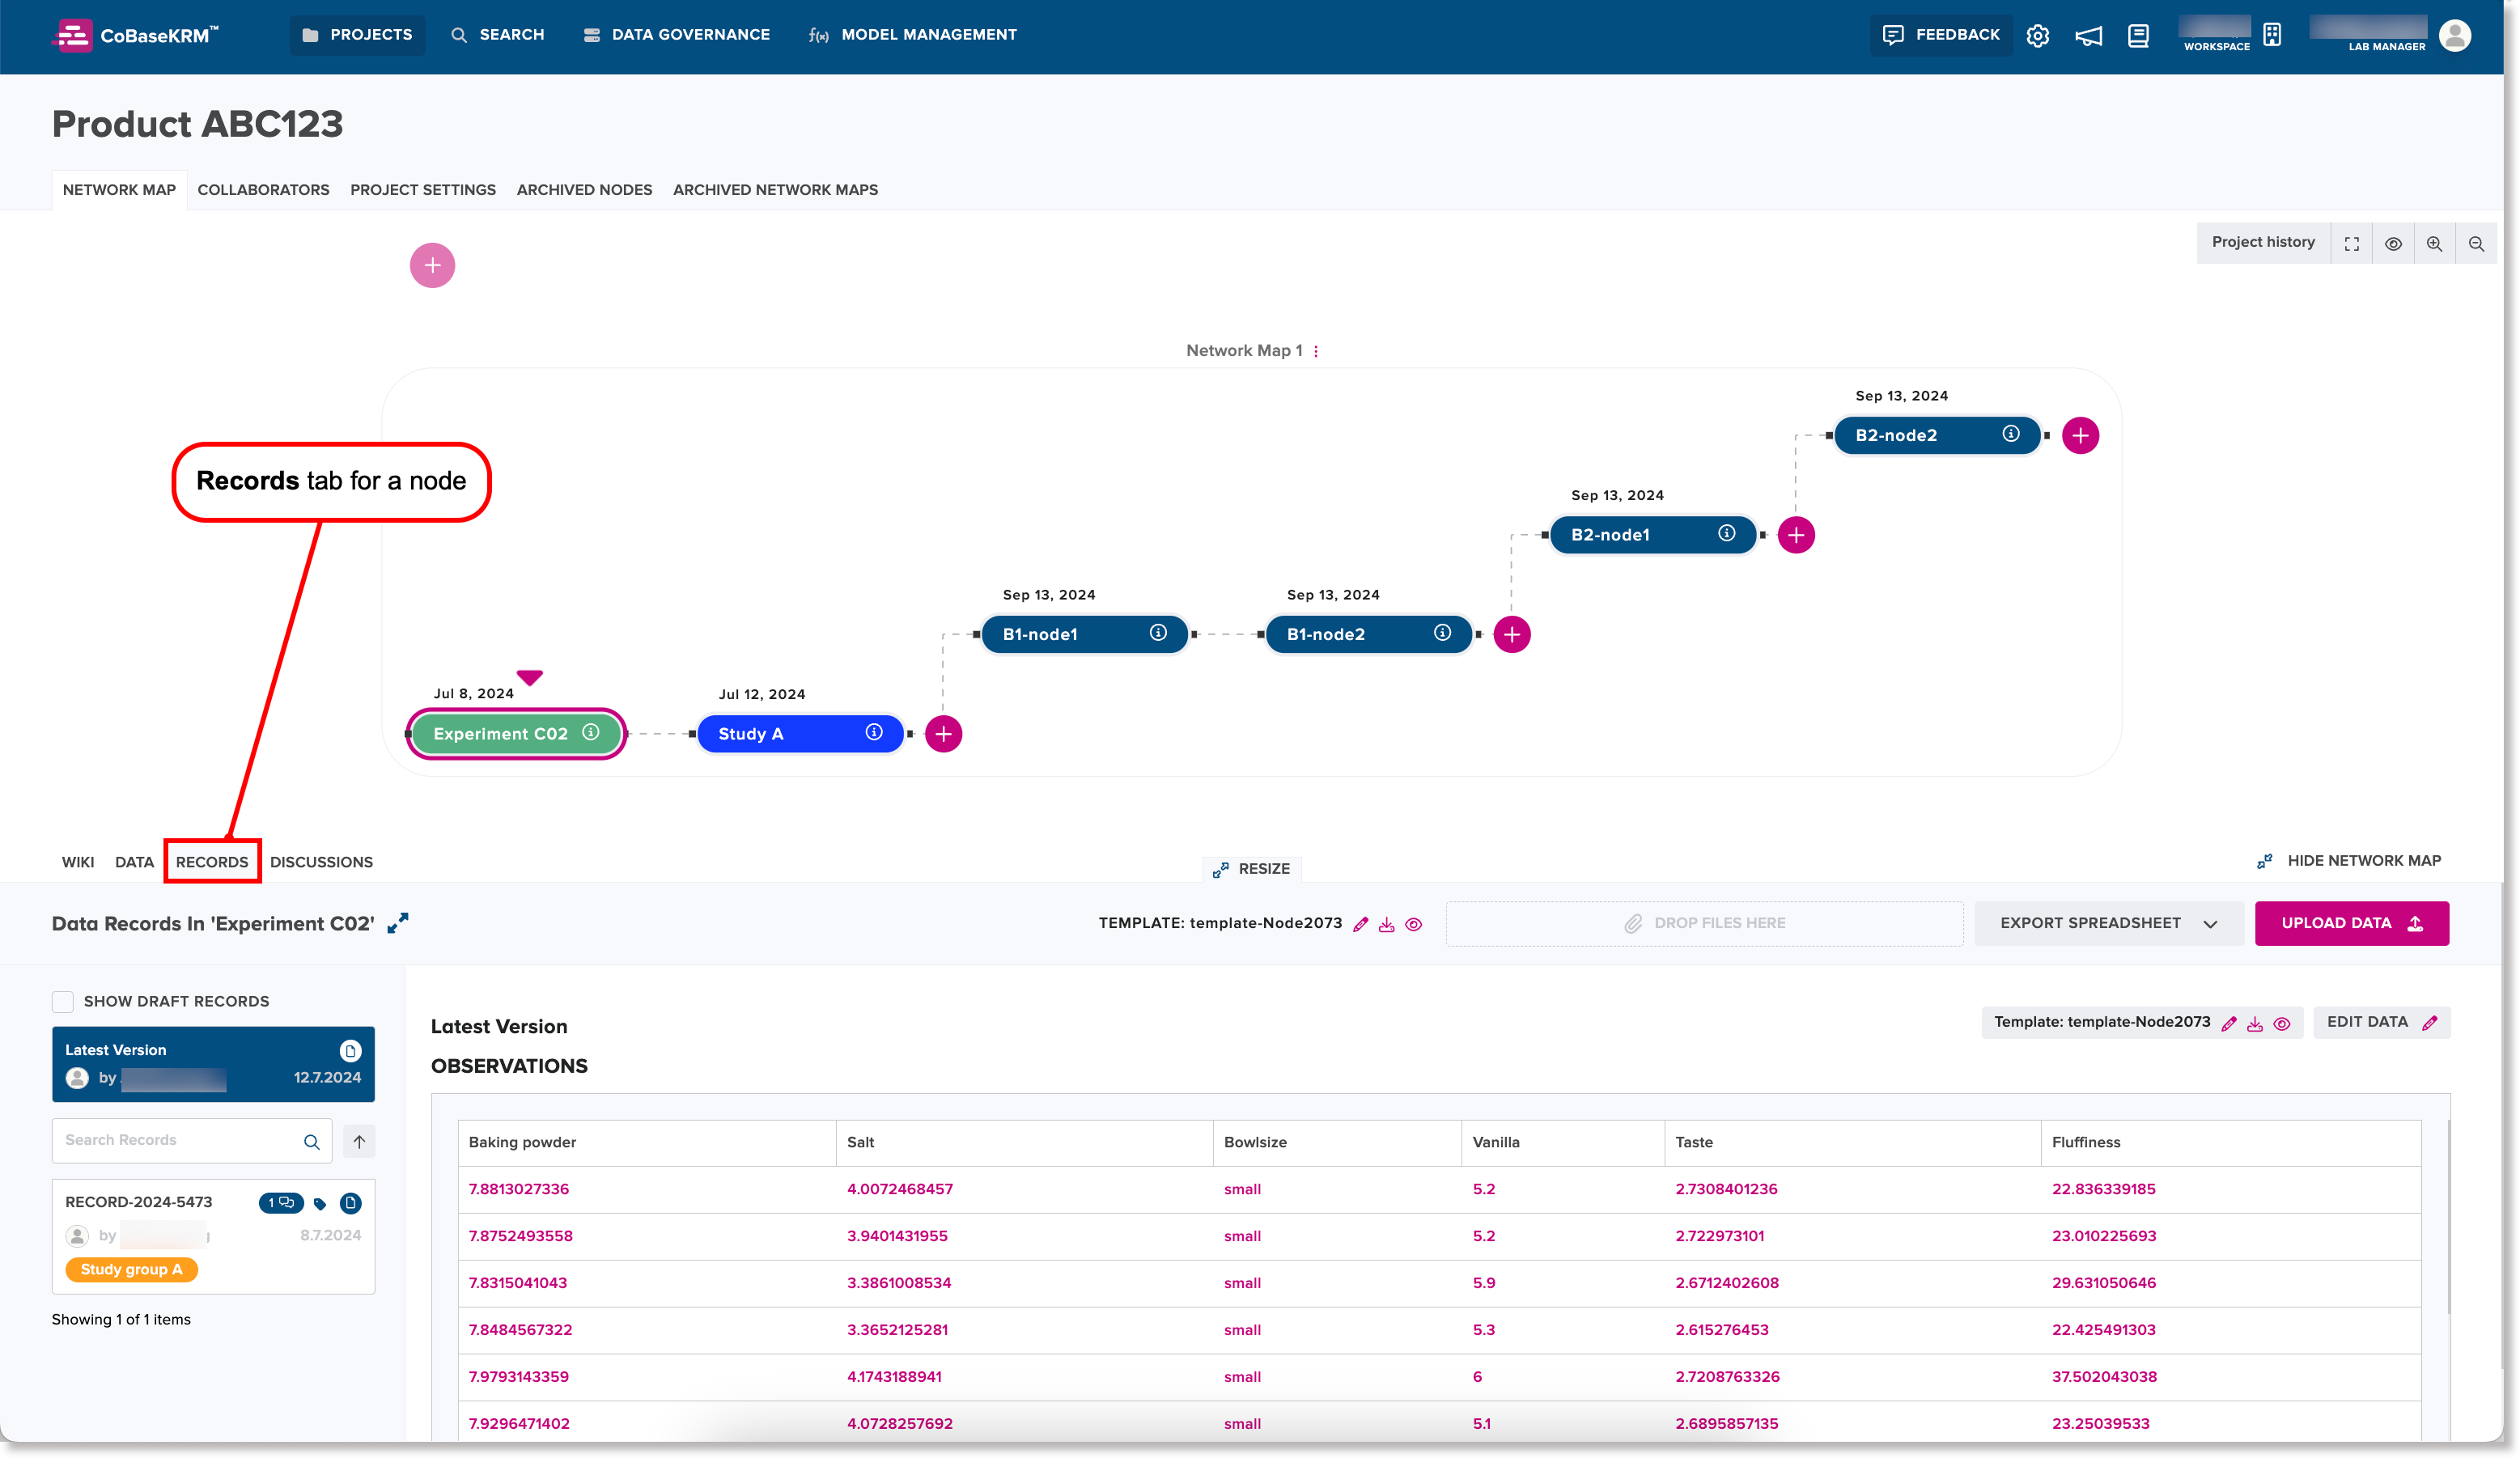
When you hover your cursor over a column heading for a parameter in the data table on the Records tab, a tooltip appears, showing more details and metadata about the parameter.
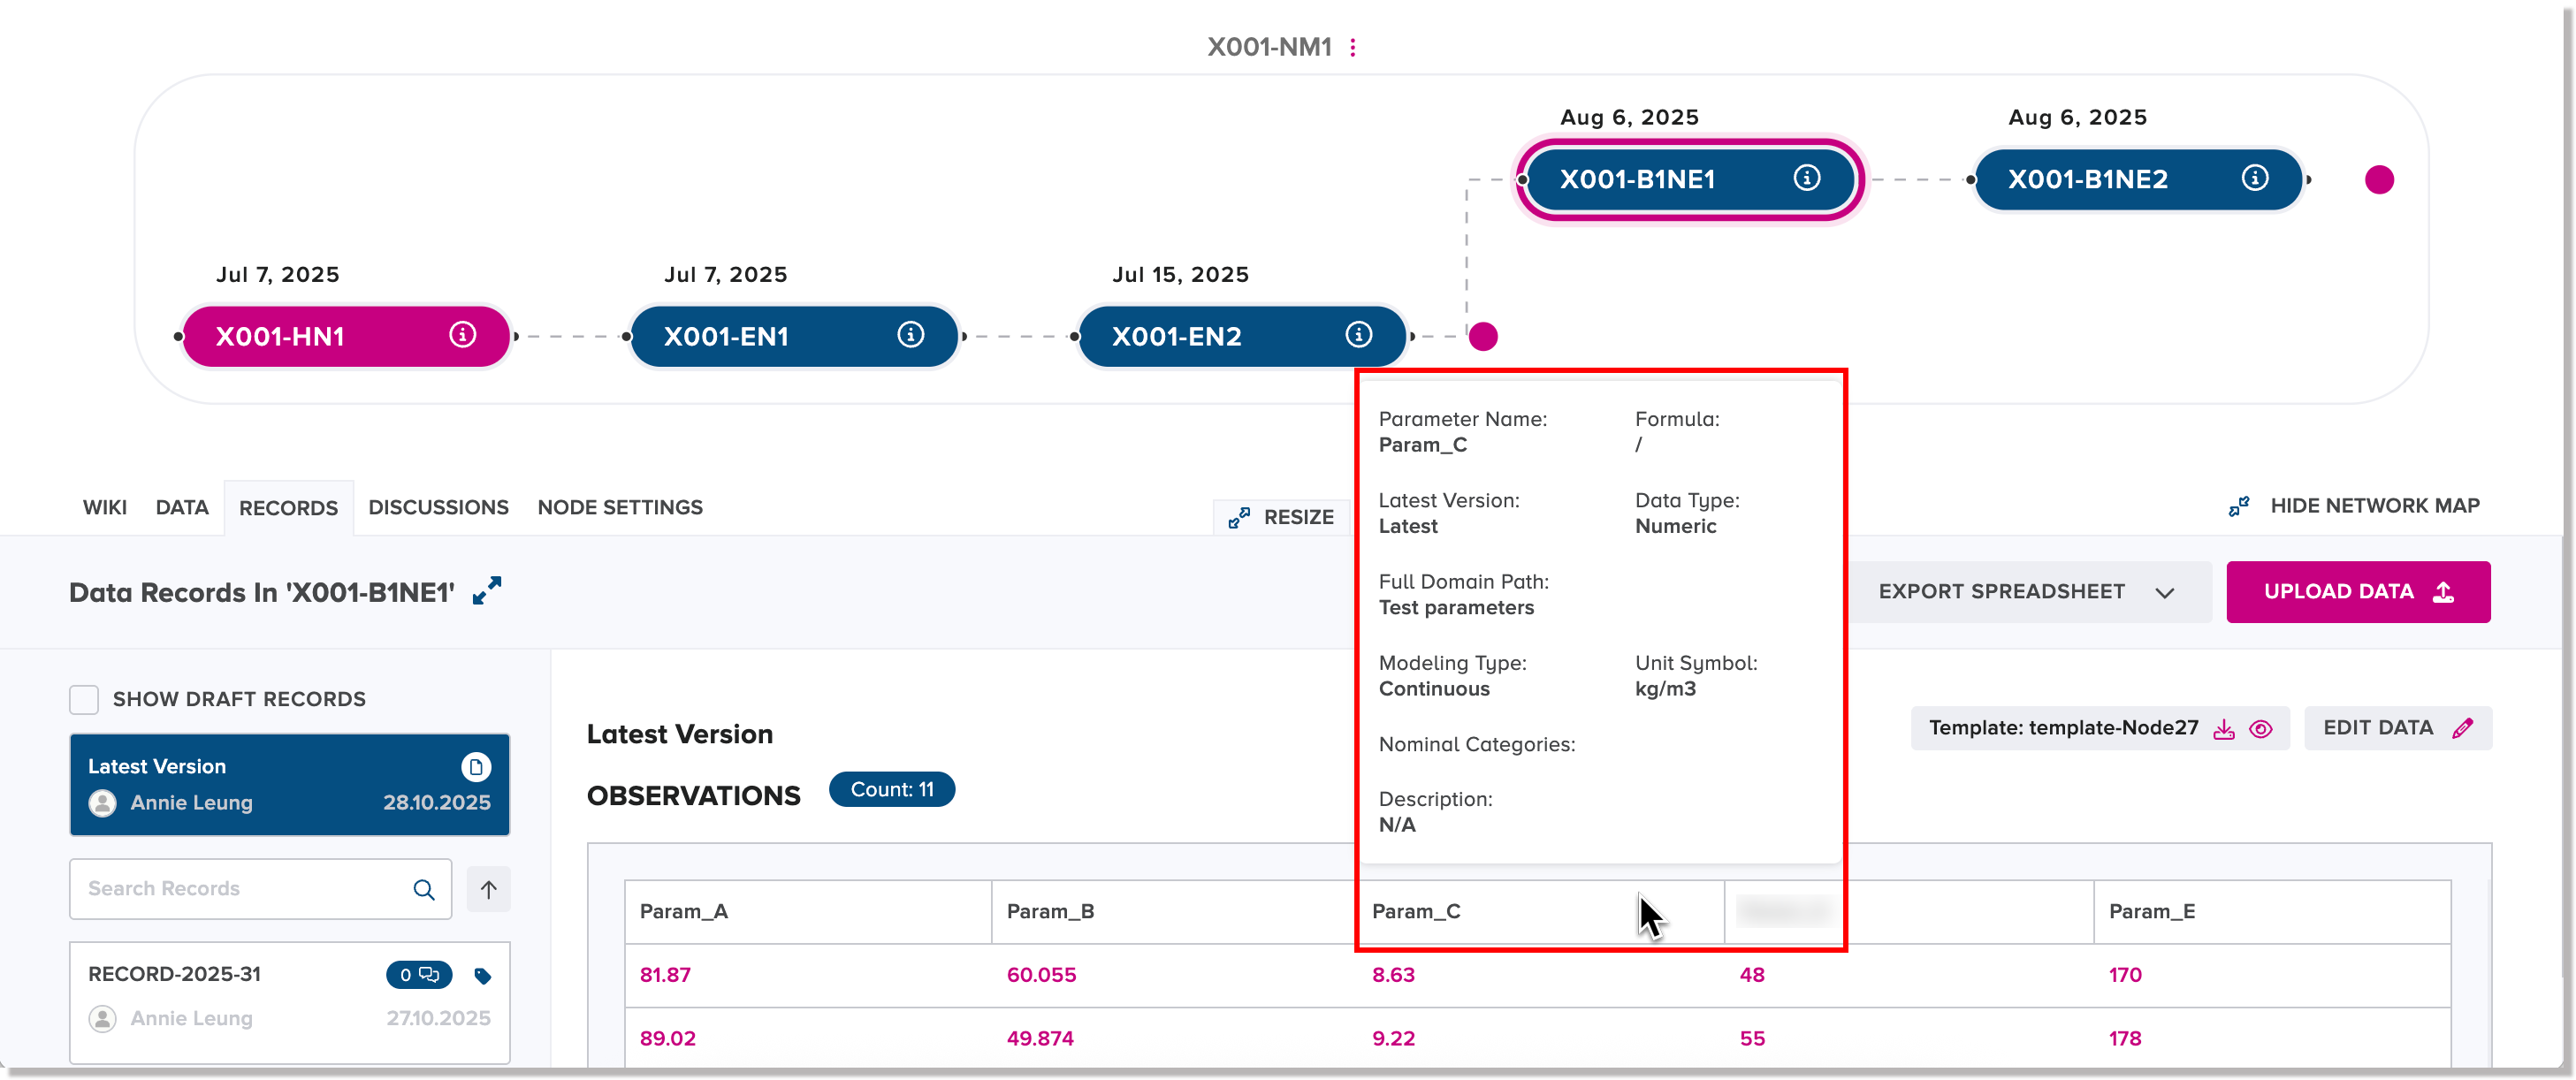
In the left panel, a record card of the latest version of the modified list of observations is featured at the top of the list. Each record card in the left panel shows the username of the user who uploaded the files for the record, the upload date, a journal card icon for any related journal cards posted, a tag icon representing assigned tags.
When you select a record card in the left panel, its related observations, files, and other details are displayed in the right panel.
Add a journal card to an existing record
To add a journal card to an existing record:
-
On the Records tab for a node, click the journal card icon for a record, either in the left panel or in the right panel under the section All files and records in this node.
The Add journal card to record dialog appears.
-
Click or tap inside the journal card editor to type your journal card.
- Use the toolbar to format your text.
- Use the image icon to add files to a journal card.
- To mention a user, type the "@" (at) character to display a list of usernames associated to the project and select a username.
- To add a tag, type the hash (#) character to display a list of tag names and select a tag.
-
Click or tap Post.
The journal card is added to the journal card history for the record.
Latest version of a record
The latest version of a record is highlighted in the left pane and its details are displayed by default in the right pane of the Records tab.
The right pane displays the following details:
-
a table of observations associated to the latest version of a record. The total count of observations is also displayed
-
a summary of the files and journal cards associated to the latest version of a record. The summary of files and journal cards is shown as collapsed by default.
To show a list of associated files, click or tap the Expand
 icon.
icon. 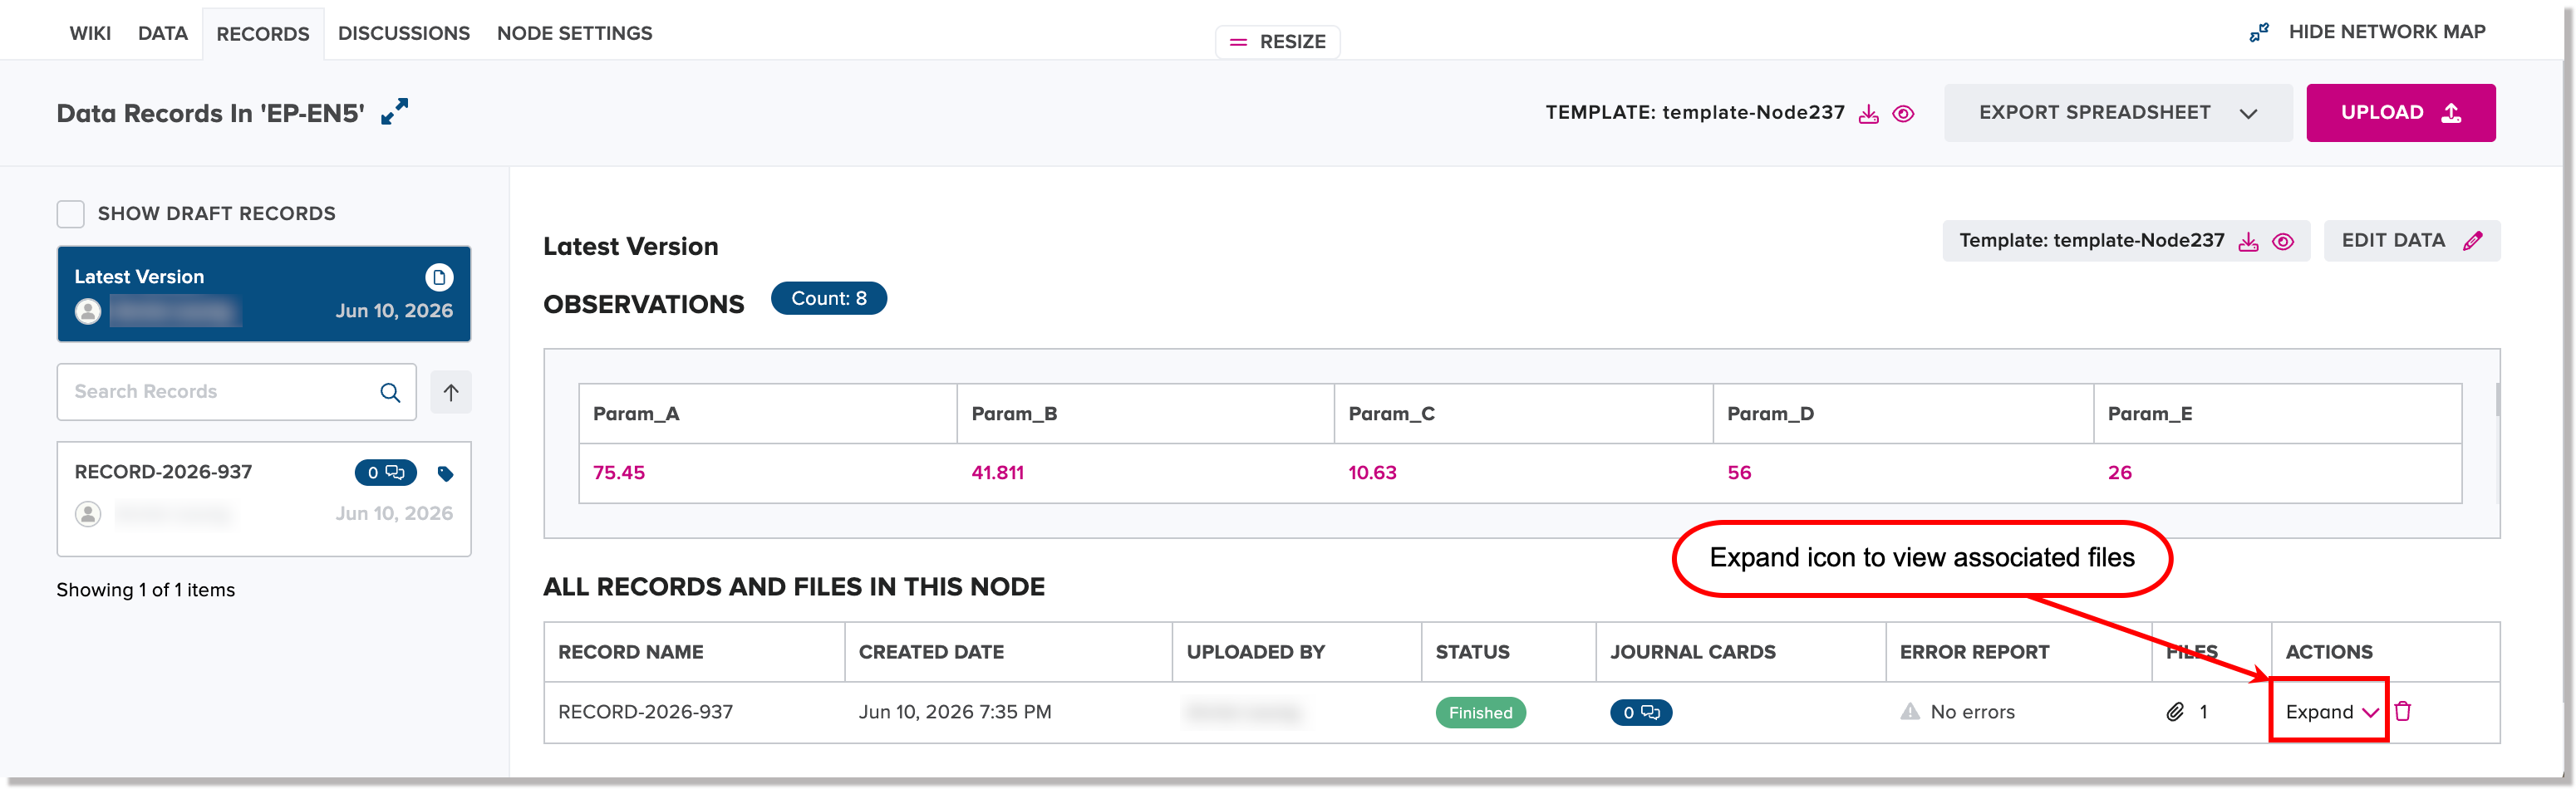
To hide the associated files, click or tap the Collapse
 icon.
icon. 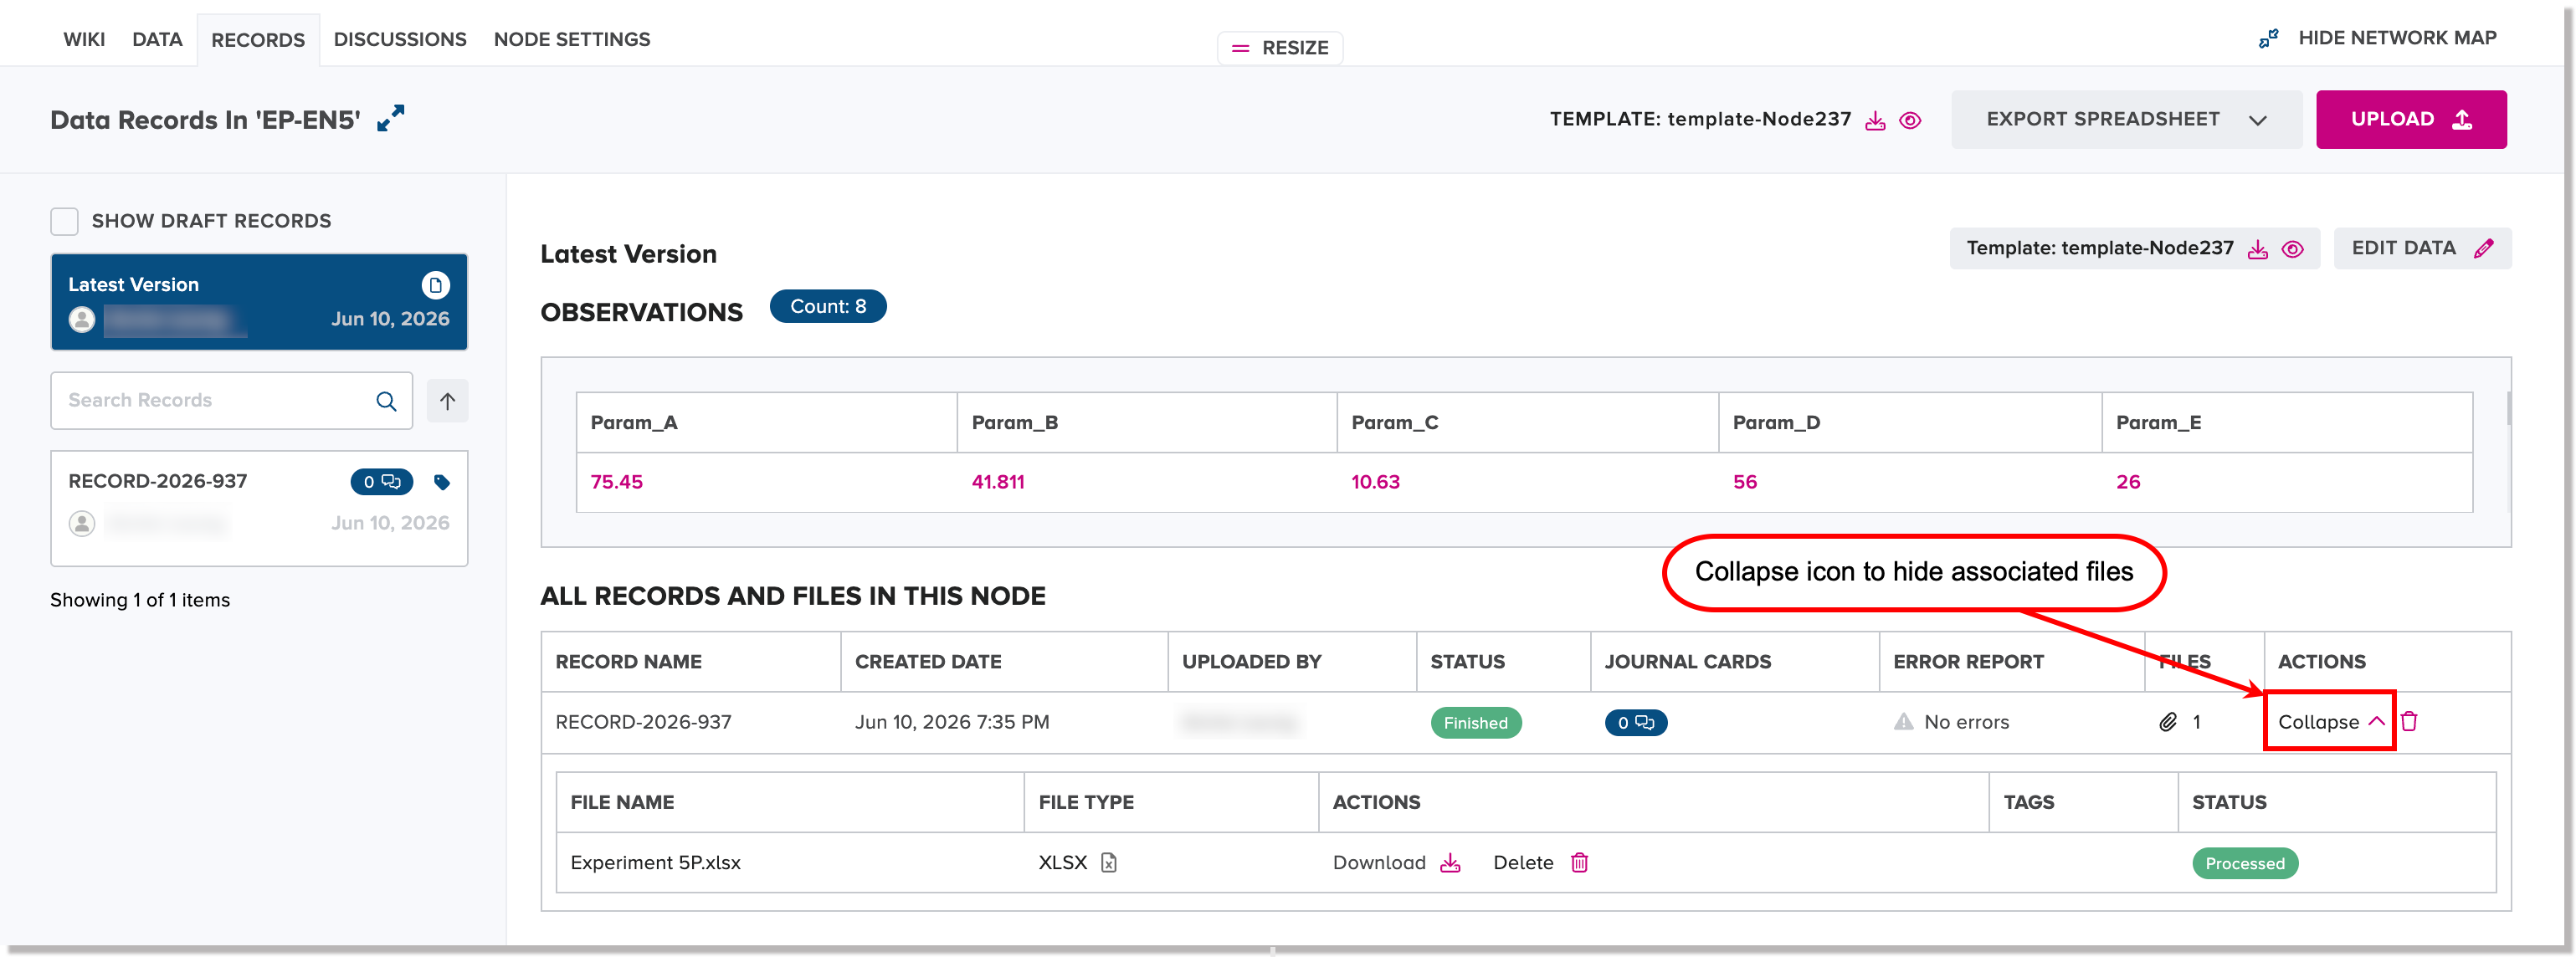
Earlier versions of a record
When you select an earlier version of a record in the left pane of the Records tab for a node, the right pane displays the following details:
-
a summary of the selected record
-
a table of observations associated to the given record
-
a list of files and journal cards associated to the given record
Delete functions for records
The Records tab for a node allows you to delete in two ways:
- Delete an existing record for a node
- Delete an associated file to a record for a node.
Delete an existing record for a node
The web client supports the ability to delete an existing record for a node, which is a permanent action. A deleted record cannot be discoverable through the Search view and cannot be recovered.
To delete an existing record for a node:
-
Navigate to the Records tab for a node.
-
In the list of records in the left panel, select a record card for a record that you want to delete.
-
In the right panel, click the Delete
 icon beside the record that you want to delete.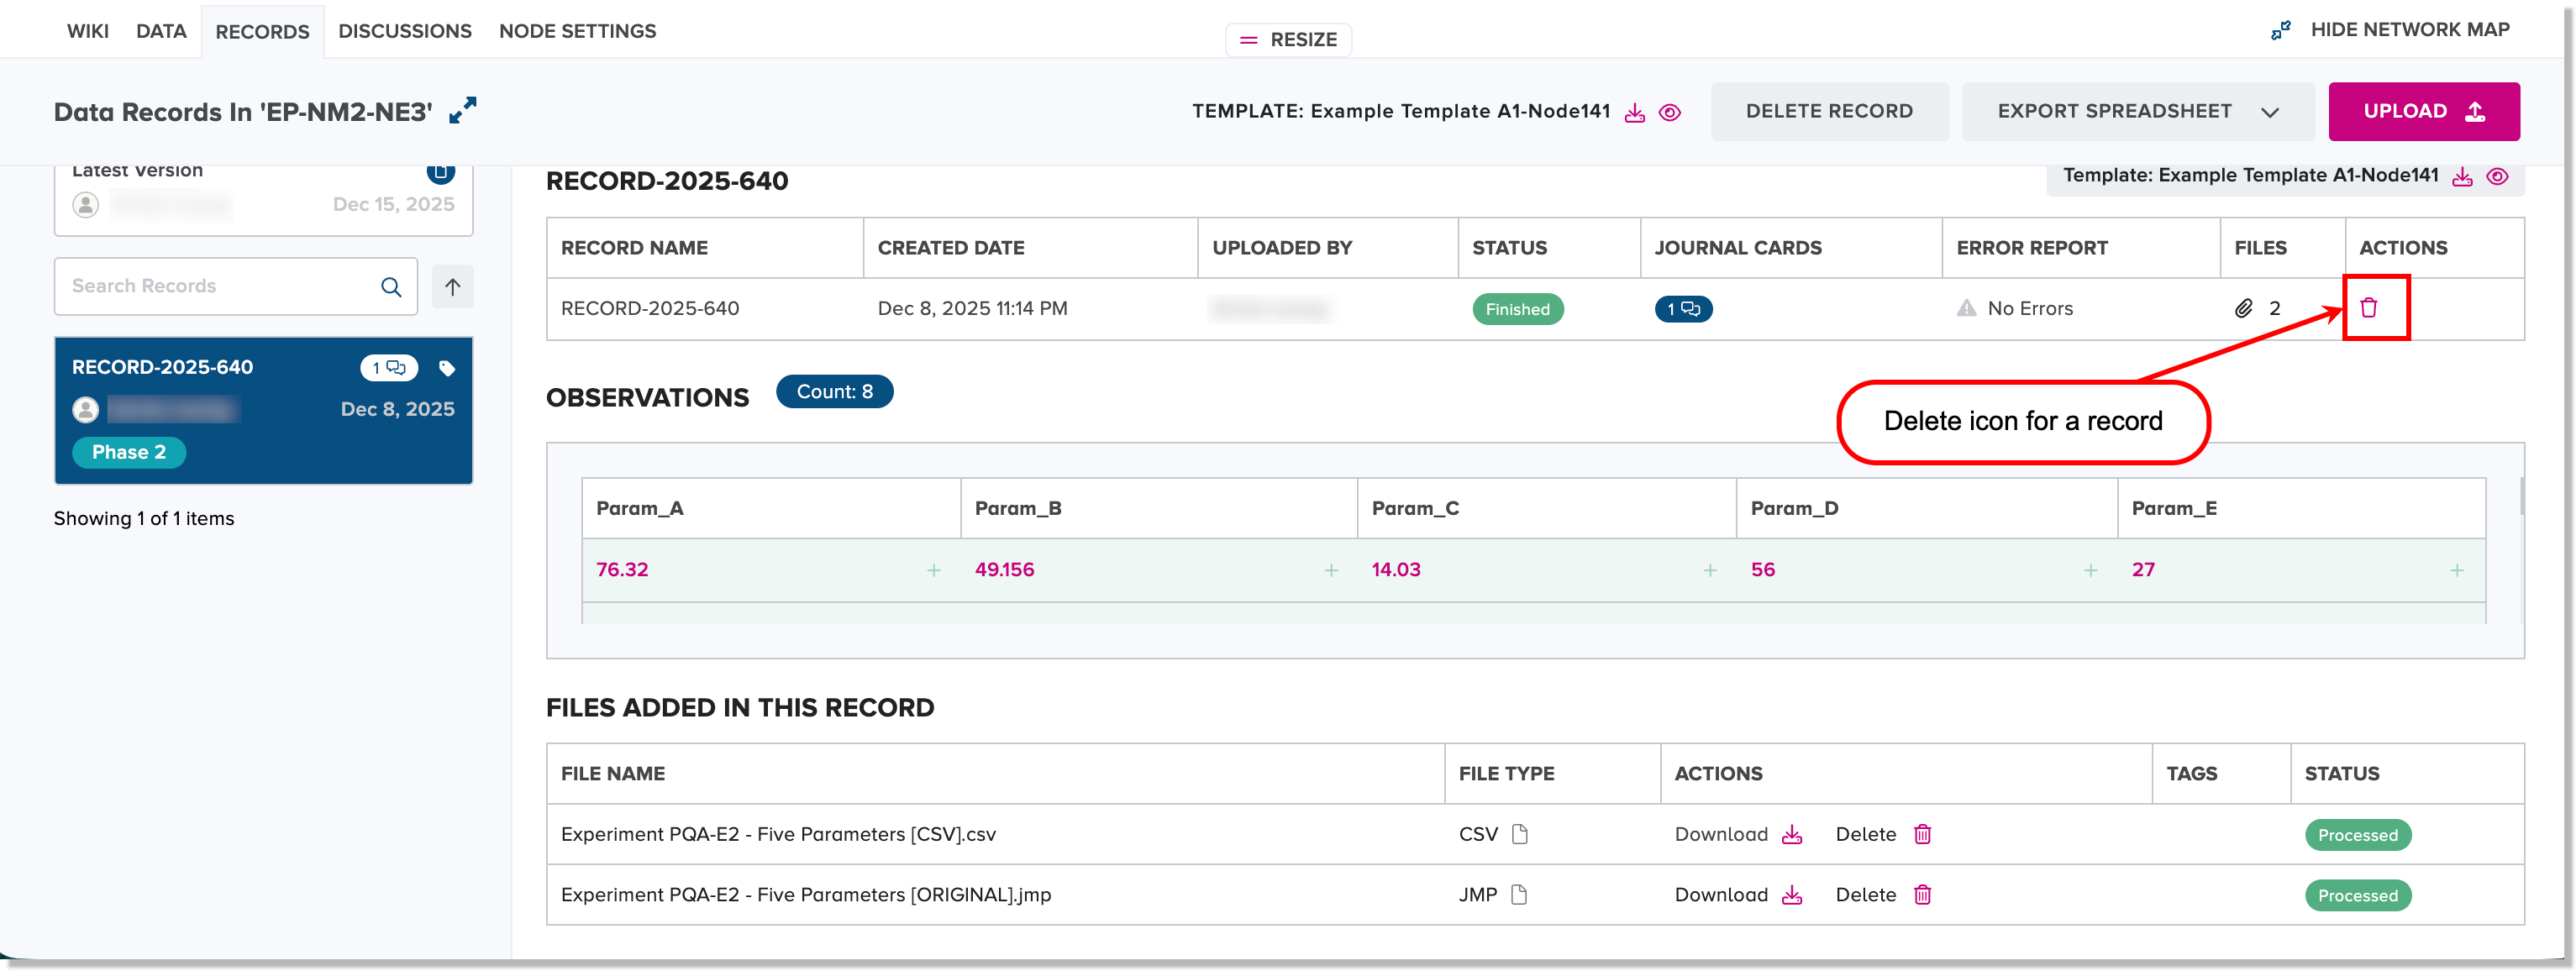
The Delete Record dialog appears.
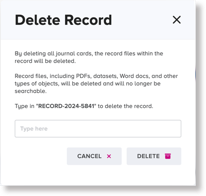
-
In the input field, type the exact record ID to confirm that you want to delete the given record.
-
Click or tap Delete.
The selected record is deleted permanently for the given node, and is removed from being displayed in the left panel of the Records tab.
Delete a file associated to a record
The web client supports the ability to delete an individual file associated to a given record for a node.
To delete a file associated to a record:
-
Navigate to the Records tab for a node.
-
In the list of records in the left panel, select a record card for the record containing a file that you want to delete.
-
In the right panel, scroll until you can view the list of associated files to the record.
-
Click or tap the Delete icon to the right of the file name to be deleted.
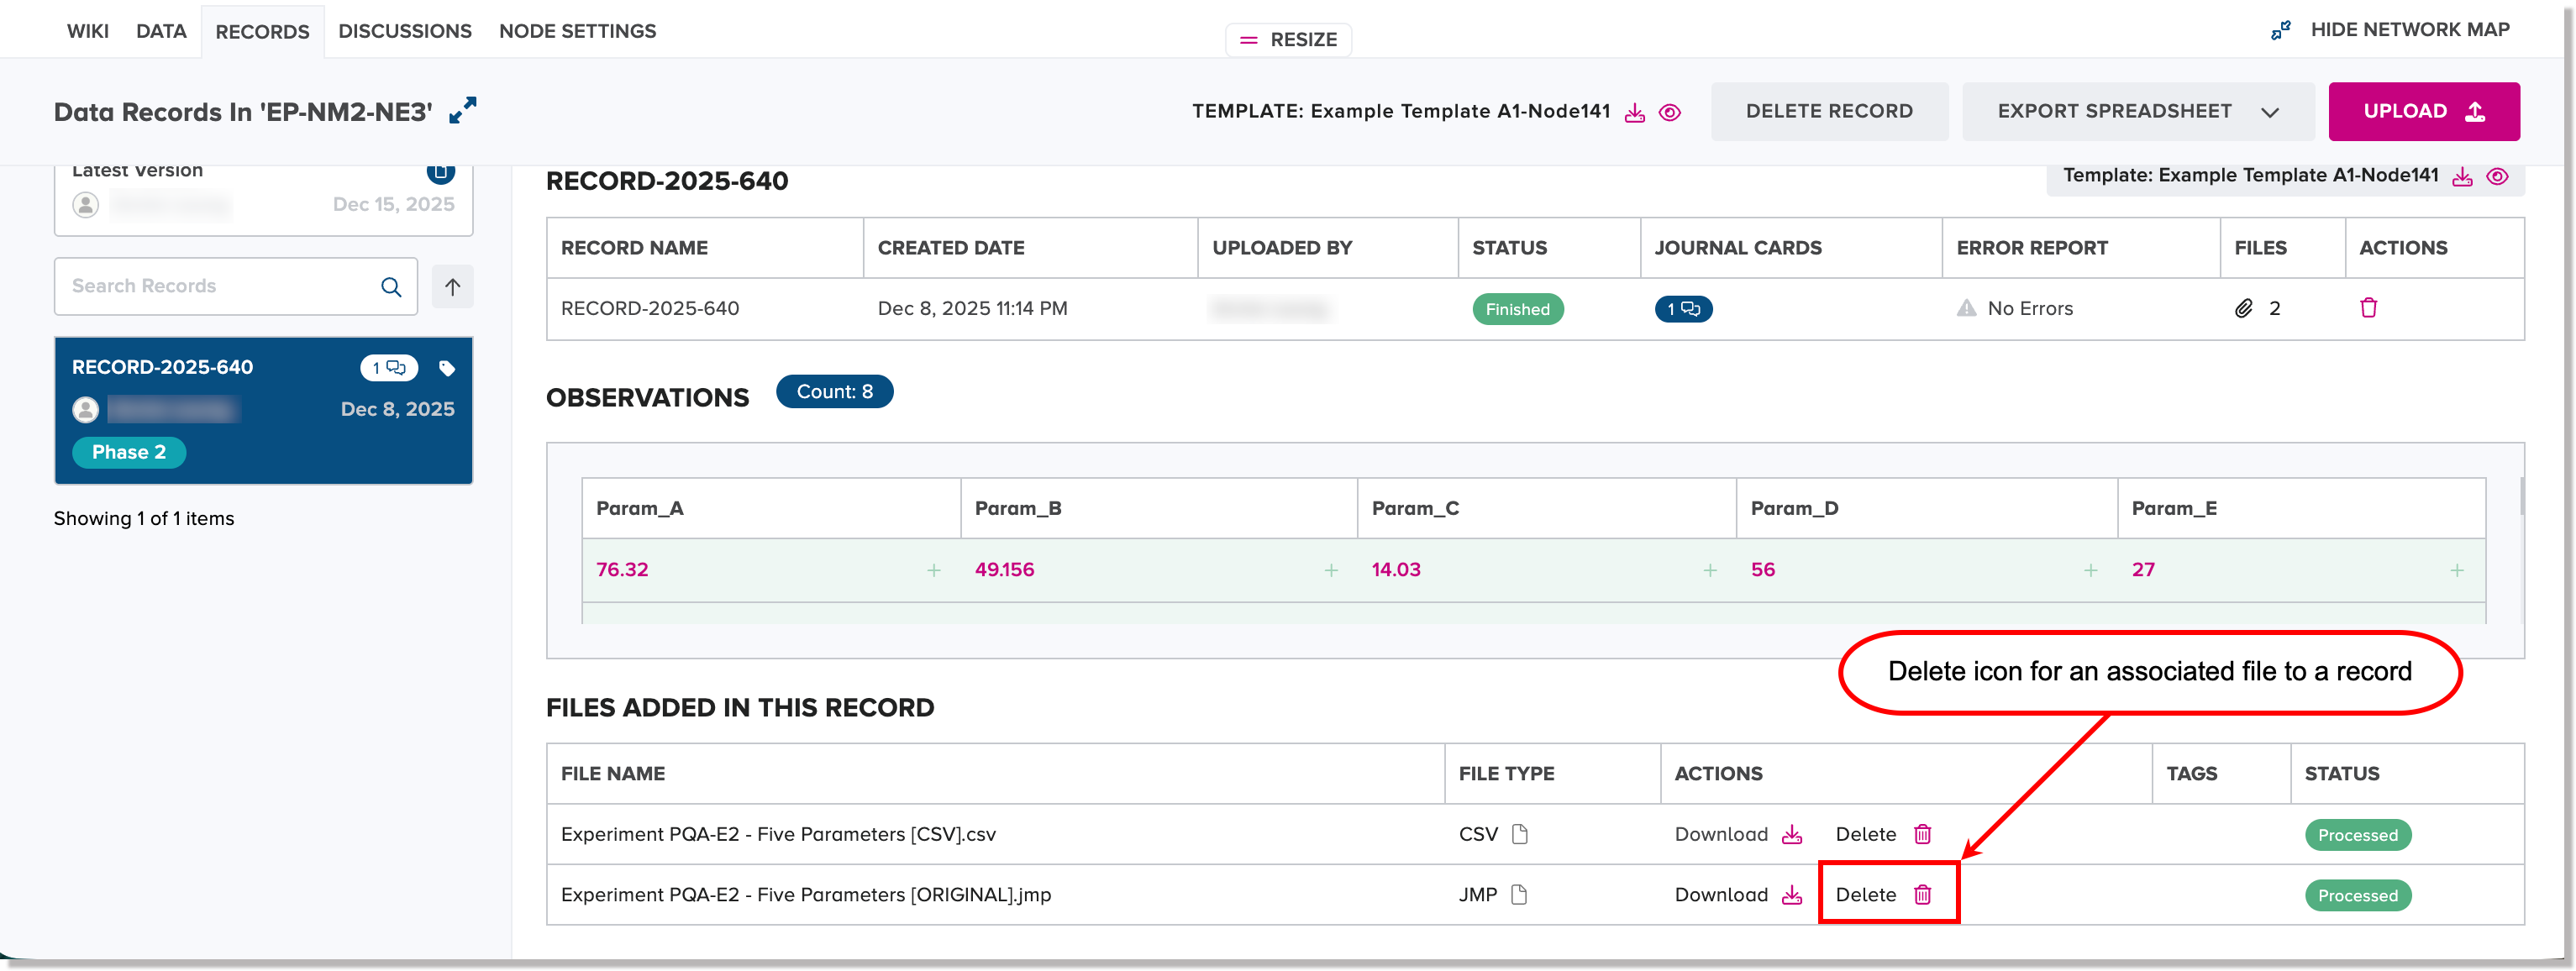
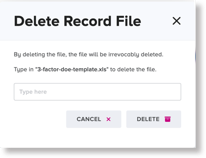
The Delete Record File dialog appears.
-
In the input field, type the exact file name including the decimal separator and the file extension, and click or tap Delete.
The selected file is deleted permanently for the given record and is not recoverable.
Discussions tab for a node
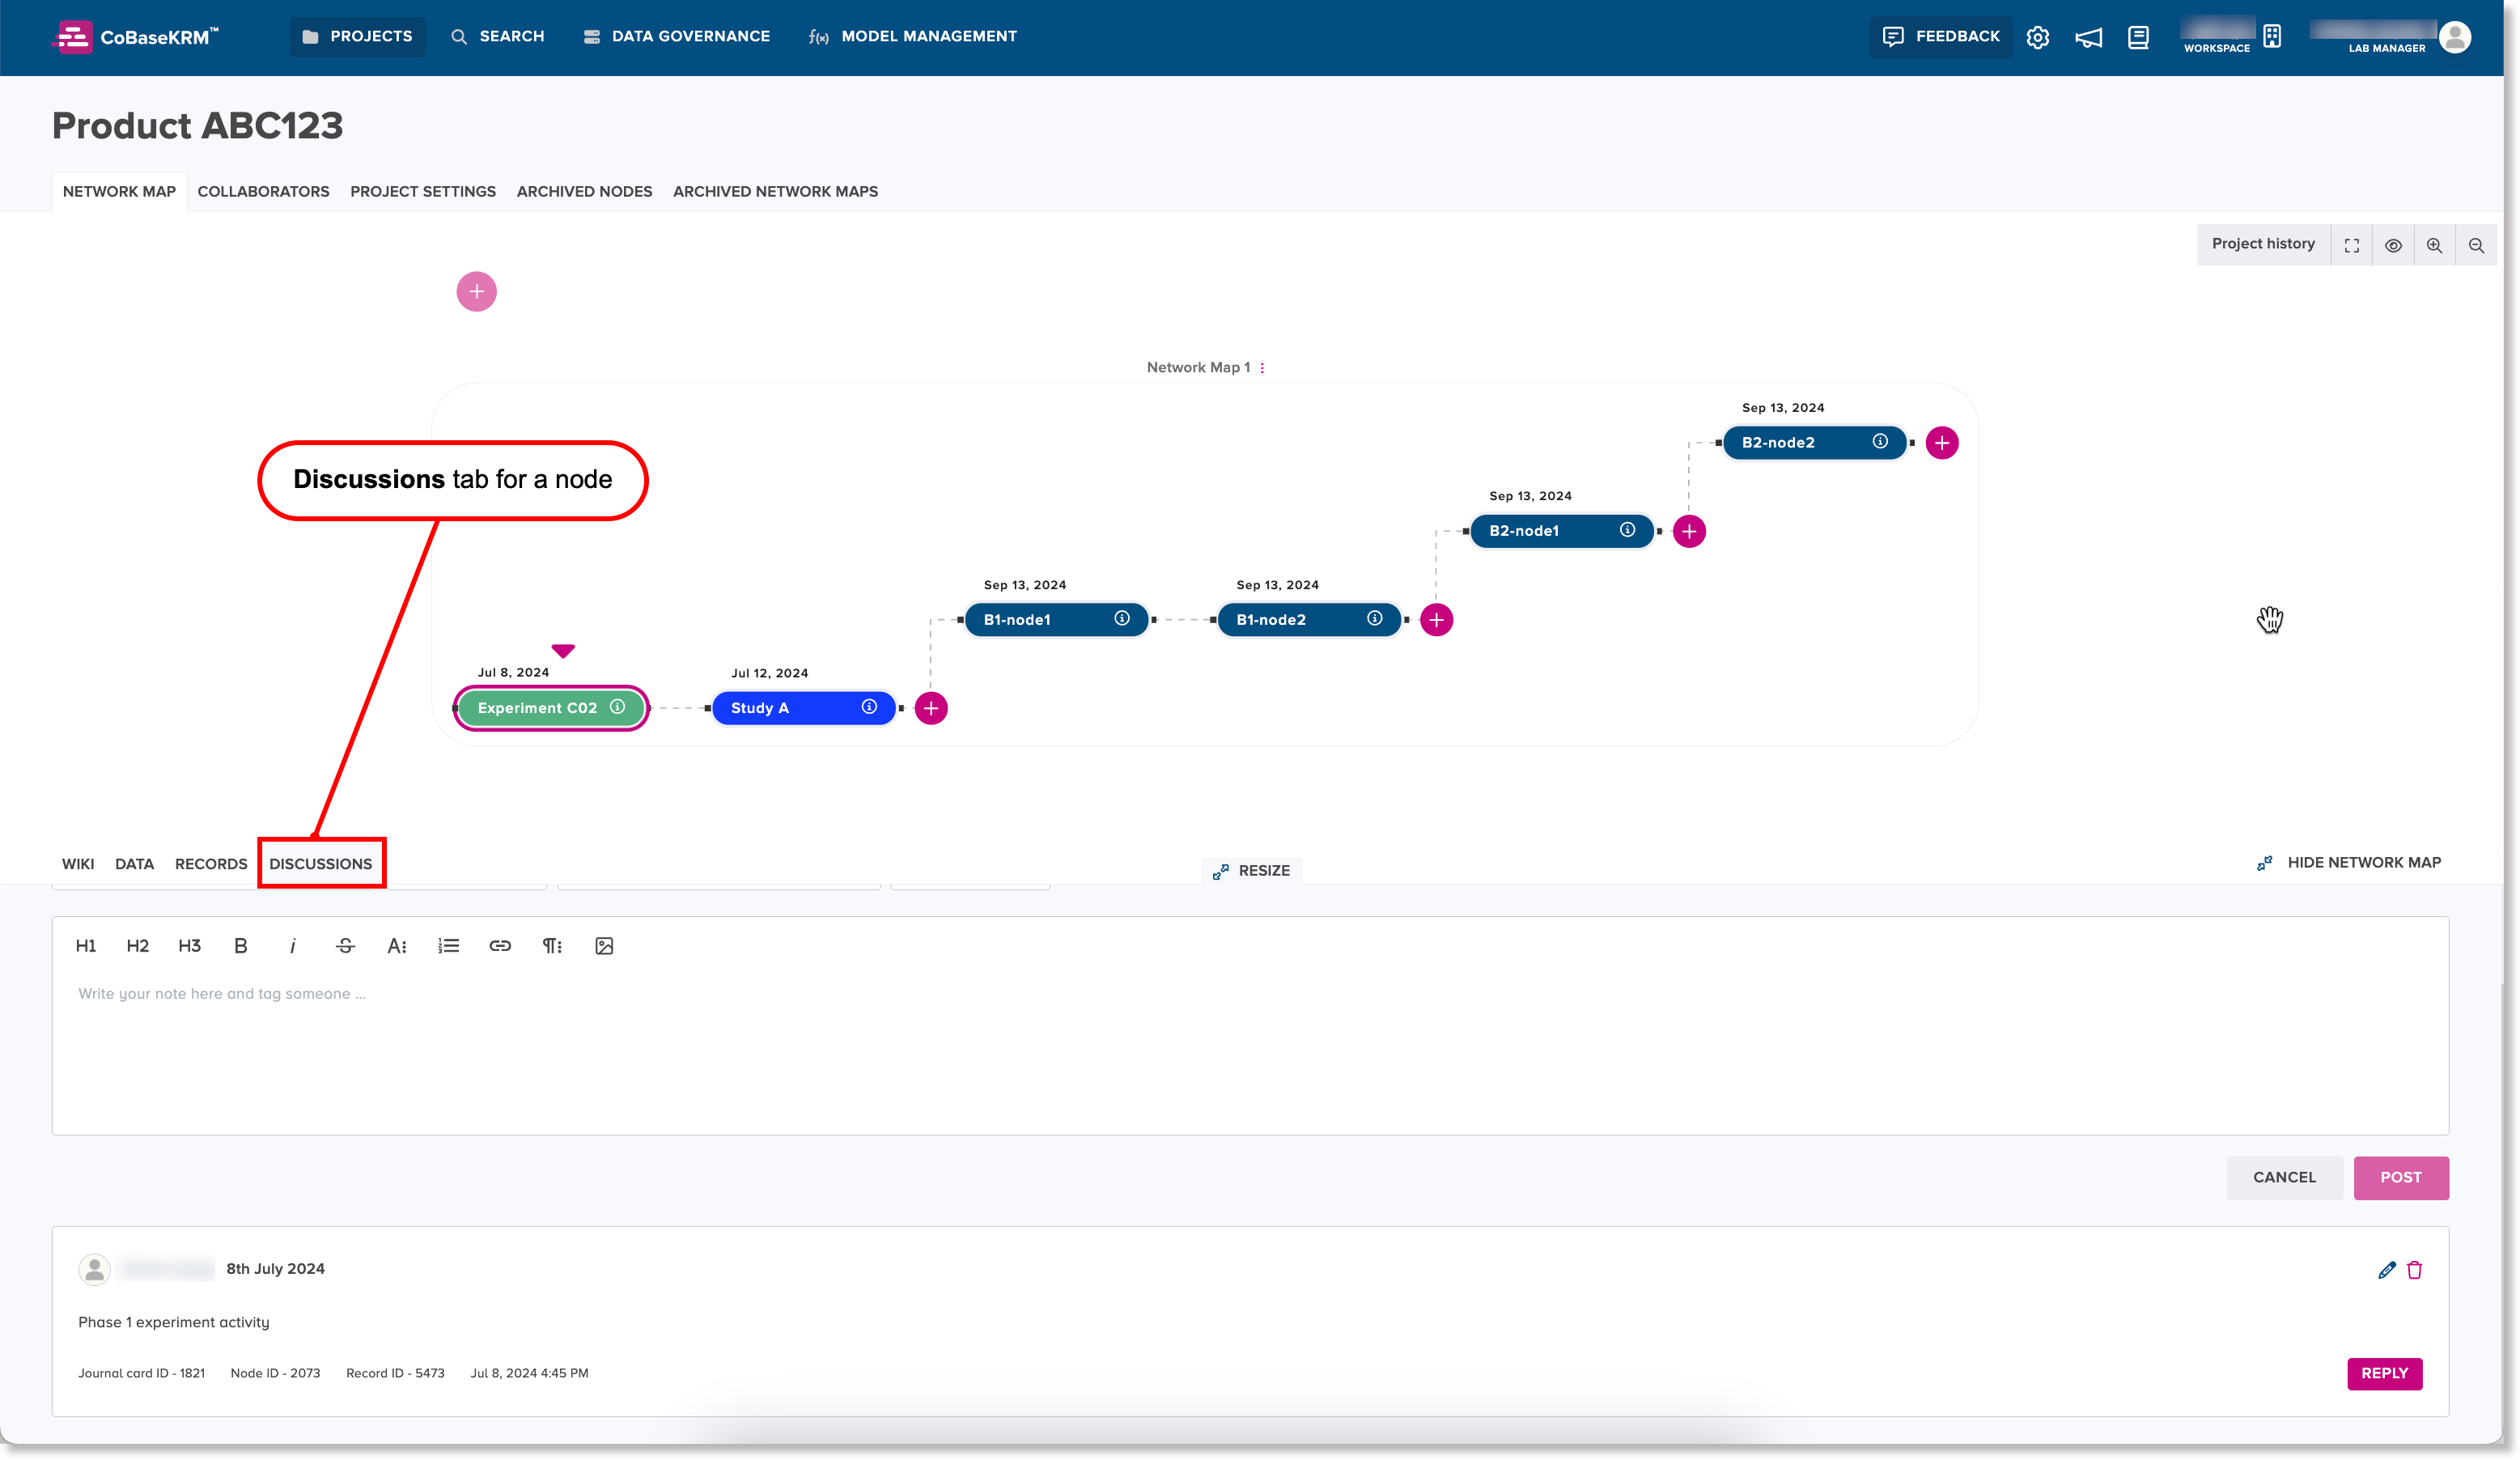
The Discussions tab displays the historical records of existing journal cards related a node. It also displays a journal card editor, in which you can edit and format text, add files, add links, mention users, and add tags.
Add a journal card to a node
To add a journal card to a node:
-
In the web client, navigate in to a node within a network map for a project to the Discussions tab.
-
Click or tap inside the journal card editor to type your journal card.
- Use the toolbar to format your text.
- Use the image icon to add files to a journal card.
- To mention a user, type the "@" (at) character to display a list of usernames associated to the project and select a username.
- To add a tag, type the hash (#) character to display a list of tag names and select a tag.
-
Click or tap Post.
The journal card is appended to the journal card history for the node on the Discussions tab.
Change node settings
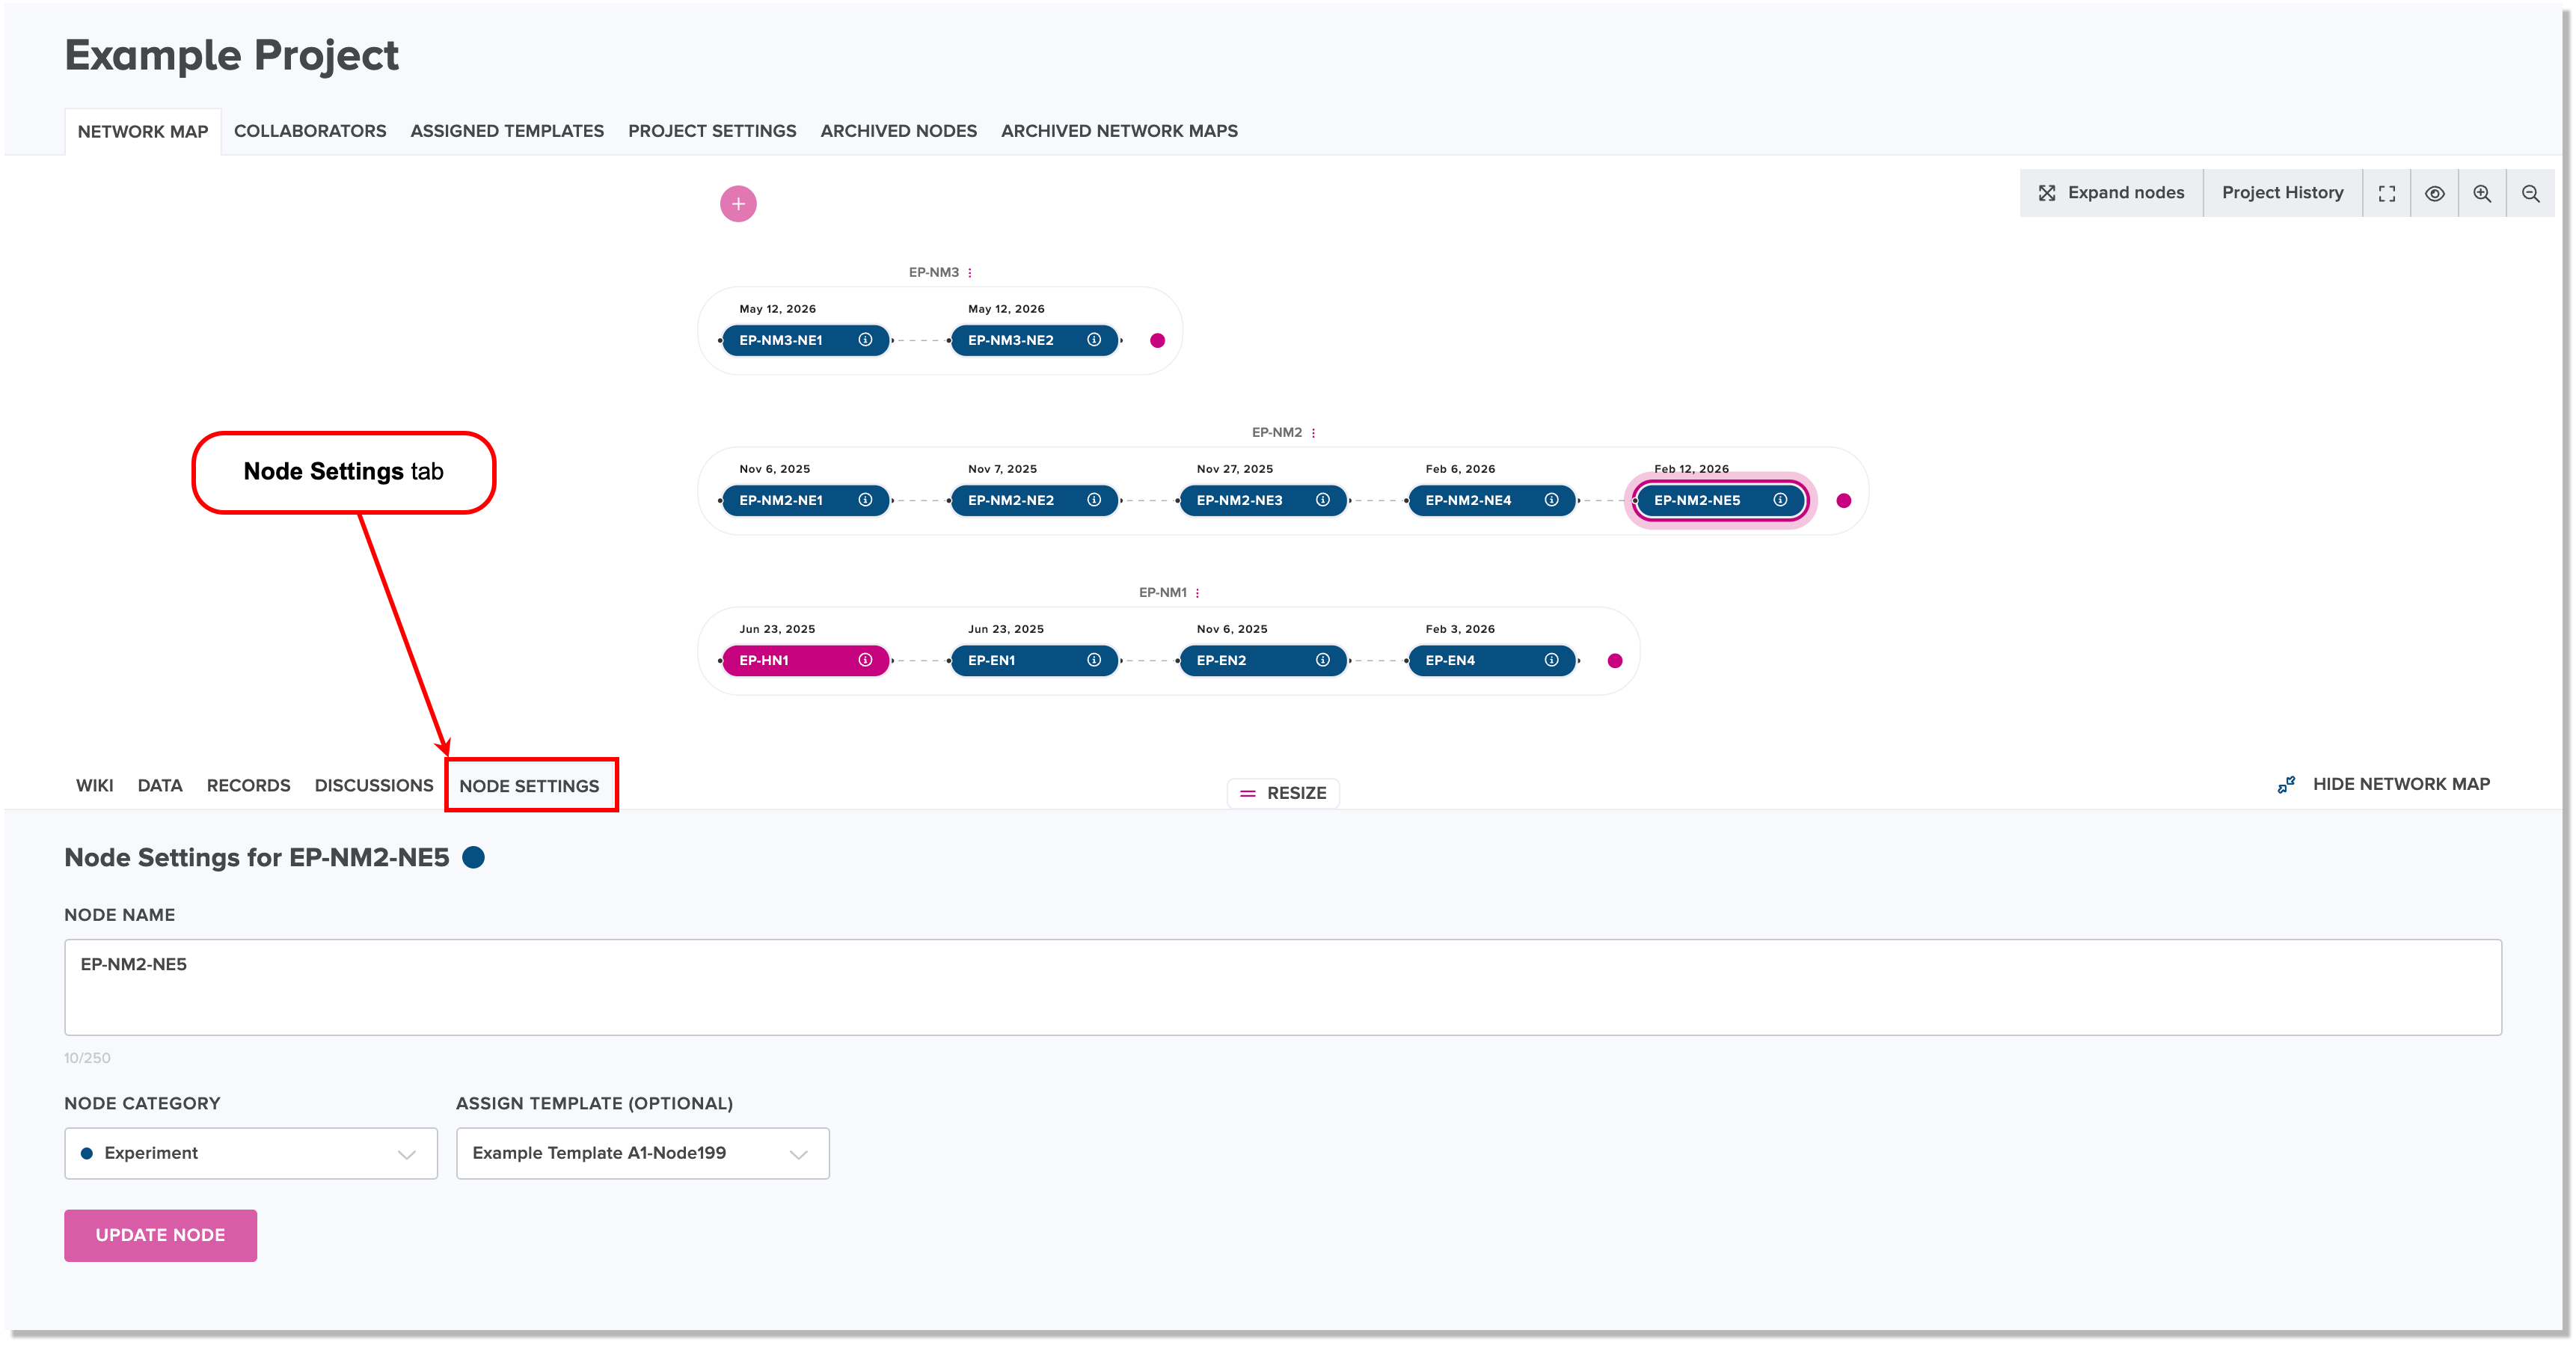
The Node Setttings tab for a node lets you make changes to a node name, node category, and assigned template.
To change the settings for a node:
-
Navigate to the Node Settings tab for a node,
-
Change the value of the Node Name field, Node Category field, and/or Assigned Template field=, as needed.
-
Click or tap the Update button.