Search using the web client
The Search view in the web client lets you perform a basic search to look up files, observations, and journal cards within a given workspace by using selected object names or IDs as search filters.
The Search view is divided into three tabs for organizing search filters and search results:
-
Files tab - lets you select filters using various parameter names and other metadata for matching files in search results
-
Observations tab - lets you select filters for matching observations in search results
-
Journal cards tab - lets you select filters for matching journal cards in search results
The left panel of filters is updated according to which tab you have navigated to.
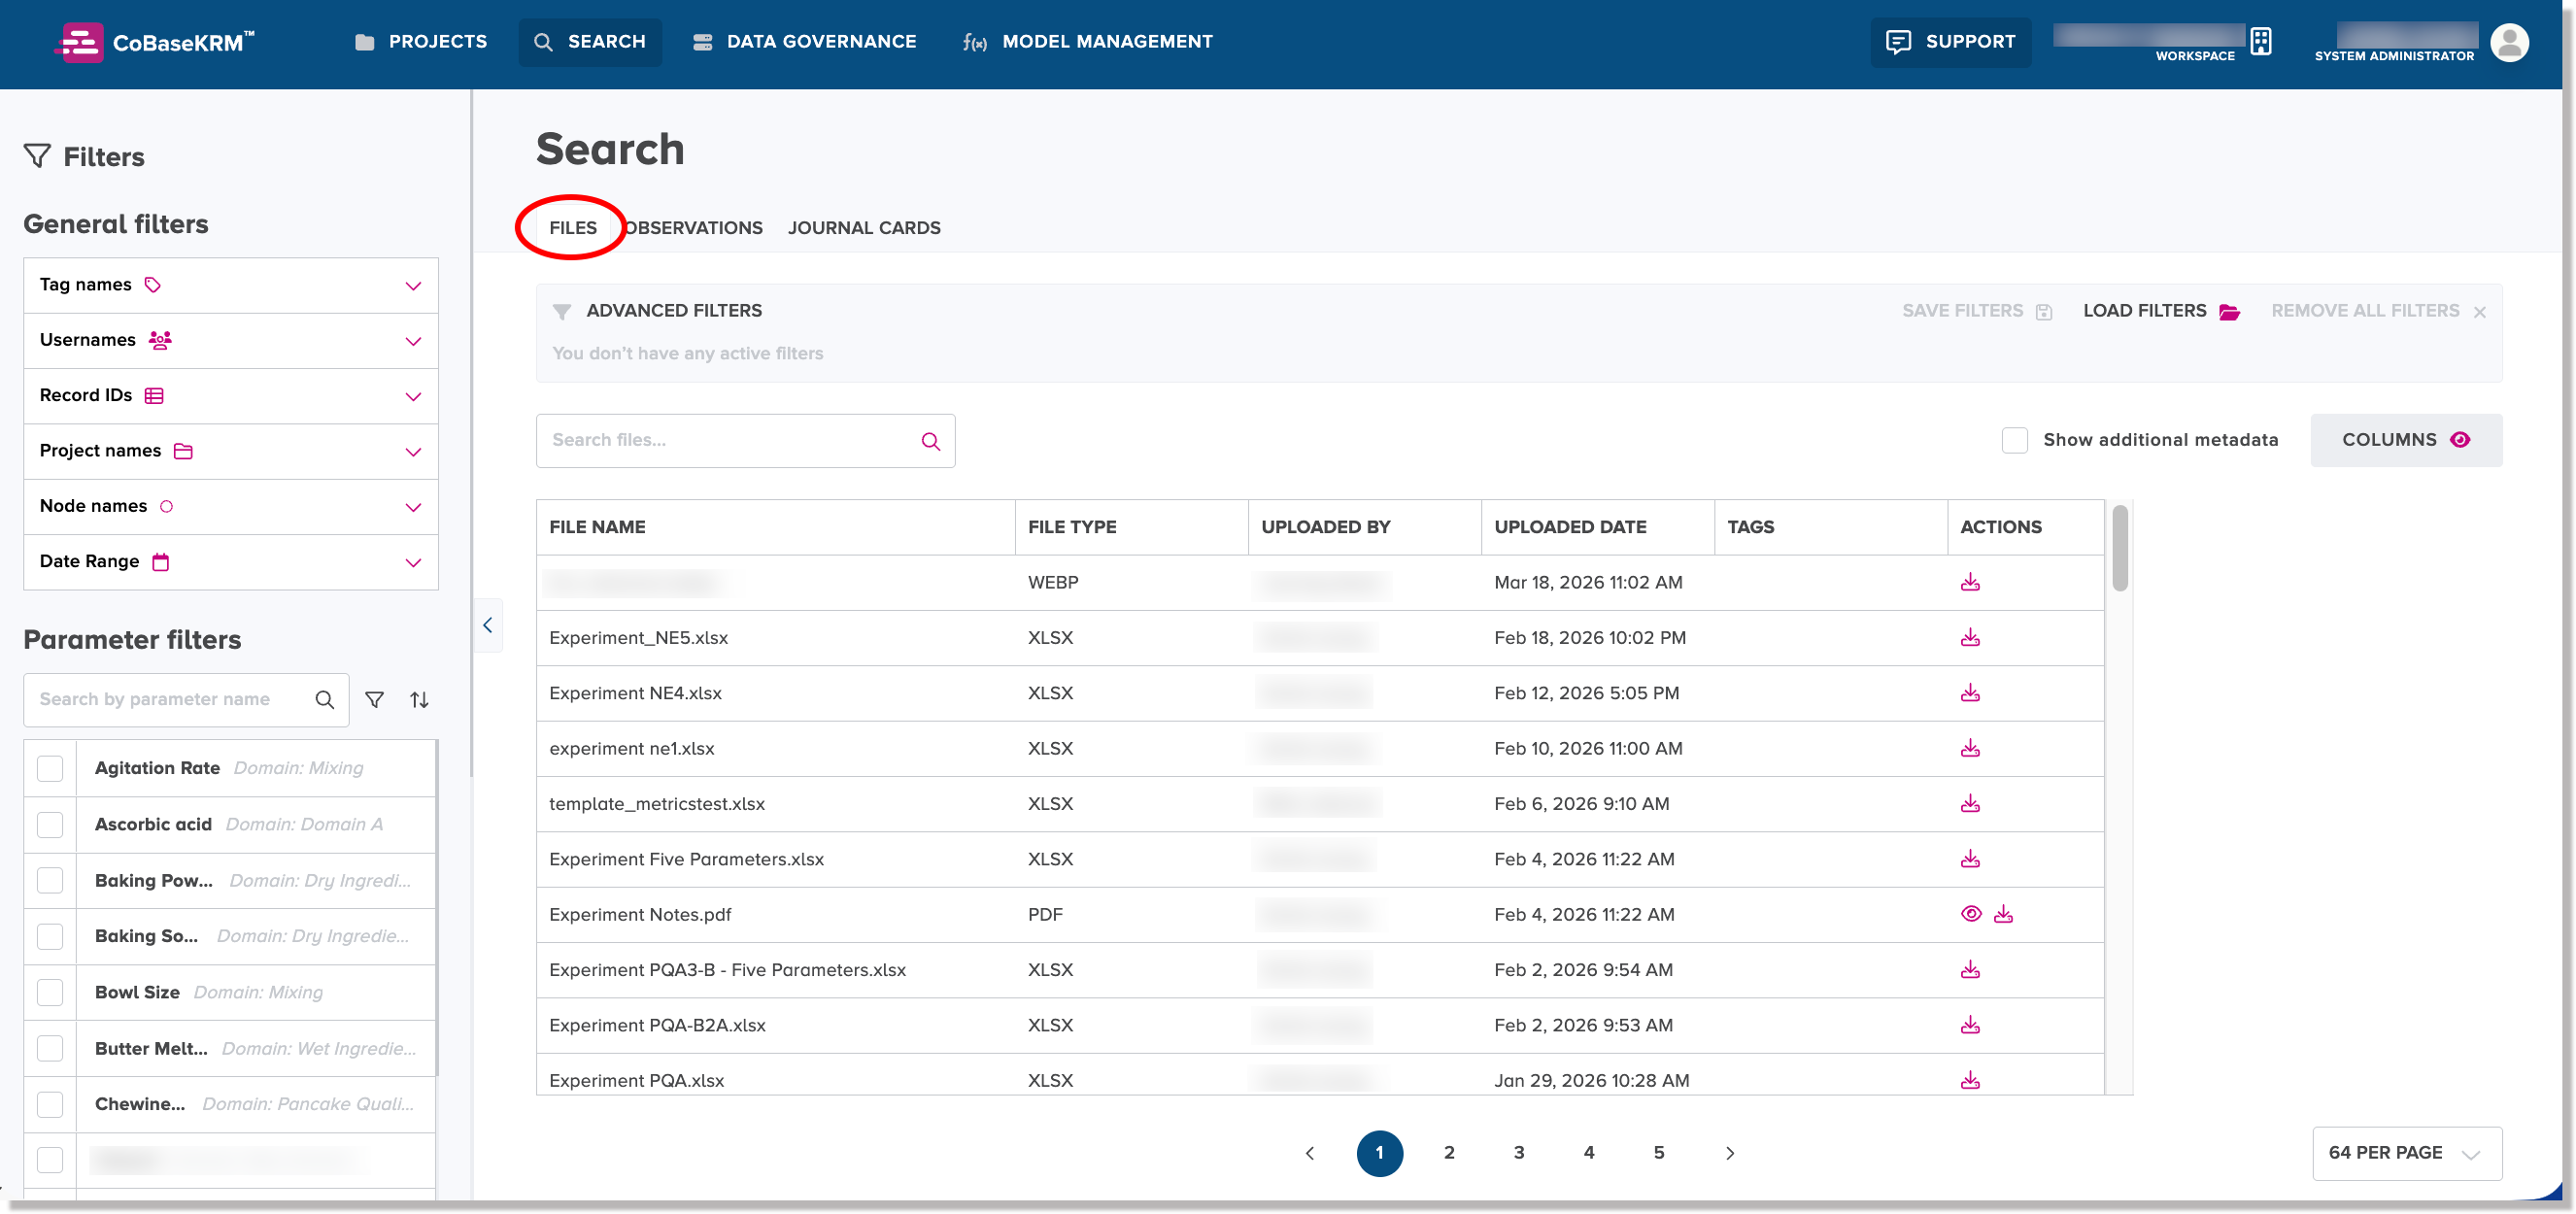
Perform a search for files
The Files tab in the Search view is used to perform a general search for files that are saved in the database.
Select search filters for files
In the left panel of the Search view, you can choose from the following object names or IDs to be defined as search filters to narrow your search for files.
Notes
For each object name shown, click or tap the chevron down (![]() ) icon to expand the corresponding panel to show a list of object names or IDs.
) icon to expand the corresponding panel to show a list of object names or IDs.
To narrow an object list for easier selection, use the search field above each list object names or IDs.
-
Tags list - expand the panel box and select the checkbox of a tag name from the list to define a tag search filter

-
Users list - expand the panel box and select the checkbox of a username from the list to define a username search filter

-
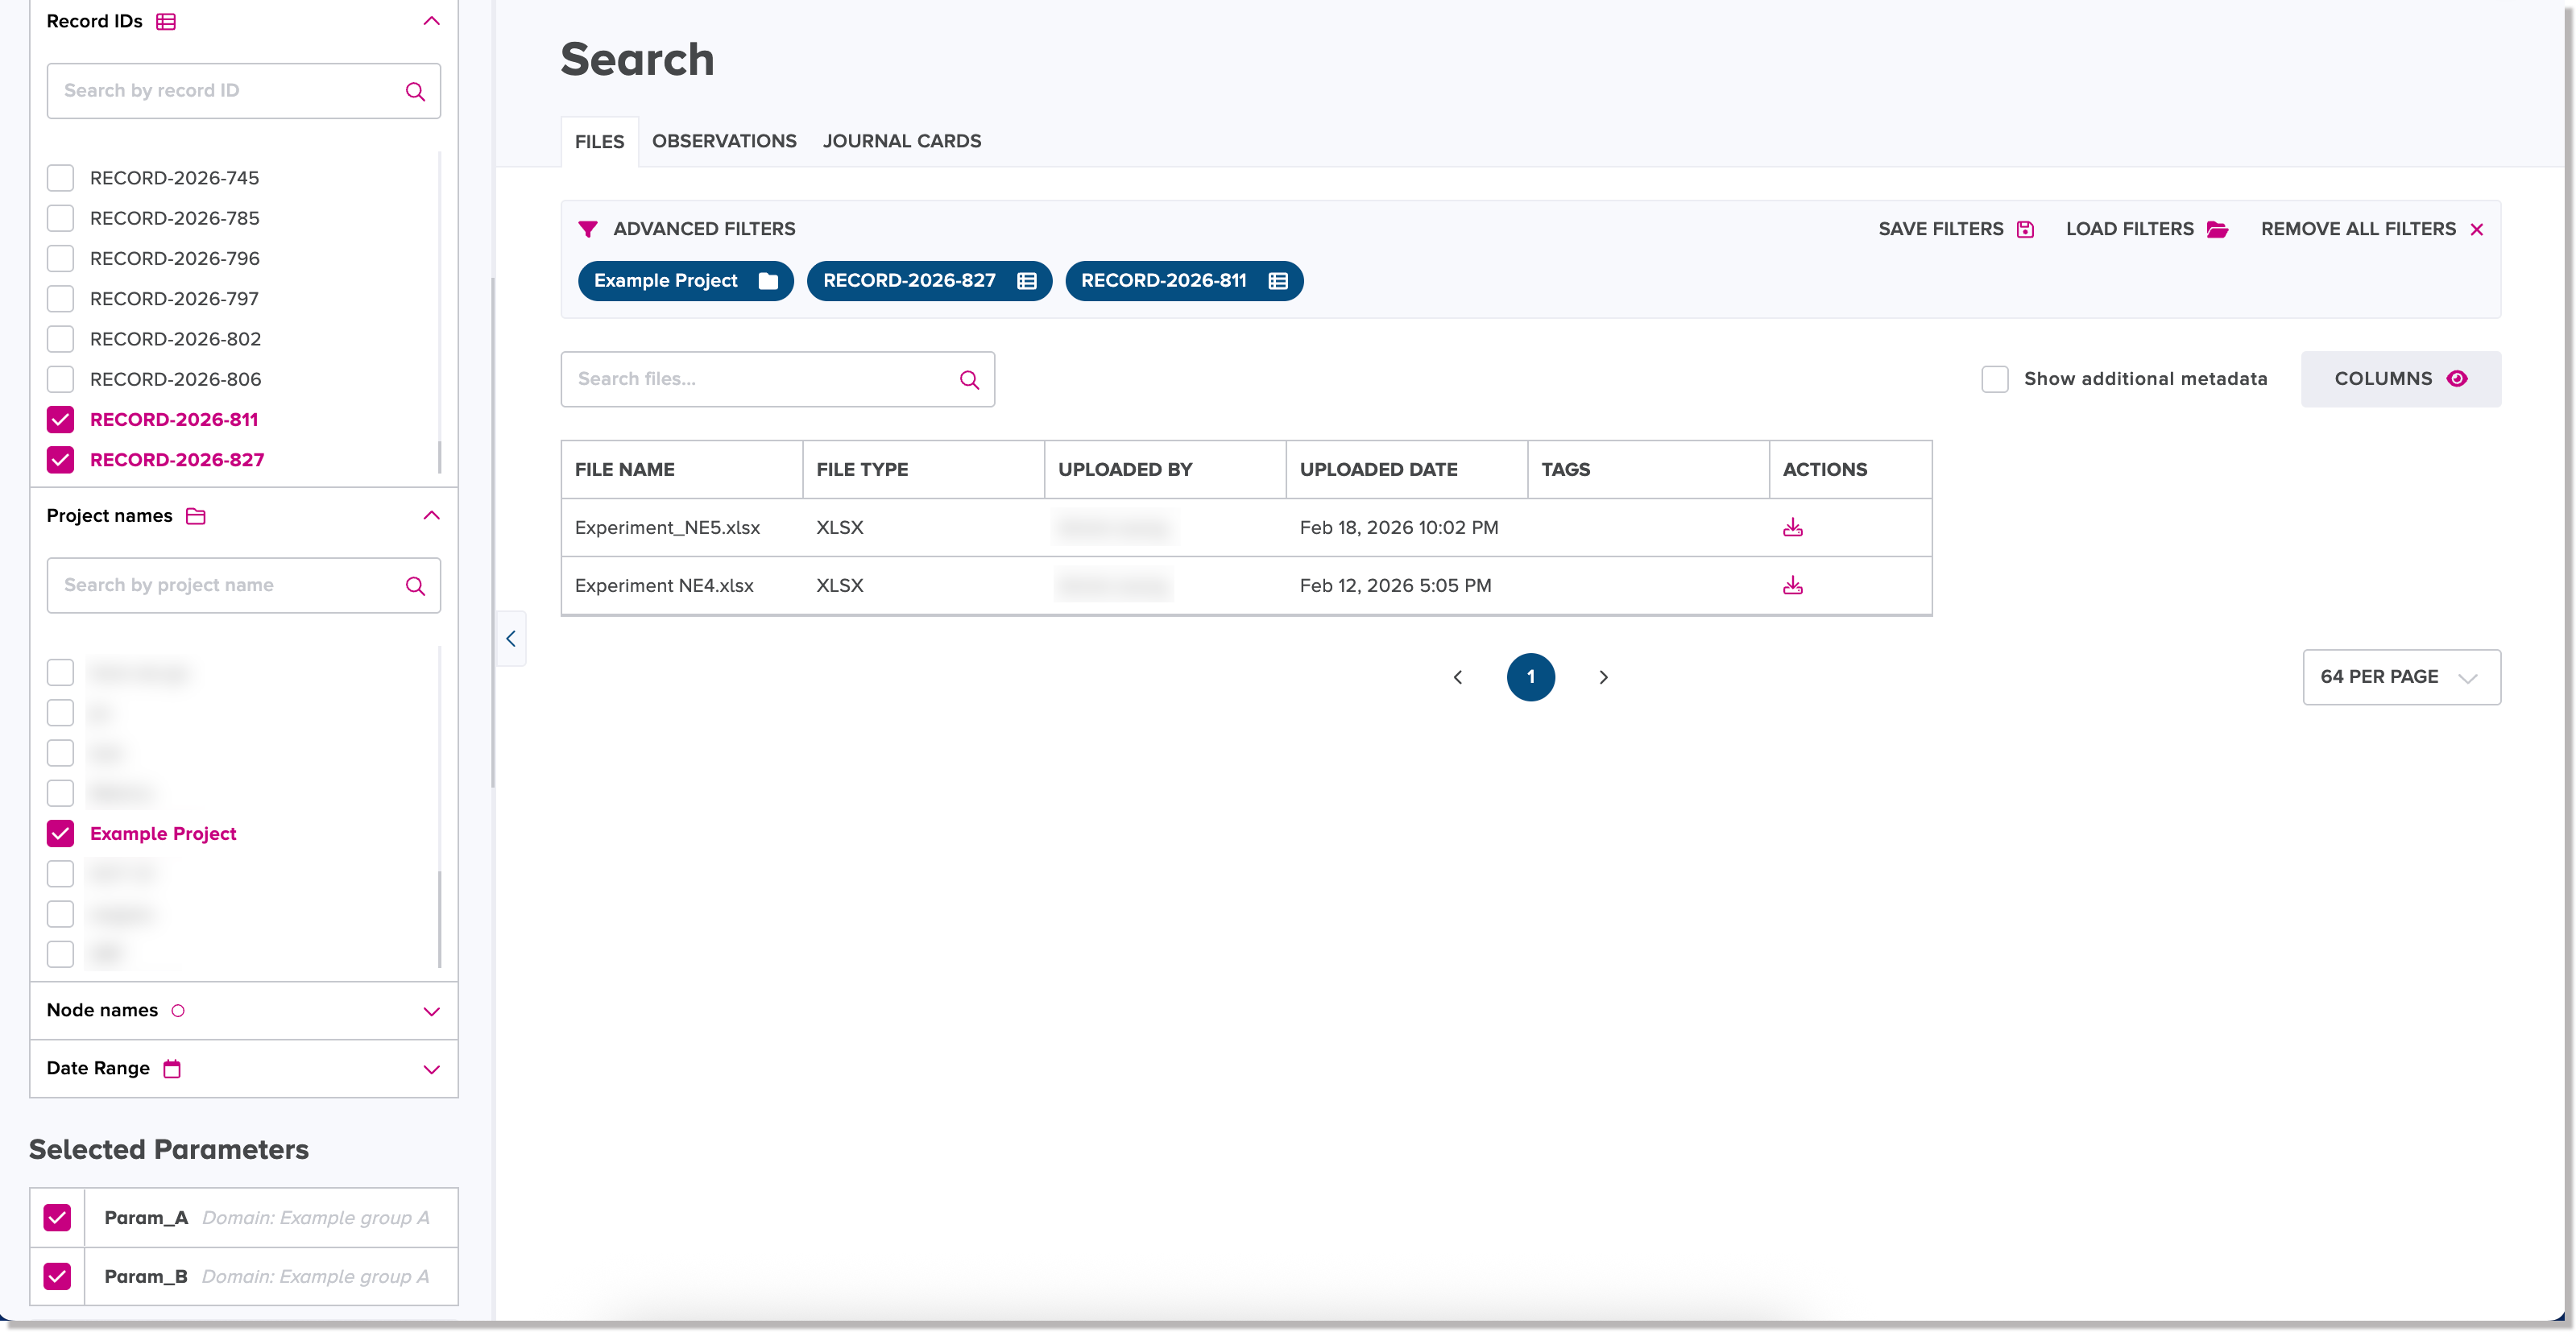
Records list - expand the panel box and select the checkbox of a record ID from the list to define a record search filter

-
Projects list - expand the panel box and select the checkbox of a project name from the list to define a project name search filter

-
Nodes list - expand the panel box and select the checkbox of a node name from the list to define a node search filter

-
Date range fields - to define a date range to search by an upload date of a file, expand the panel box, click the From date field to select earliest date of the range from a calendar chooser and/or click the To date field to select the latest date of the range from a calendar chooser, as needed

-
Parameter filters list - expand the panel box and select the checkbox of a parameter name from the list to define a parameter search filter.

To narrow the list of parameters to choose from, you can use either of the following features:
-
Use the search parameters field to type in some characters to show similar or matching parameter names in the list.
-
Click or tap the Filter by domain button to display a list of domain names by which to narraw the list of parameter names
Also, if you want to sort the list of parameter names either alphabetically or by created date, click the Sort button and select your preferred option to sort by.
-
-
Metrics list - from the panel box, select the checkboxes one or more metric names to define metric search filters.
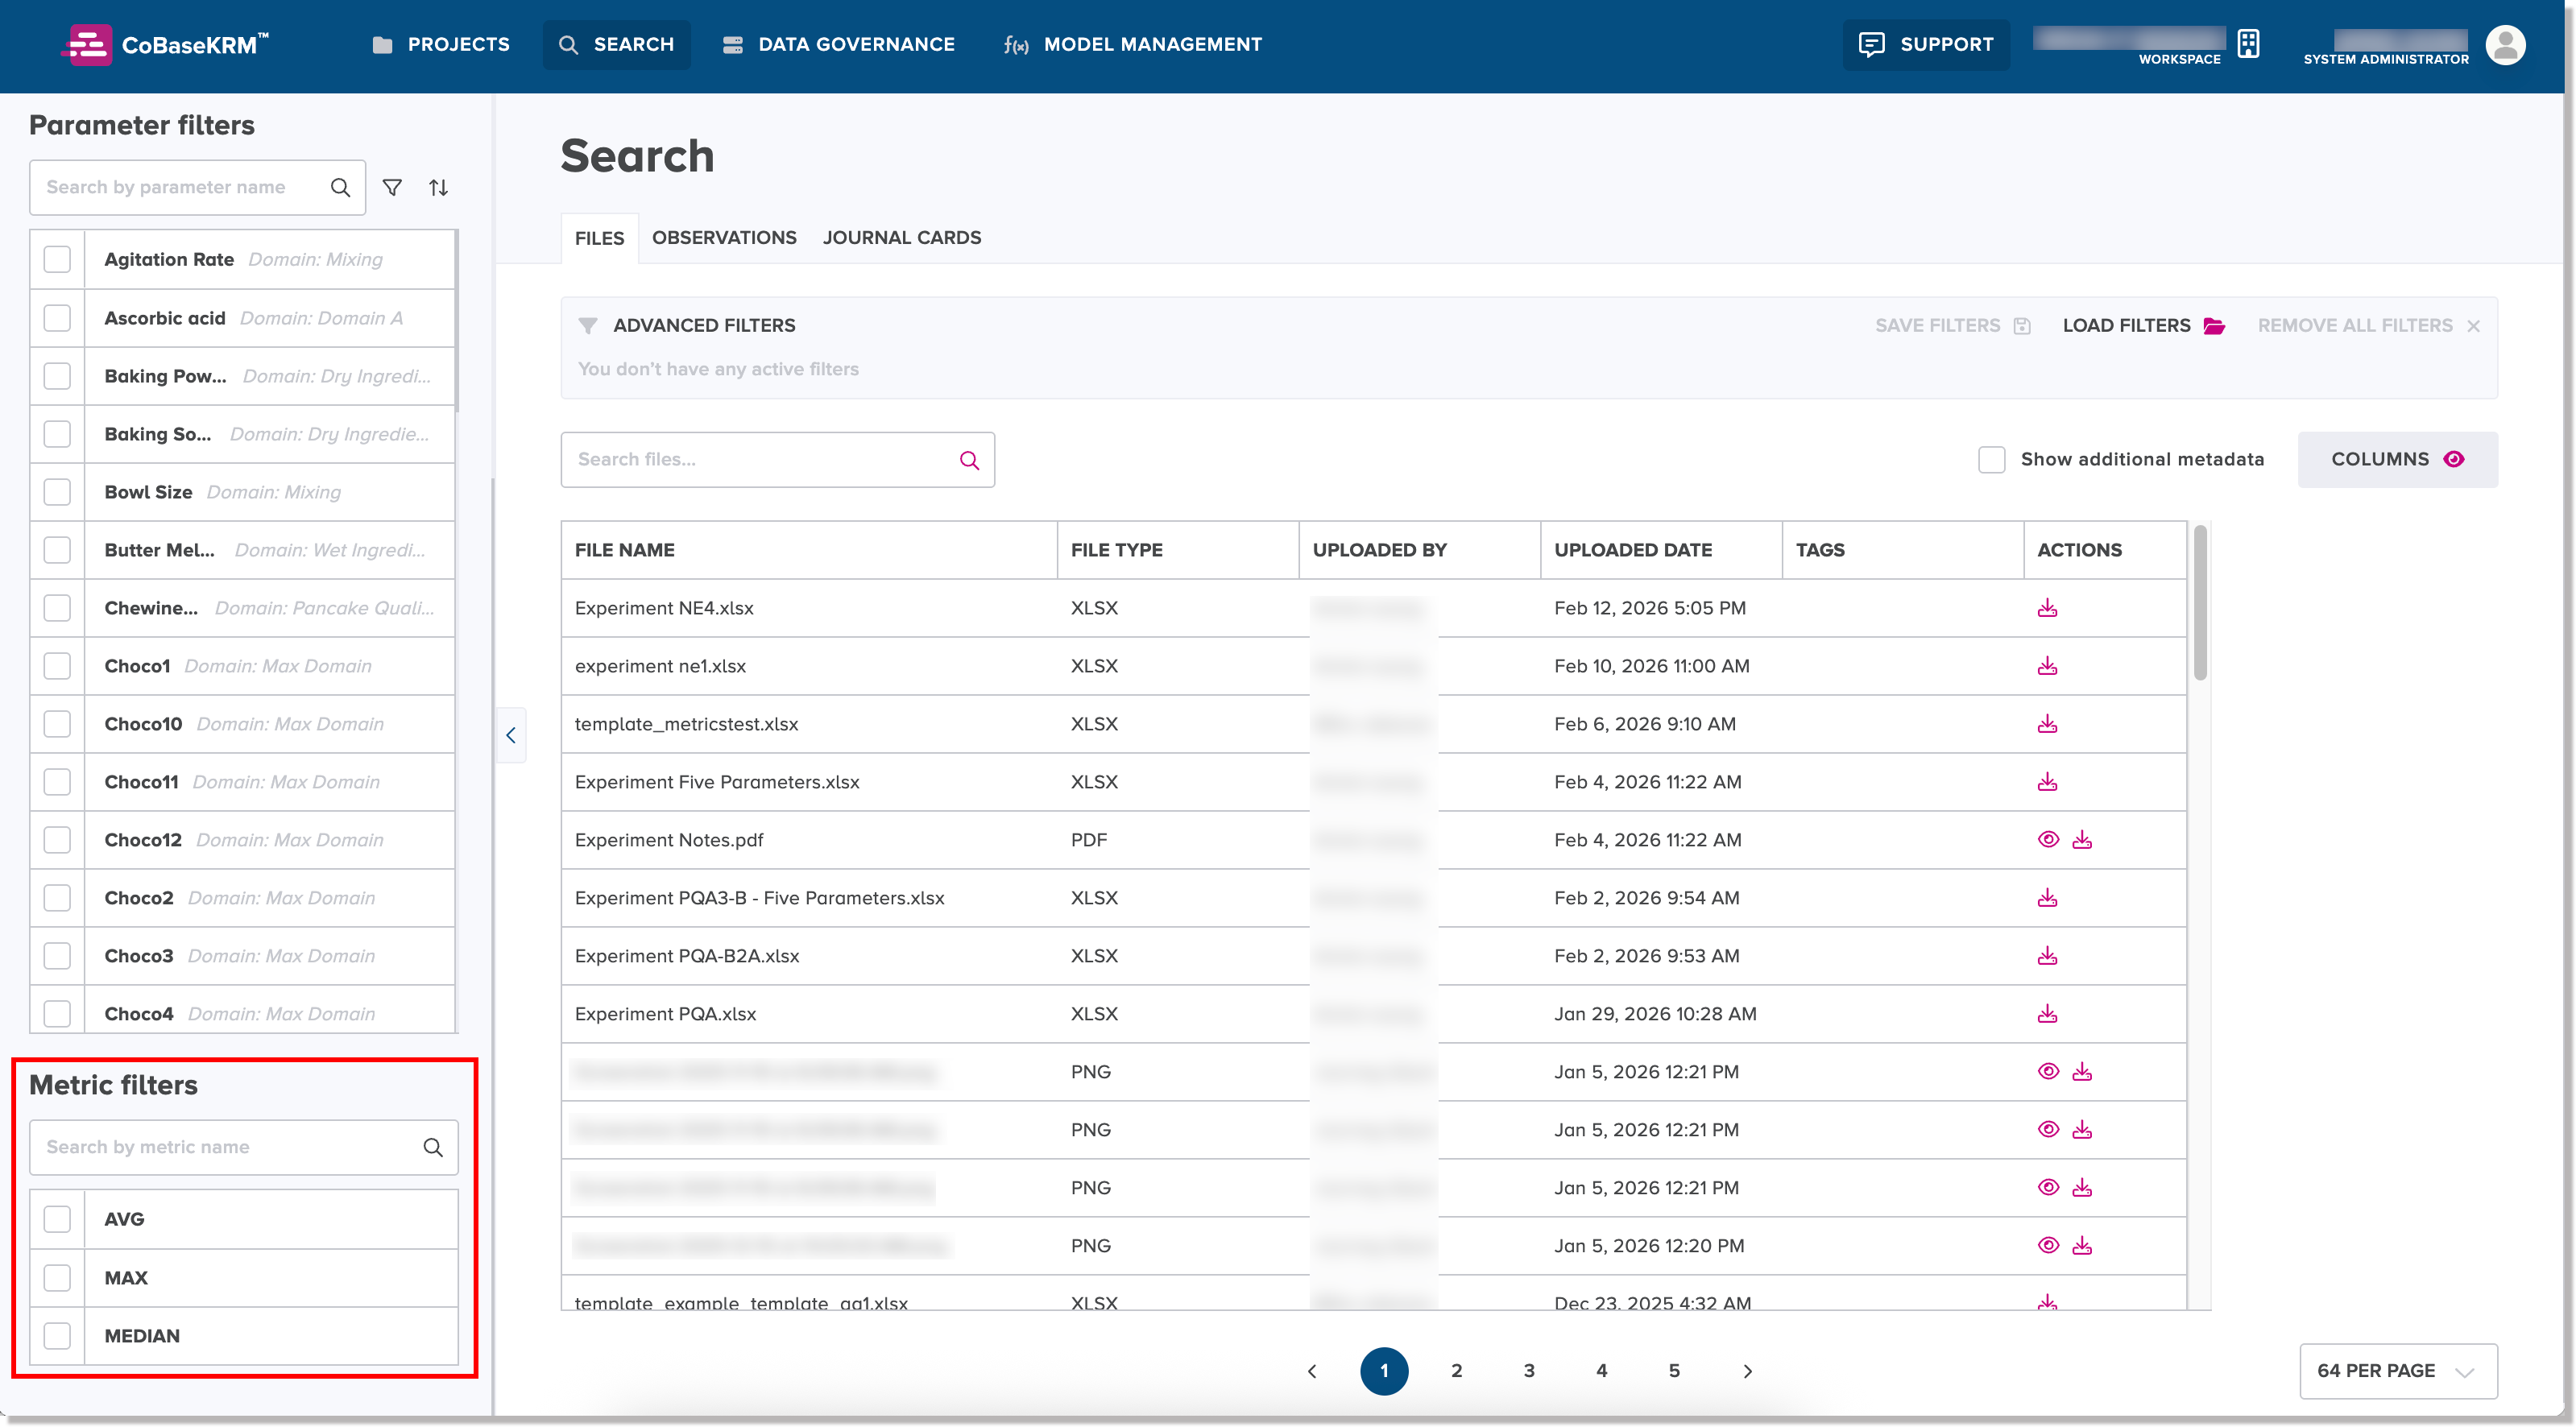
To narrow the list of metrics to choose from, you can use either of the following features, use the search metrics field to type in some characters to filter similar or matching metric names in the list.
View matching files in search results
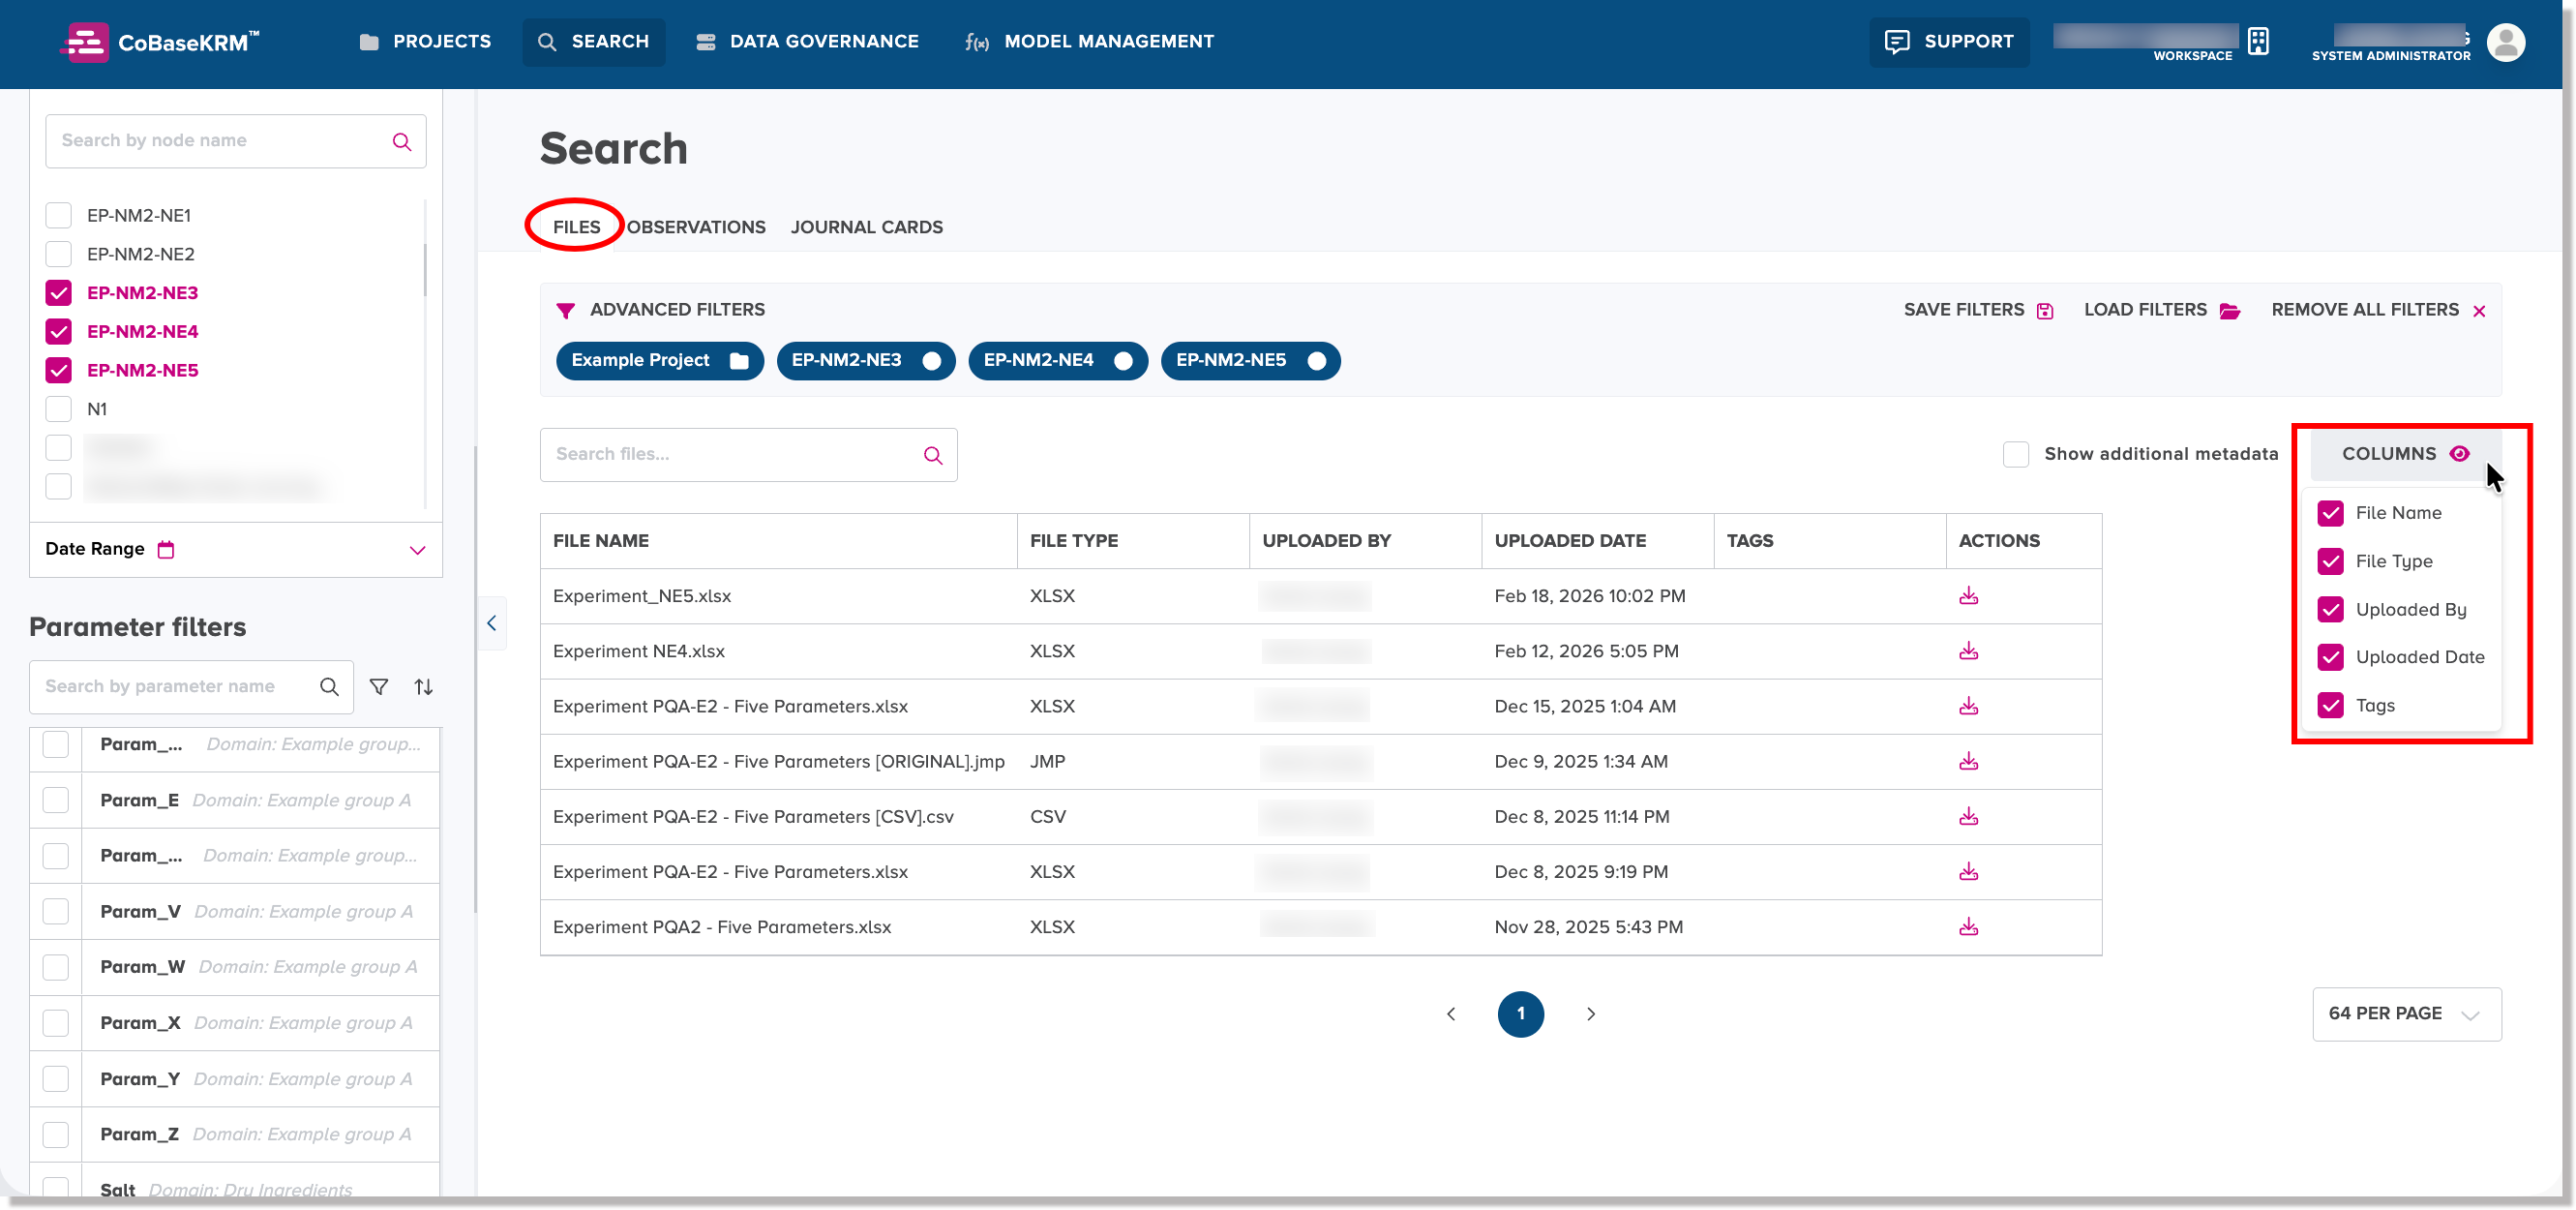
Files that match your search filters are displayed in the search results table on the Files tab. By default, the columns of details that are displayed for files in search results are: file name, file type, username of the user who uploaded the file, upload date,and assigned tag names.

Results features on the Files tab
You can use the following results features to change the display of search results:
-
Show additional metadata checkbox - when this feature is turned on, additional columns of metadata (for project name, related node name, and record ID) for the files are displayed in the search results. This feature is turned off to hide the above metadata columns by default.

-
Columns display menu - when you open the Columns menu, it lists the column names in the search results and their corresponding checkboxes turned on by default to show thse columns. To hide one or more of the columns, turn off the corresponding checkbox.
Note
When the Show additional metadata checkbox is turned on, the the Columns display menu will also include the metadata columns in the full list, so you can hide or show them, as desired.

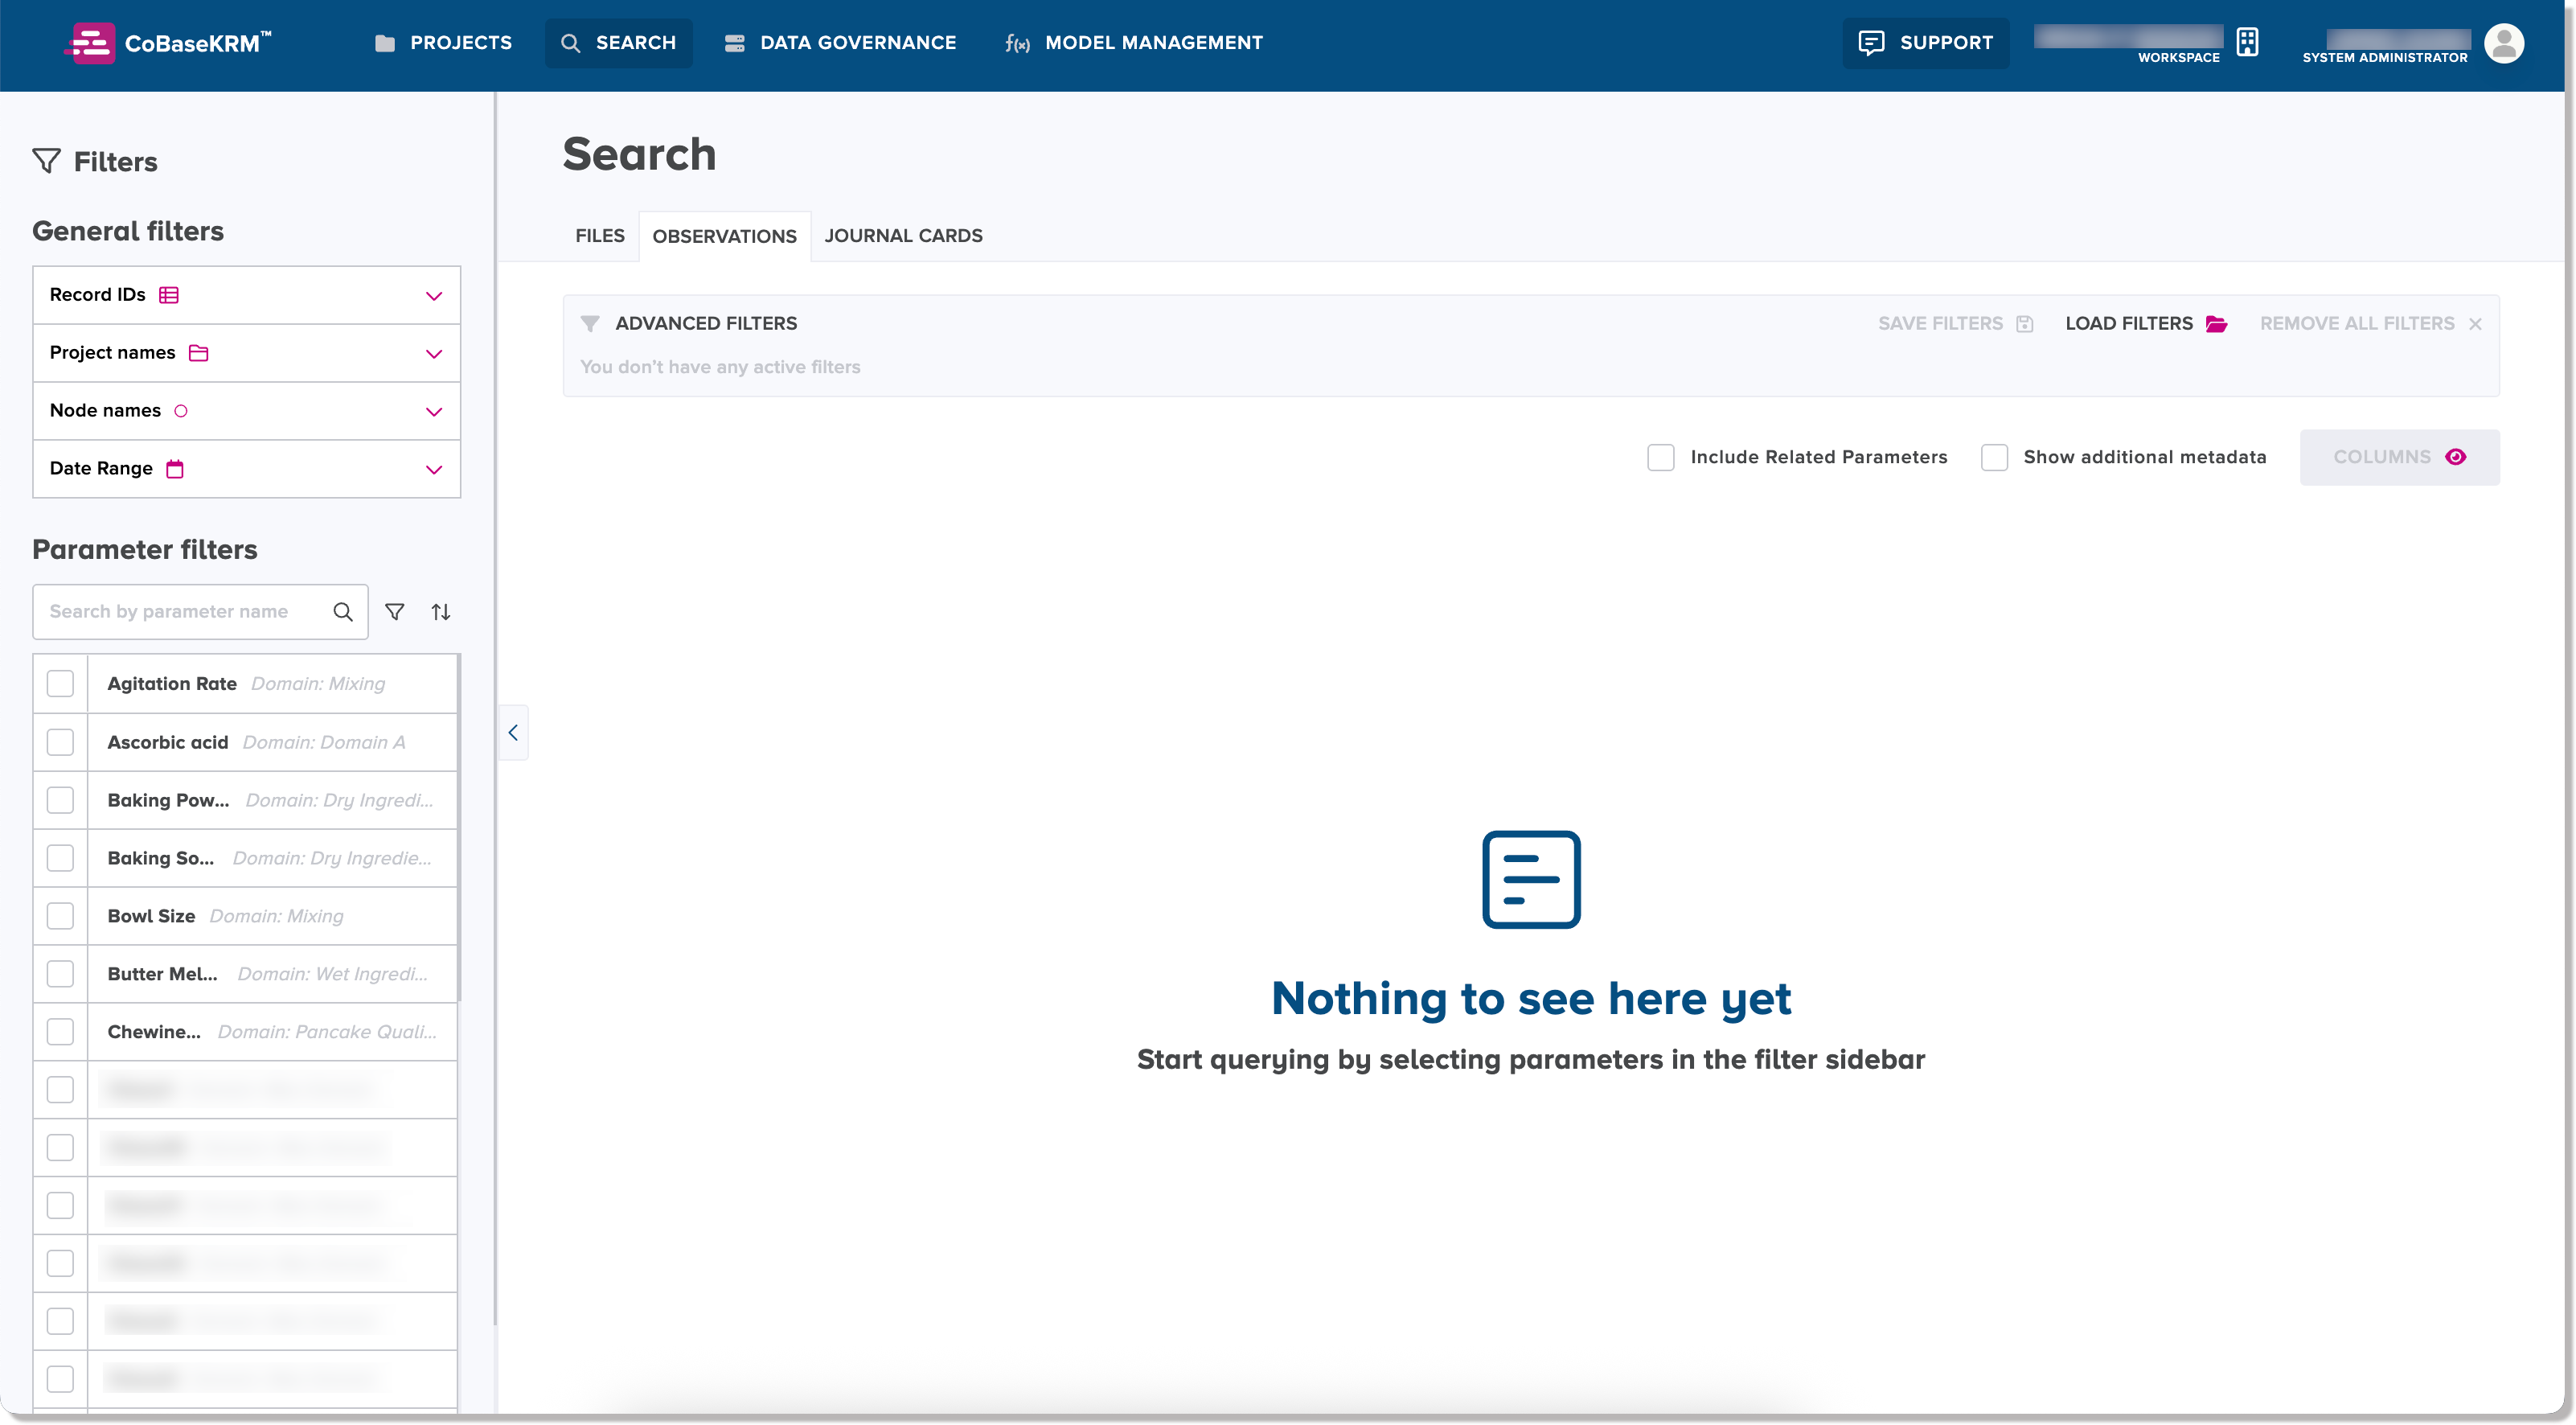
Perform a search for observations
The Observations tab in the Search view is used to perform a general search for observations that are saved in the database.
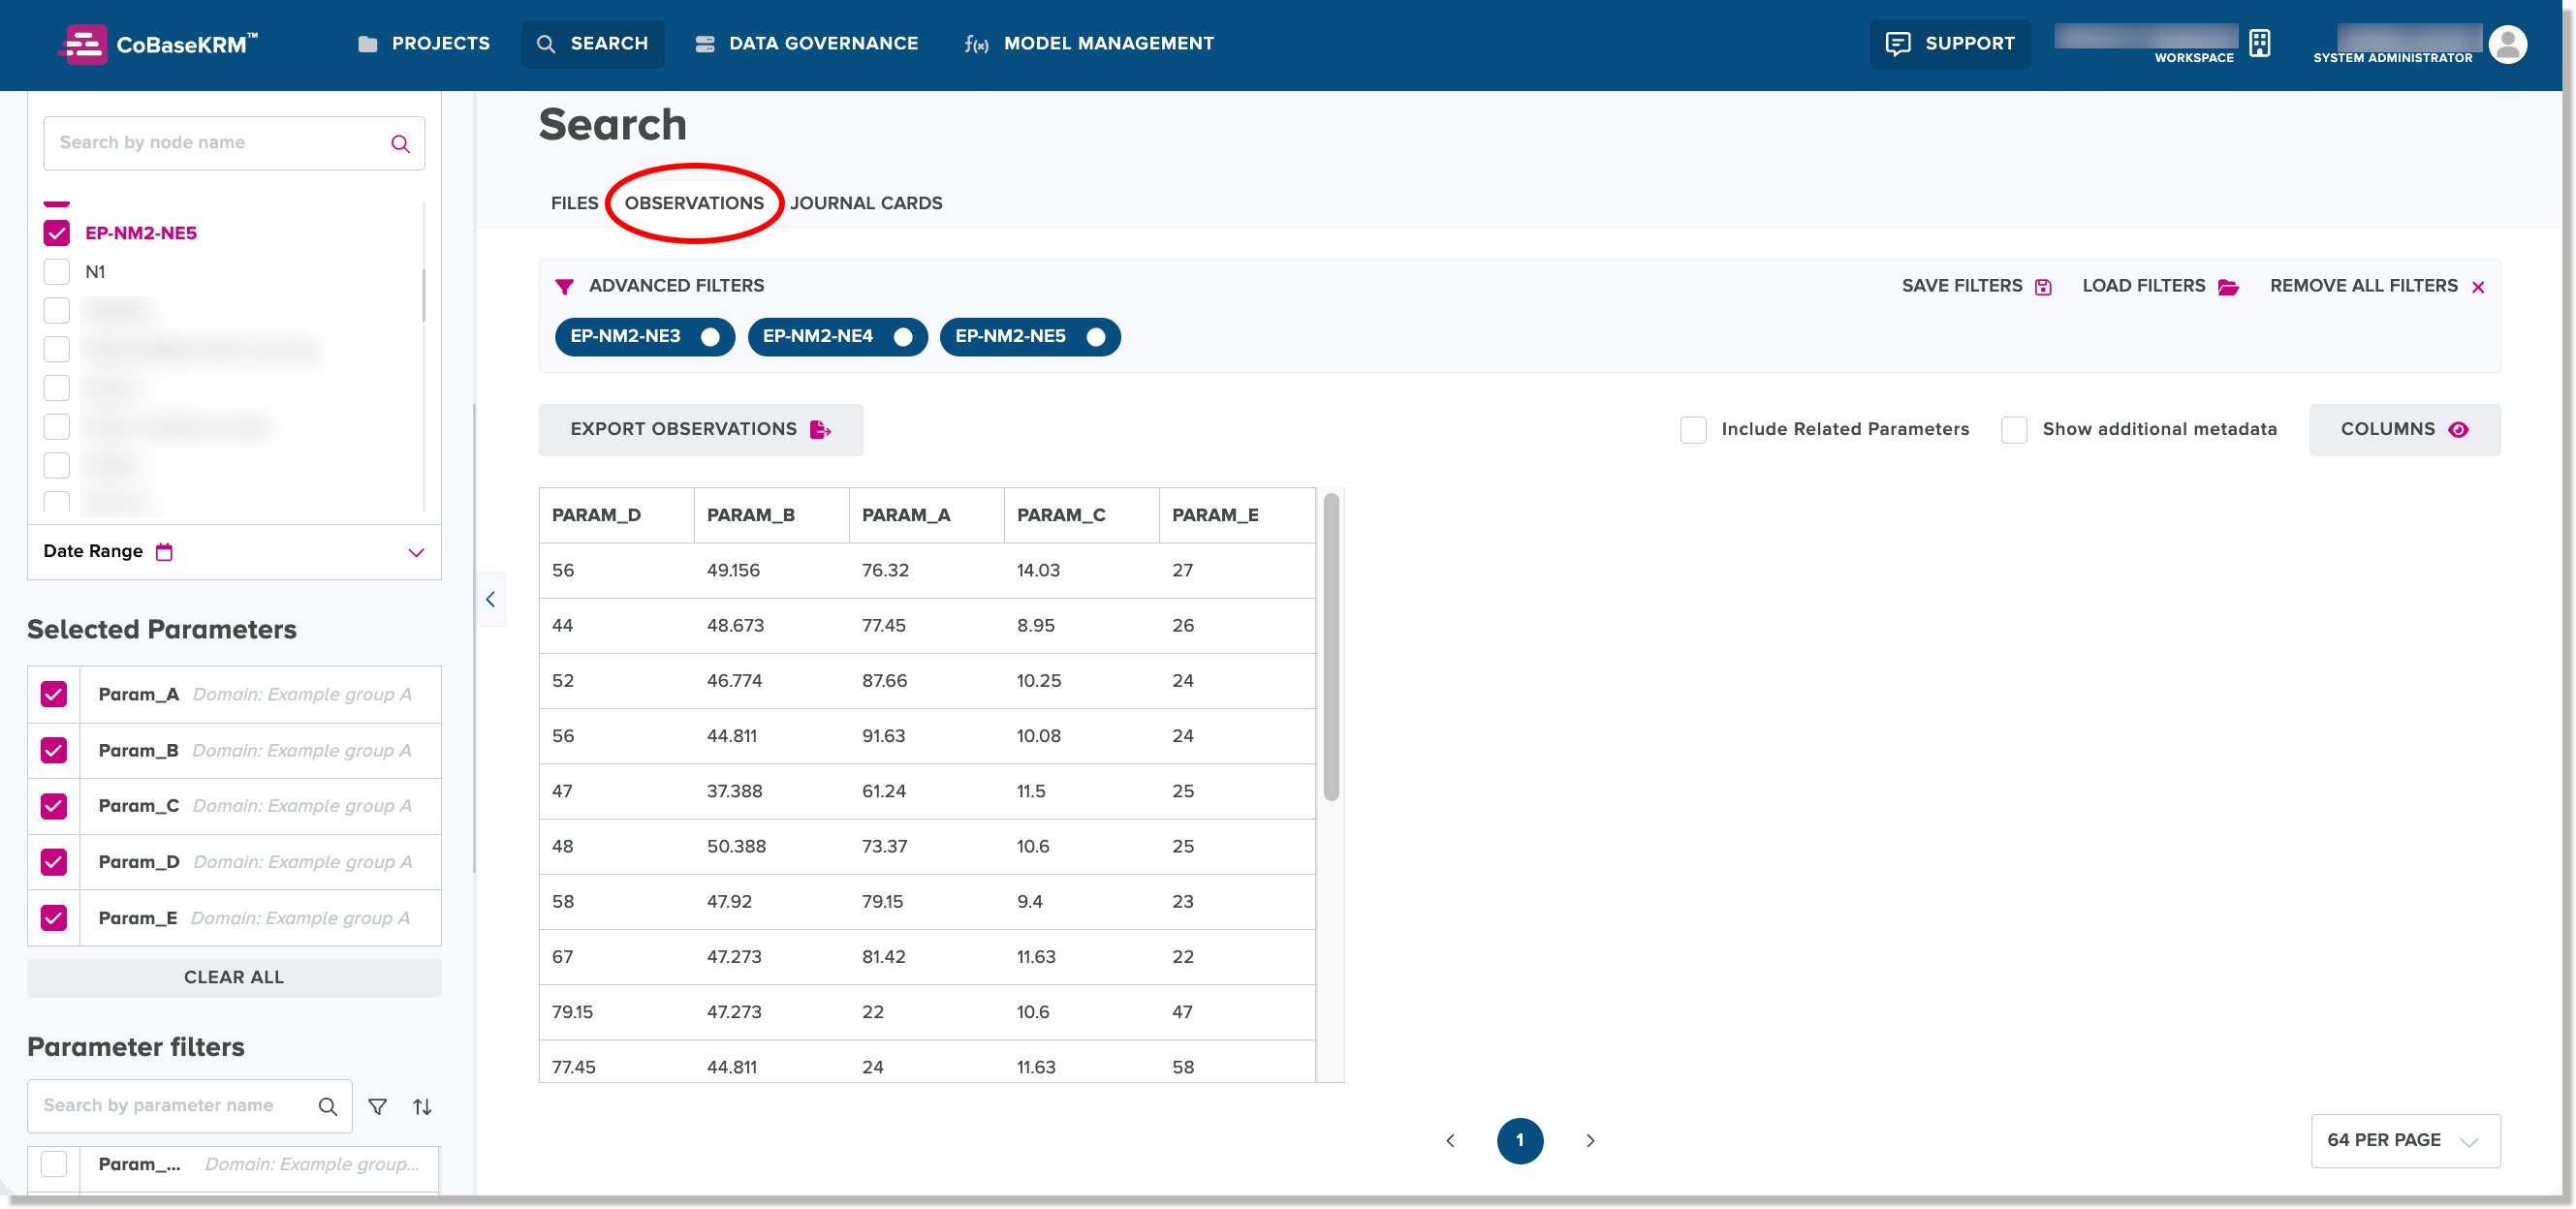
Select search filters for observations
In the left panel of the Search view, you can choose from the following objects to be defined as search filters to narrow your search for observations.
Notes
For each object name shown, click or tap the chevron down (![]() ) icon to expand the corresponding panel to show a list of object names or IDs.
) icon to expand the corresponding panel to show a list of object names or IDs.
To narrow an object list for easier selection, use the search field above each list of object names or IDs to define characters to narrow your selection by.
-
Records panel box - expand the panel box and select the checkbox of a record ID from the list to define a record search filter
-
Projects panel box - expand the panel box and select the checkbox of a project name from the list to define a project name search filter
-
Nodes panel box - expand the panel box and select the checkbox of a node name from the list to define a node search filter
-
Date range panel box - to define a date range to search by an upload date of observations, expand the panel box, click the From date field to select earliest date of the range from a calendar chooser and/or click the To date field to select the latest date of the range from a calendar chooser, as needed.
-
Parameter filterss list - expand the panel box and select the checkbox of a parameter name from the list to define a parameter search filter. To narrow the list of parameters to choose from, you can use either of the following features:
-
Use the search parameters field to type in some characters to show similar or matching parameter names in the list.
-
Click or tap the Filter by domain button to display a list of domain names by which to narraw the list of parameter names
Also, if you want to sort the list of parameter names either alphabetically or by created date, click the Sort button and select your preferred option to sort by.
-
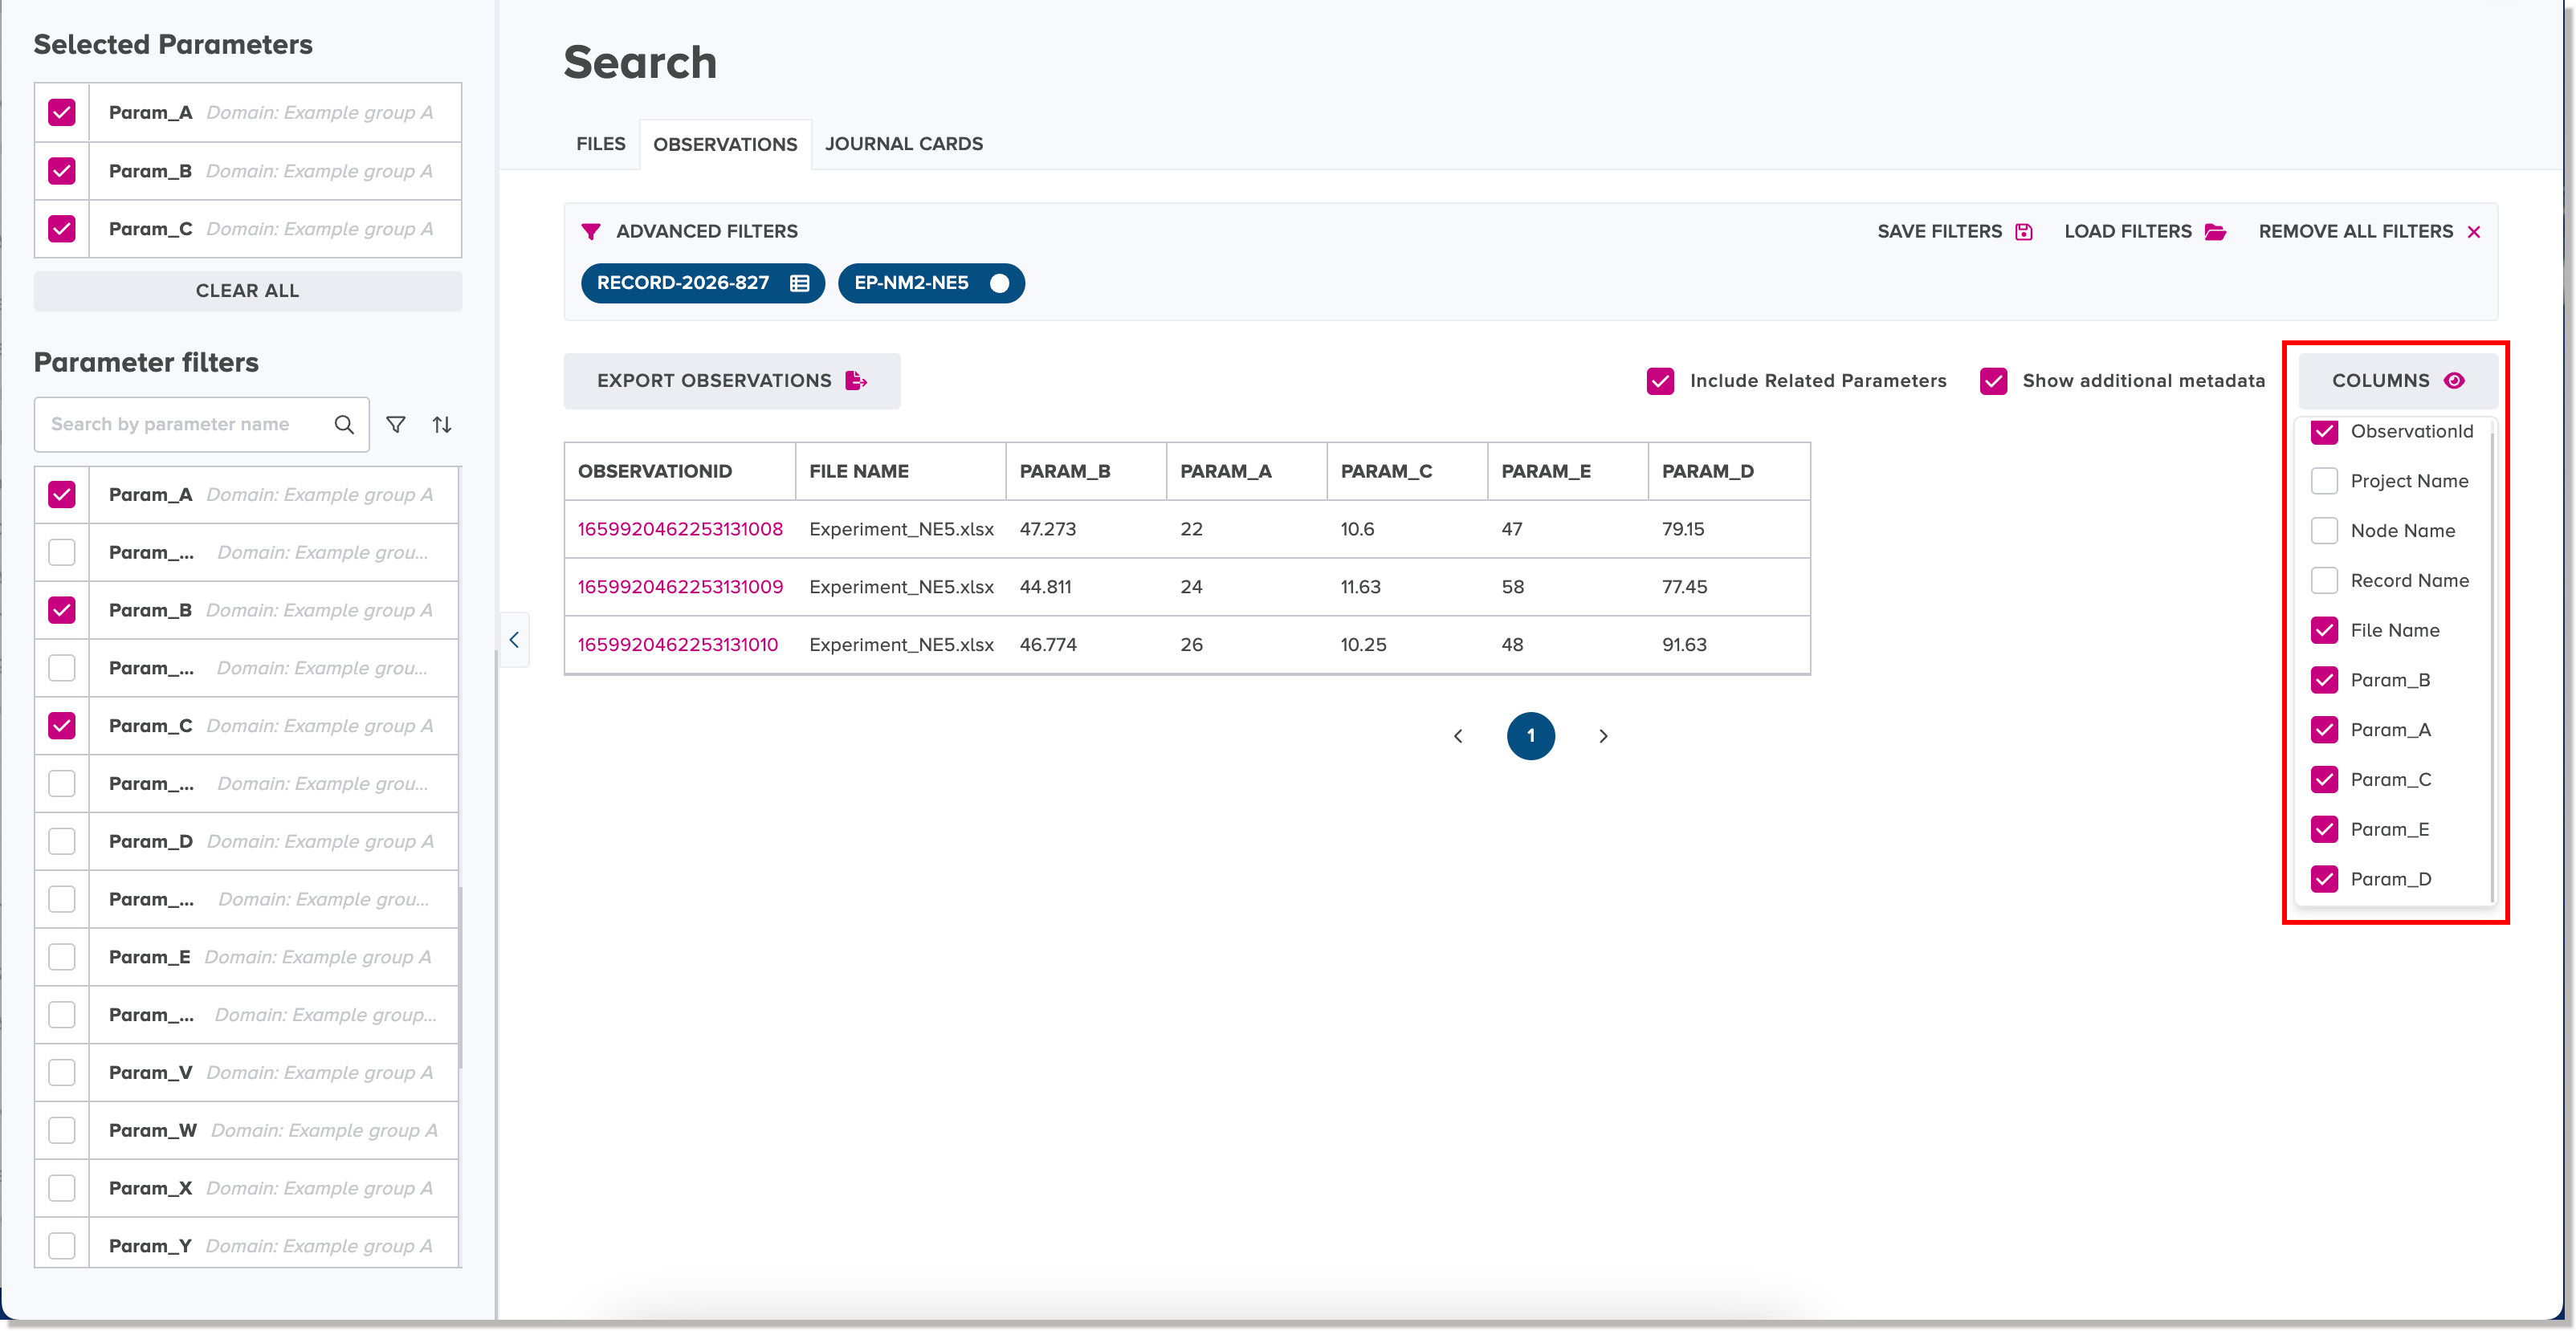
Labels of selected search filters are displayed in the top section of the right panel on the Observations tab. Selected parameter filters are displayed in the Selected Parameters list in the left panel. Search results are displayed in the bottom section of the right panel.

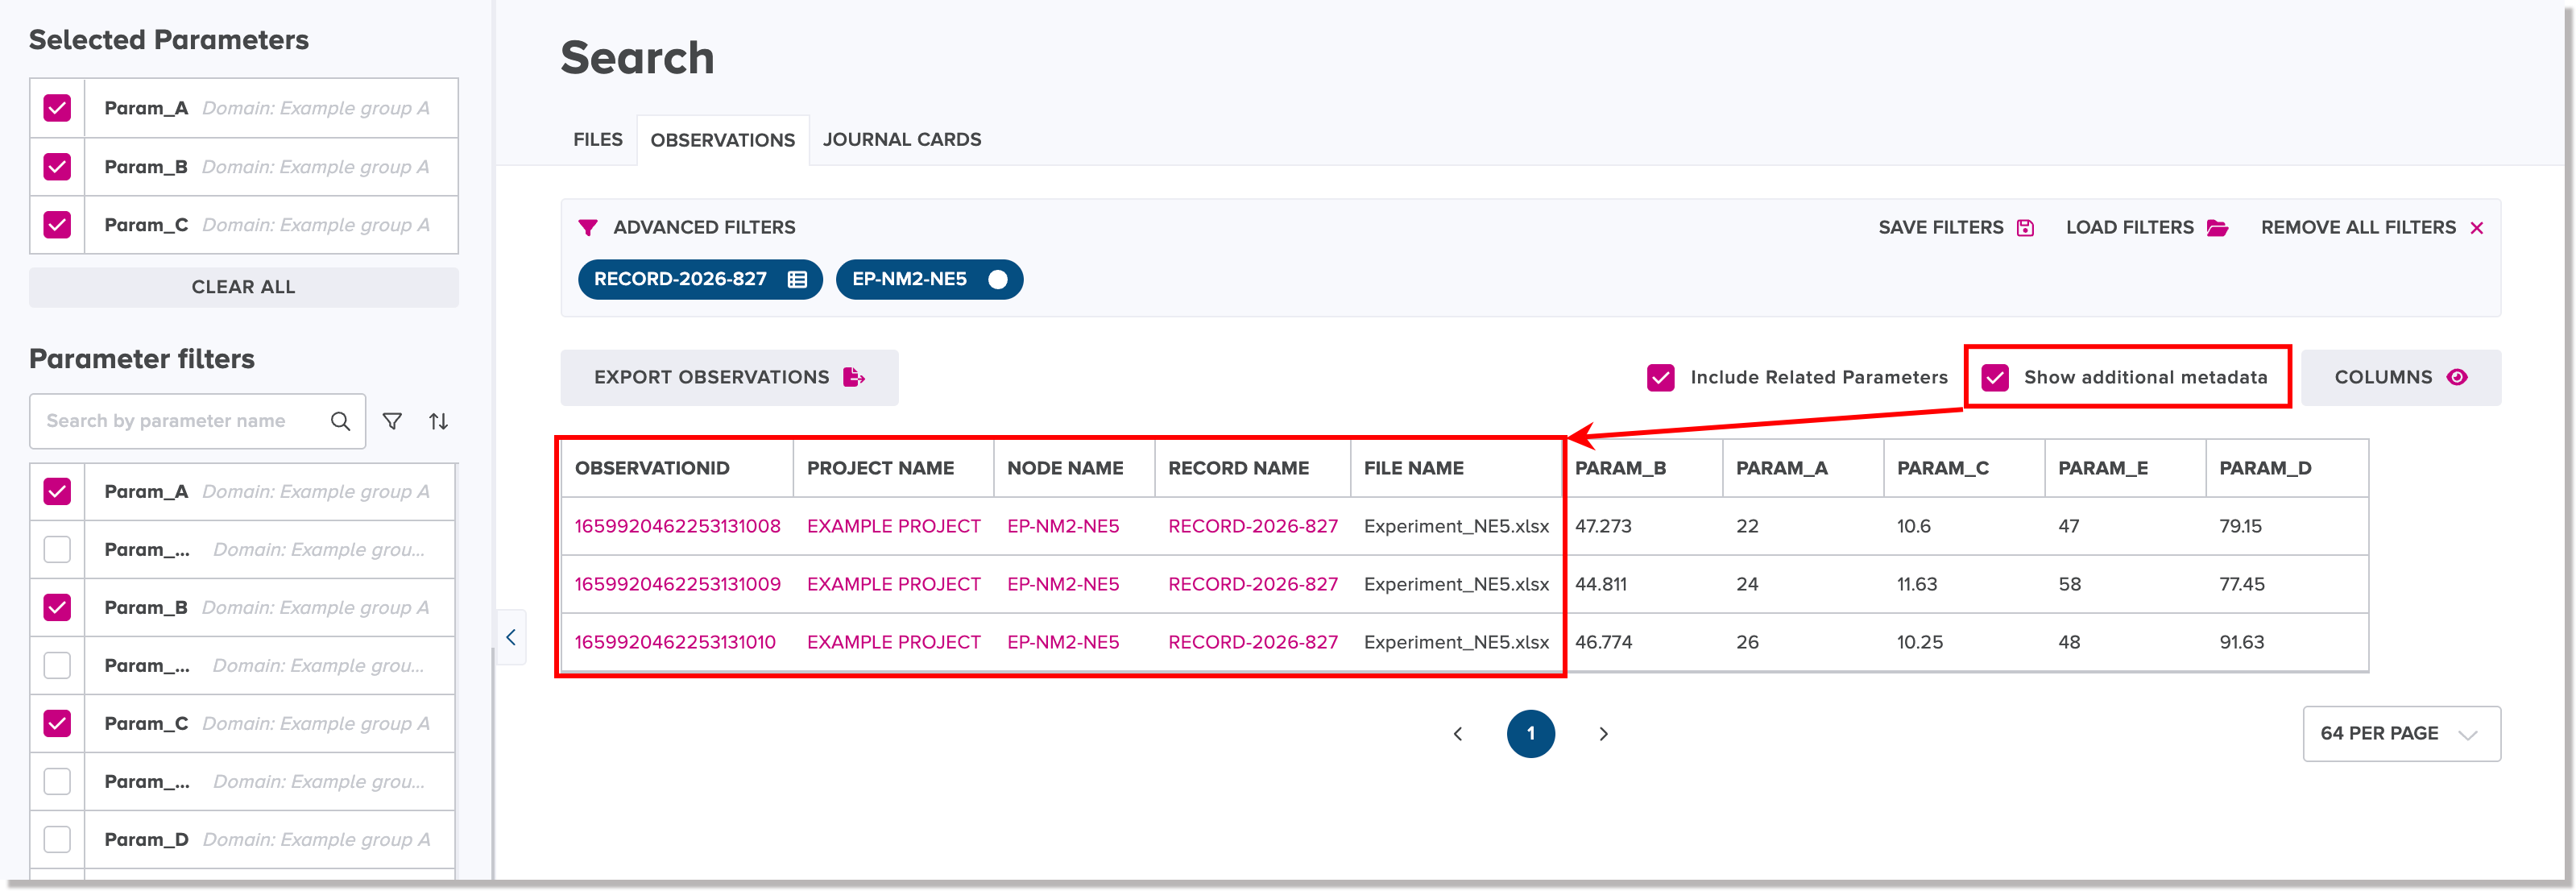
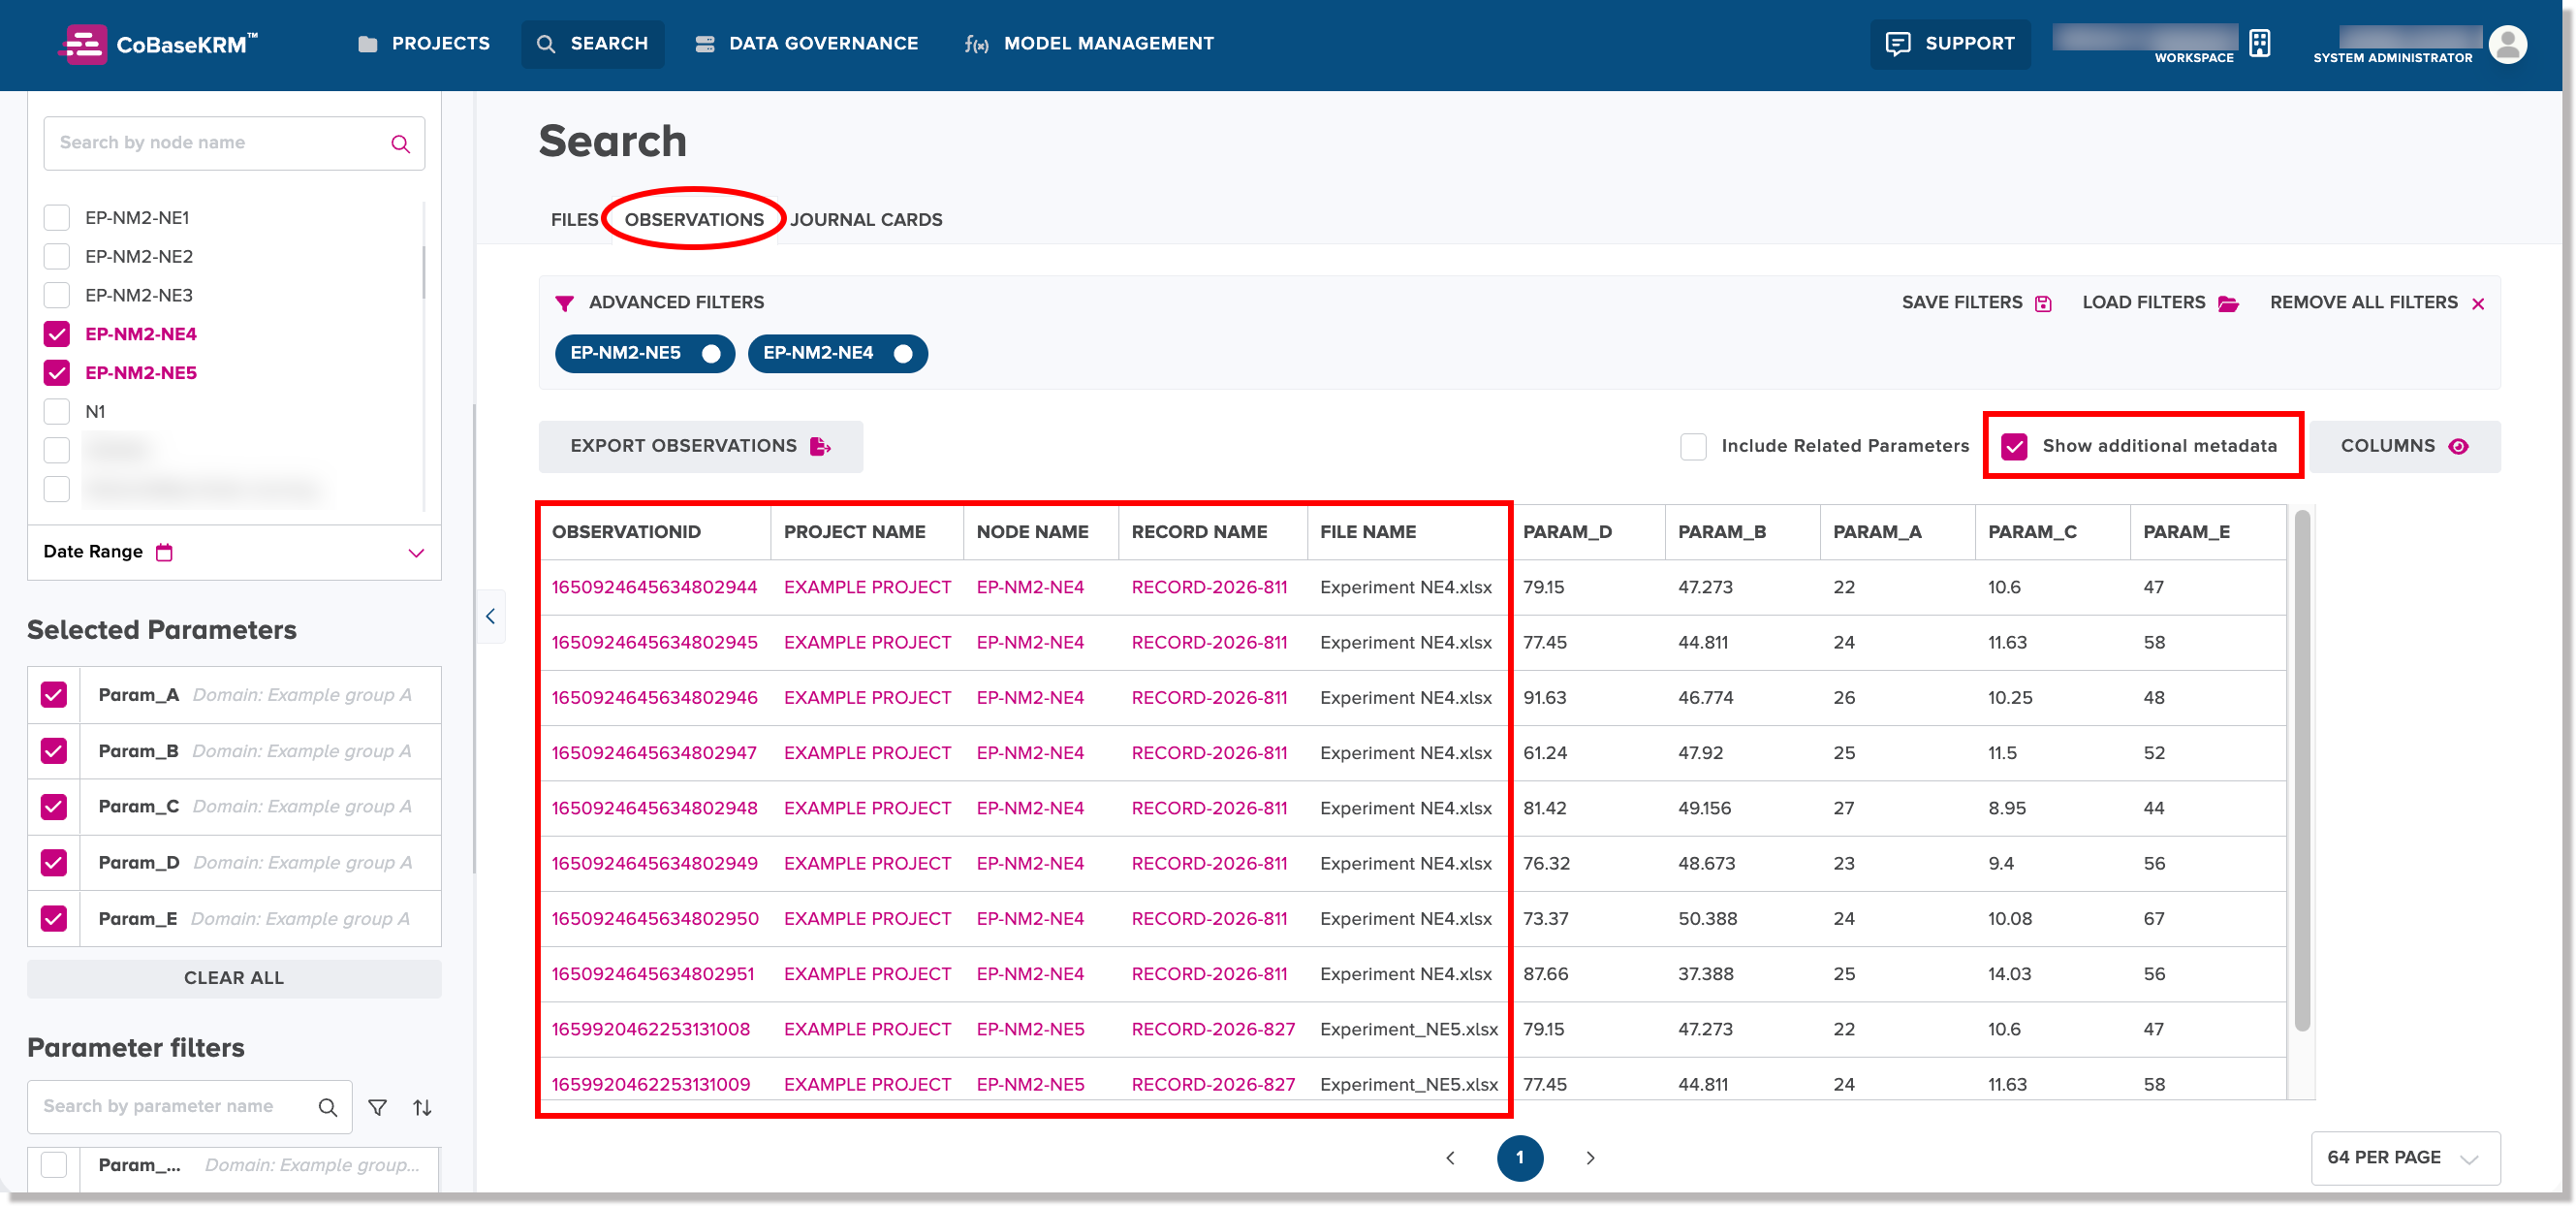
View matching observations in search results
Matching observations are filtered and displayed by selected parameters in search results.

You can use results filters to change the display of search results, as follows:
-
To show the observations of related parameters in the same data tables as the observations of selected parameters in search results, turn on the Include related parameters checkbox.

-
To display additional metadata for files in search results, turn on the Show additional metadata checkbox. This feature is turned off by default. The additional columns of metadata are for project name, related node name, and record ID, and tag names.
-
To hide particular columns from being displayed in search results:
-
Click or tap Columns to view a drop-down list of checkboxes and names of columns, which are shown in the search results by default.

-
Turn off the checkboxes for the columns that you want to hide.
Note
When the Include related parameters checkbox and Show additional metadata checkbox are turned on, the corresponding extra column names and checkboxes will be displayed in the Columns drop-down list, so you can hide one or more individual extra columns, if desired.
-
Perform a search for journal cards
The Journal cards tab in the Search view is used to perform a general search for journal cards that are saved in the database.
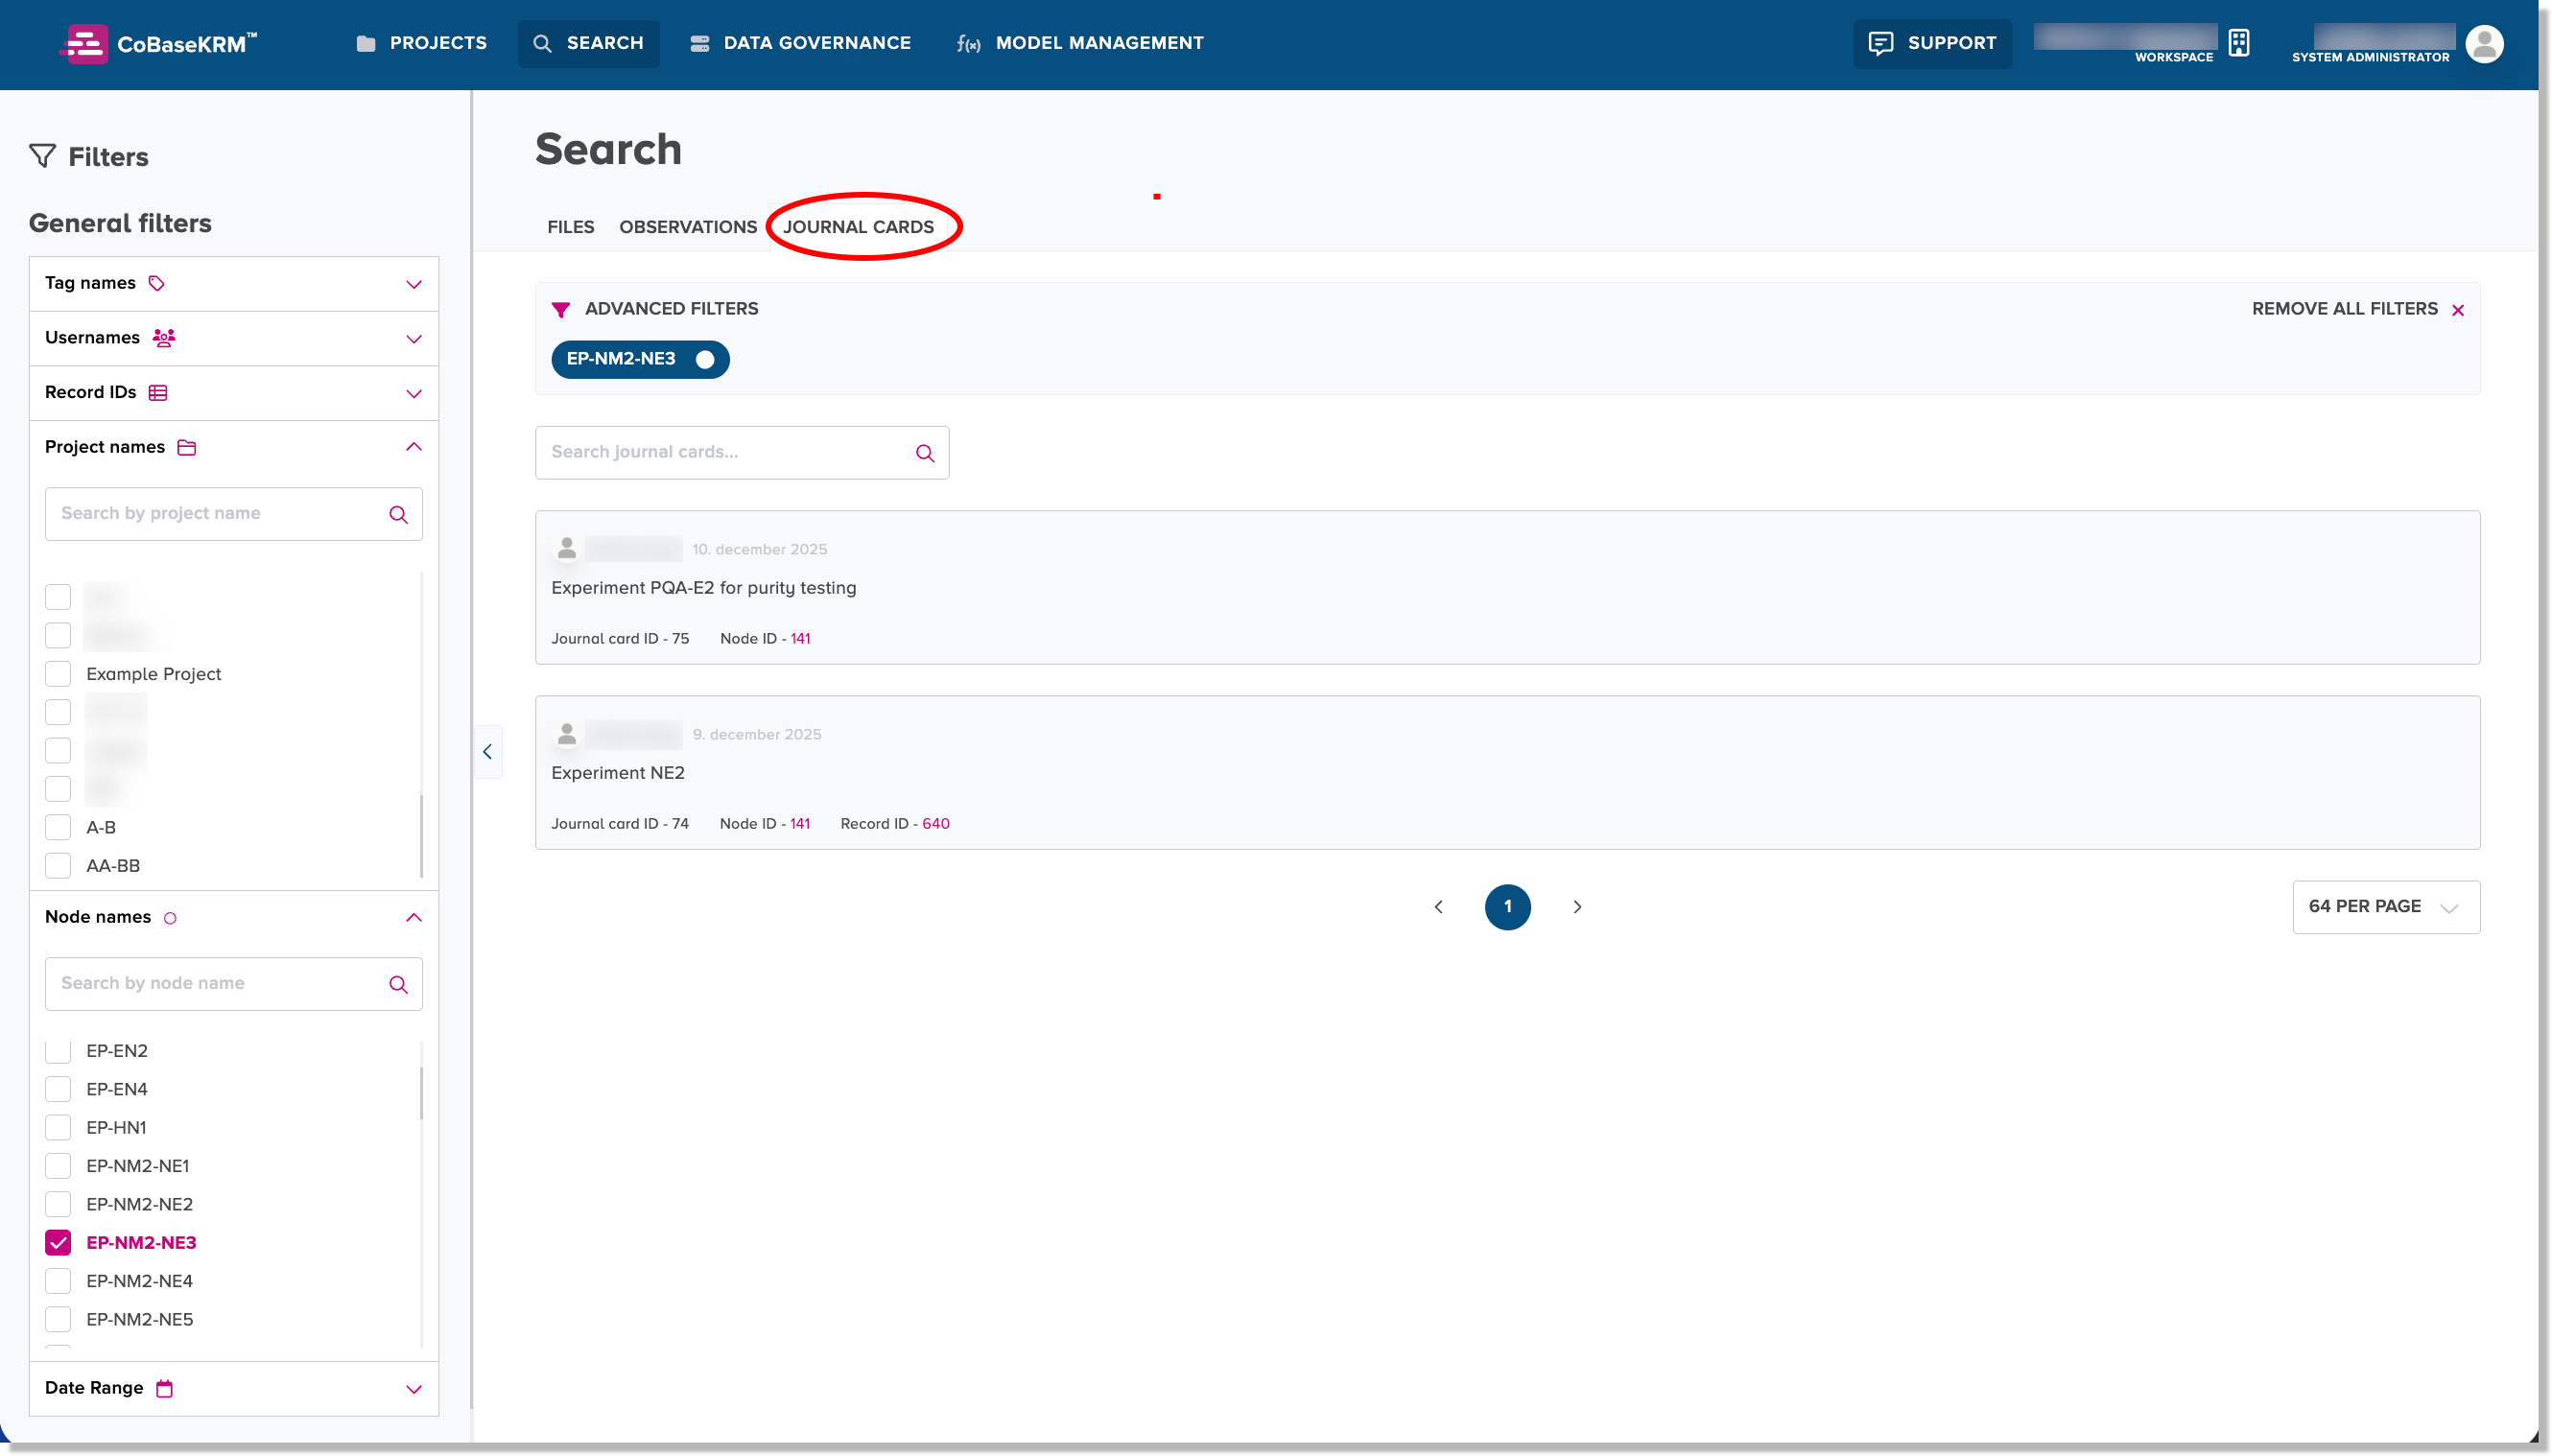
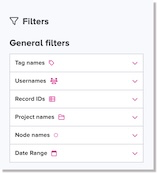
Select filters for narrowing a search for journal cards
In the left panel of the Search view, you can choose from the following objects to be defined as search filters to narrow your search.
Notes
For each object name shown, click or tap the chevron down (![]() ) icon to expand the corresponding panel to show a list of object names or IDs.
) icon to expand the corresponding panel to show a list of object names or IDs.
To narrow an object list for easier selection, use the search field above each list object names or IDs
-
Tag names panel box - select the checkbox of a tag name to define it as a search filter
-
Users panel box - select the checkbox of a username to define it as a search filter
-
Records panel box - select the checkbox of a record ID to define it as a search filter
-
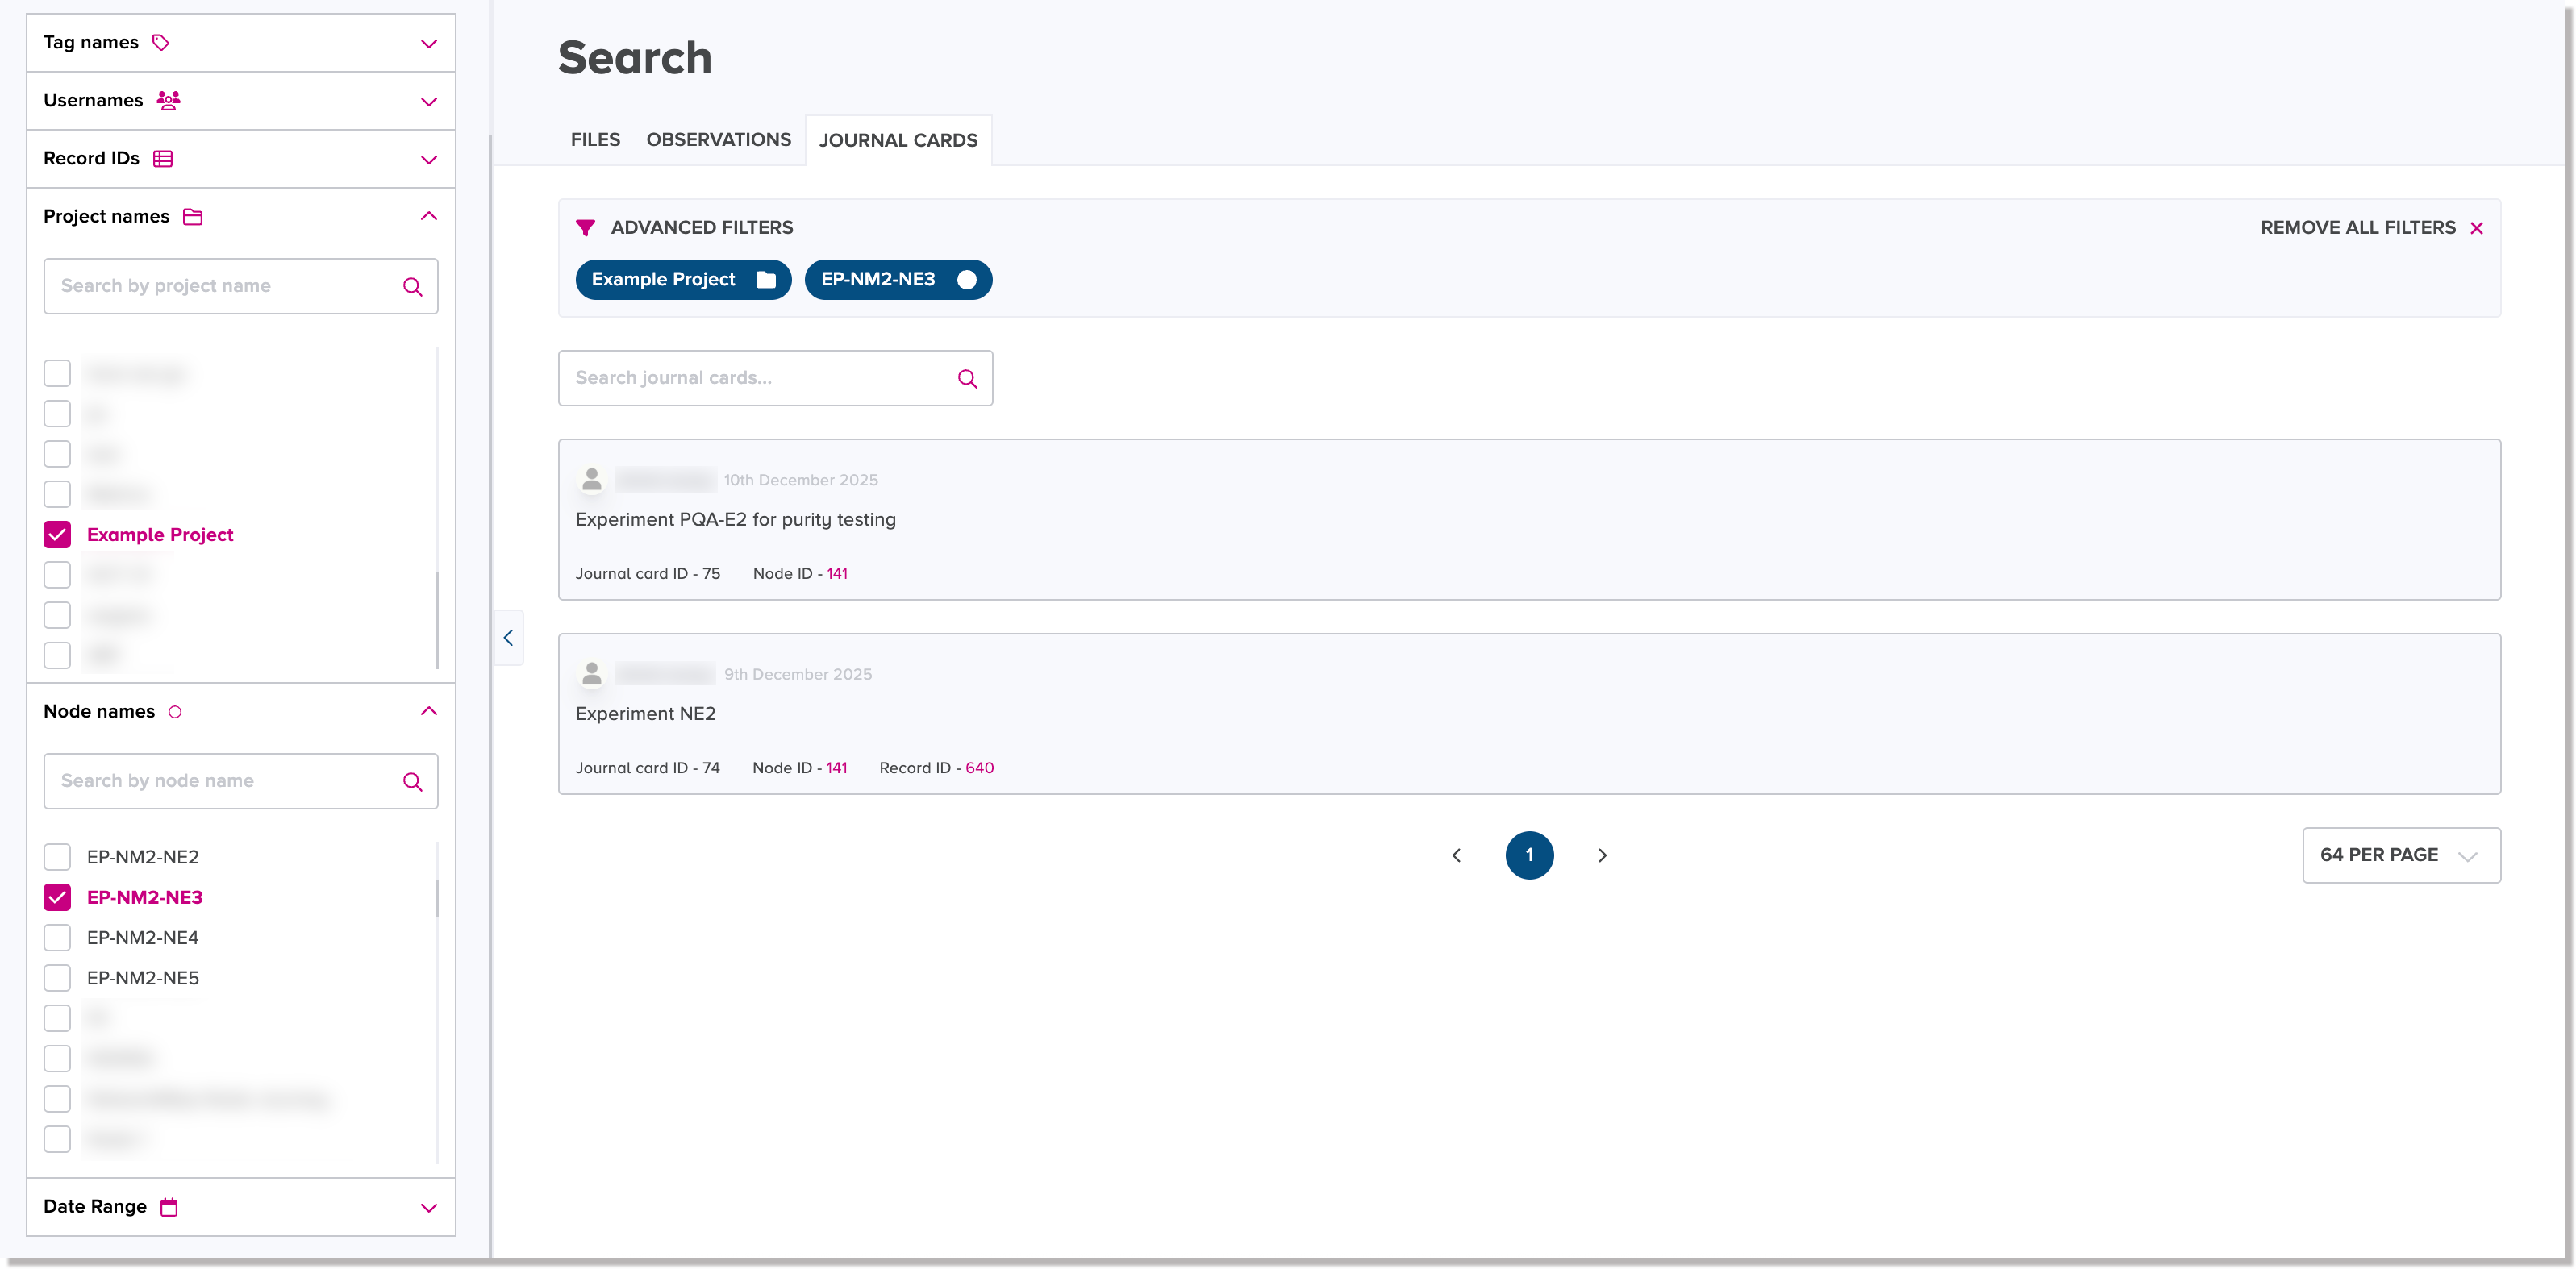
Projects panel box - select the checkbox of a project name to define it as a search filter
-
Nodes panel box - select the checkbox of a node name to define it as a search filter
-
Date range panel box - define a date range in which a journal card was saved
-
Available parameters list - expand the panel box and select the checkbox of a parameter name from the list to define a parameter name filter
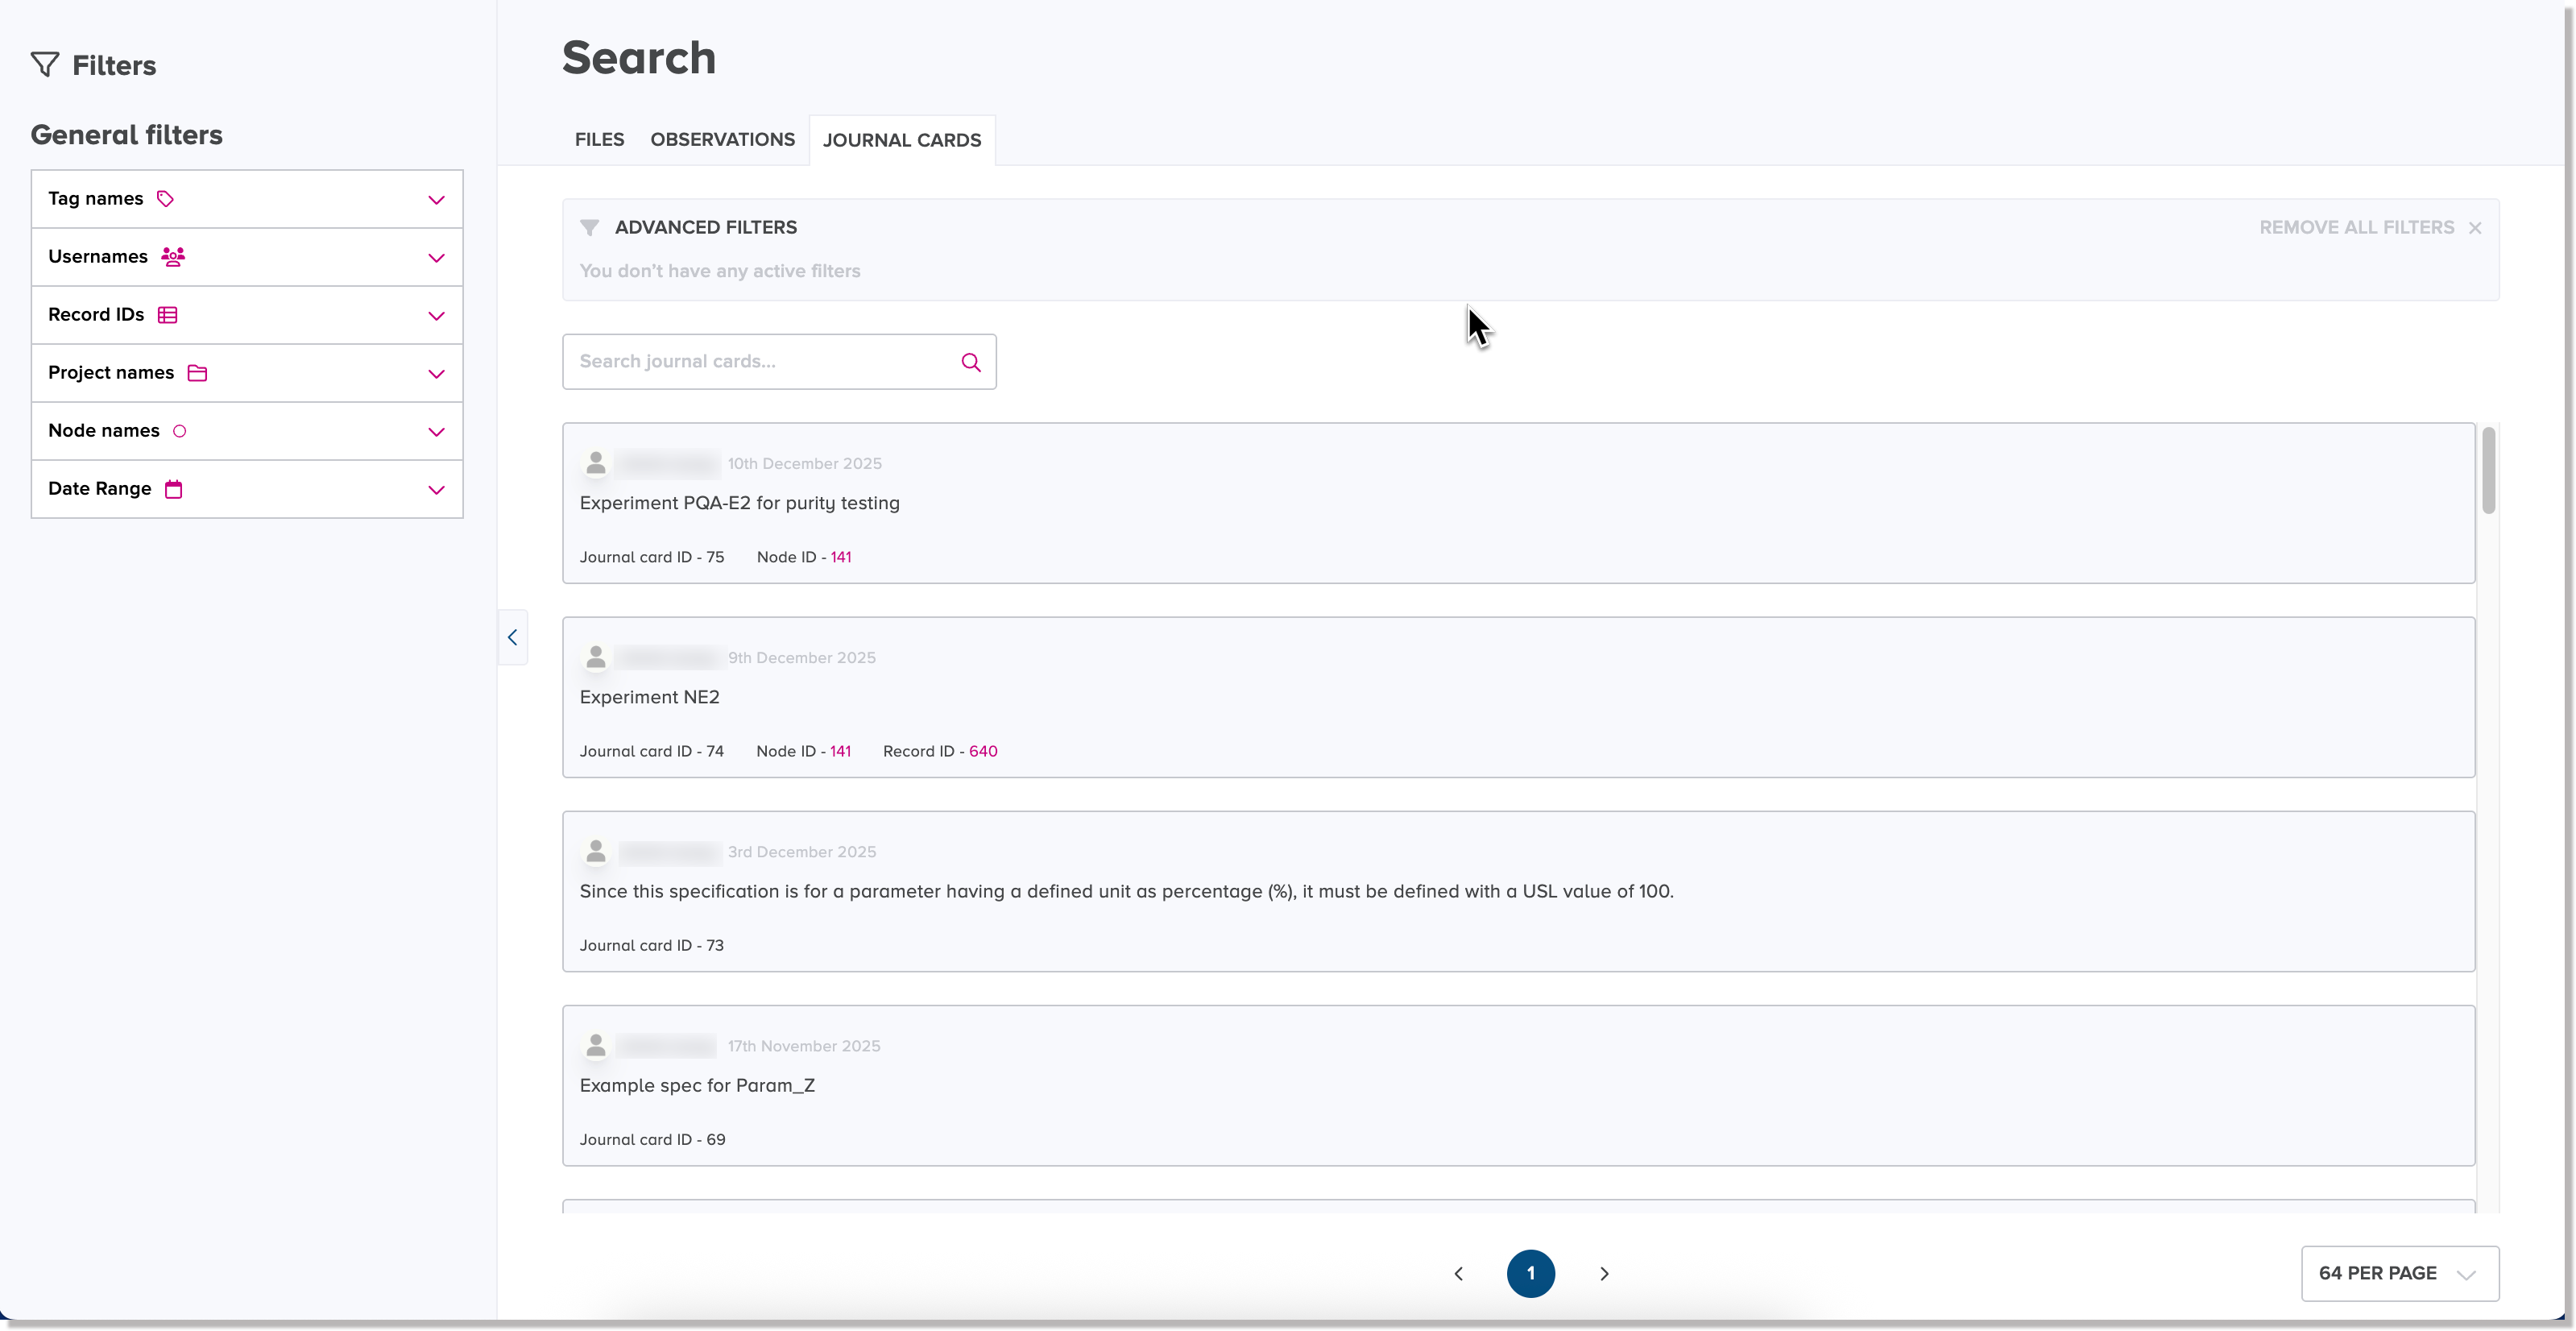
Labels of selected search filters are displayed in the top-right area of the Journal cards tab.
View journal cards in search results
Journal cards that match your search filters are displayed in the search results table on the Journal cards tab.

Filter features
Hide or show the left panel of filter options
The left panel containing filter options is displayed by default on each tab in the Search view. To hide the left panel of filter options, click or tap the collapse (chevron left ![]() ) icon in the center of the right border of the left panel.
) icon in the center of the right border of the left panel.
![]()
To show the hidden left panel of filter options, click or tap the expand (chevron right ![]() ) icon in the center of the right border of the hidden left panel.
) icon in the center of the right border of the hidden left panel.
Remove a defined search filter
To remove a defined search filter from the top of a tab in the Search view, hover your cursor over a label and click the x icon that appears.
![]()
Remove all selected filters
If you want to remove all selected filters for a given search, click or tap the Remove all filters button at the far right of the top section where labels of selected filters are displayed.

Save a set of search filters
You can save a set of defined search filters so that you can repeat the same search without having to redefine the same set of filters for each run.
To save a set of search filters:
-
Click or tap the Save filters button.

The Save filters dialog appears.
-
In the Filter name field, type the name that you want to assign to the set of filters.
-
Click or tap Save.
The set of search filters is saved. To reuse the set of search filters, see the section Load a filter set.
Load a filter set
To load a set of search filters either on the Files tab or Observations tab, click or tap the Load filters button, and select the name of the set of filters that you want to load.

Perform a search for files
The Files tab in the Search view is used to perform a general search for files that are saved in the database.
Select search filters for files
In the left panel of the Search view, you can choose from the following object names or IDs to be defined as search filters to narrow your search for files.
Notes
For each object name shown, click or tap the chevron down (![]() ) icon to expand the corresponding panel to show a list of object names or IDs.
) icon to expand the corresponding panel to show a list of object names or IDs.
To narrow an object list for easier selection, use the search field above each list object names or IDs.
In the General filters section, expand the corresponding panel box for one of the following lists of filters.
-
Tags list - select one or more checkboxes of tag names from the list to define tag search filters
-
Users list - select one or more checkboxes of usernames from the list to define username search filters
-
Records list - select one or more checkboxes of record IDs from the list to define record search filters
-
Projects list - select one or more checkboxes of project names from the list to define project name search filters
-
Nodes list - select one or more checkboxes of node names from the list to define node search filters
-
Date range fields - to define a date range to search by an upload date of a file, click the From date field to select earliest date of the range from a calendar chooser and/or click the To date field to select the latest date of the range from a calendar chooser, as needed
In the Parameters filters section, select one or more checkboxes of parameter names from the list to define parameter search filters.
To narrow the list of parameters to choose from, you can use either of the following features:
-
Use the search parameters field to type in some characters to show similar or matching parameter names in the list.
-
Click or tap the Filter by domain button to display a list of domain names by which to narraw the list of parameter names
Also, if you want to sort the list of parameter names either alphabetically or by created date, click the Sort button and select your preferred option to sort by.
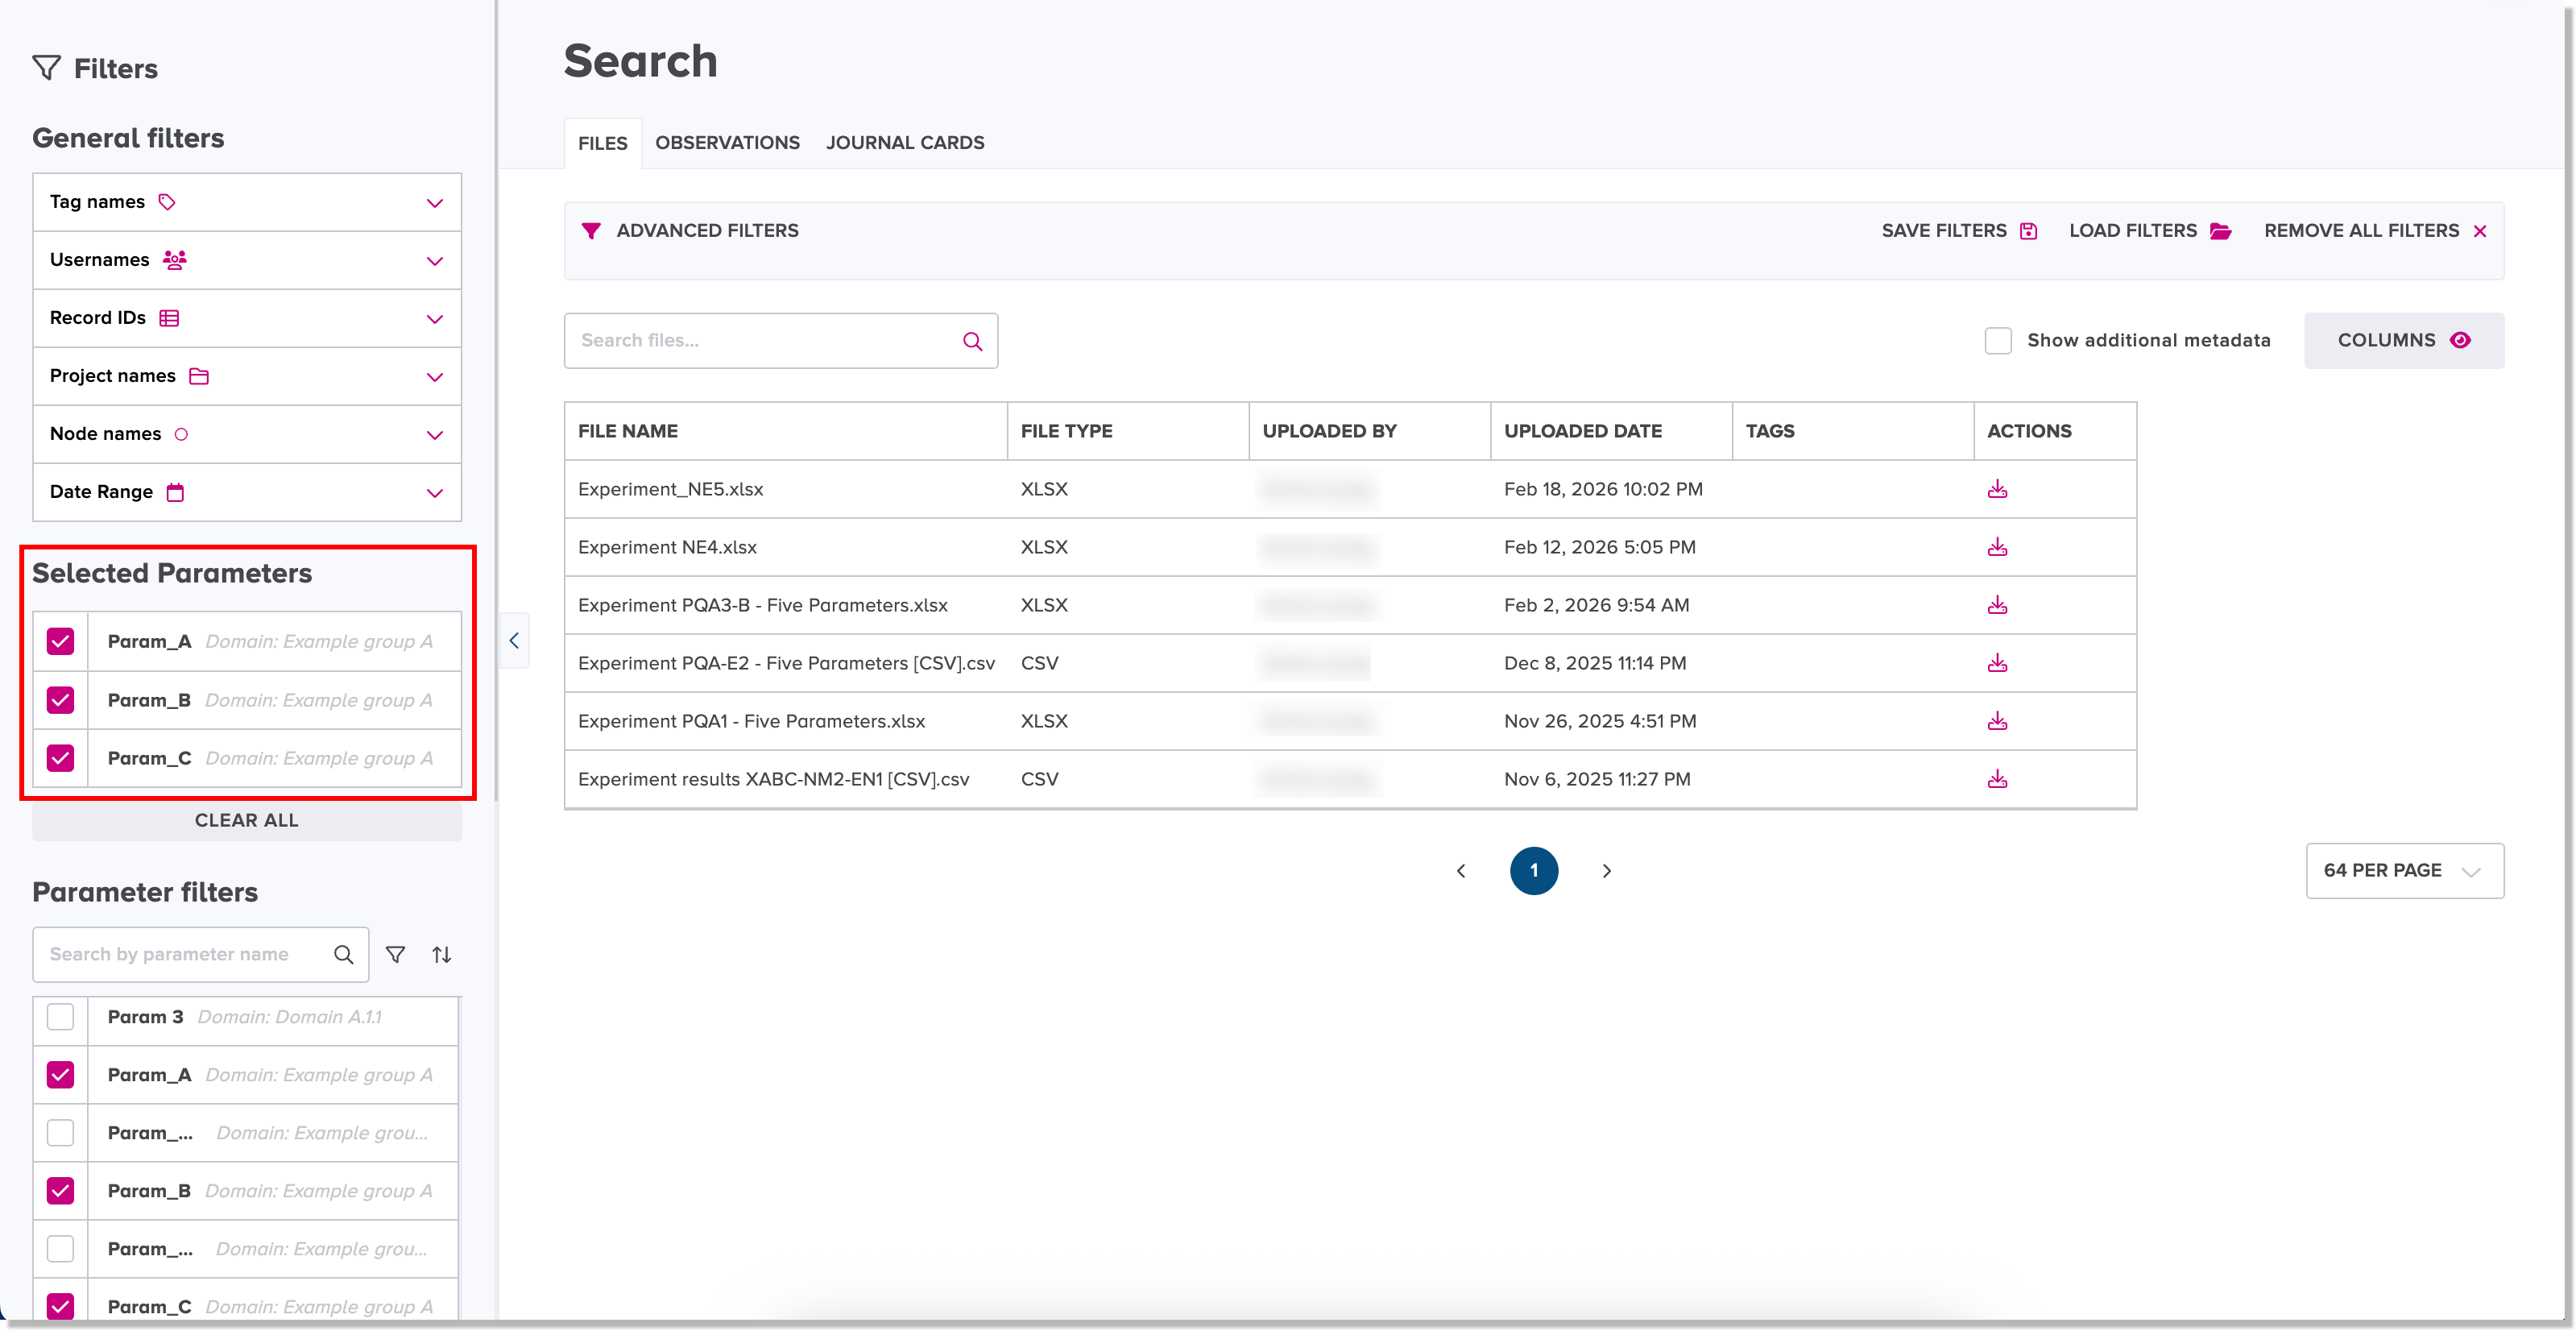
Labels of selected search filters are displayed in the top-right area of the Files tab. Selected parameter filters are displayed in the Selected Parameters list in the left panel.

View matching files in search results
Files that match your search filters are displayed in the search results table on the Files tab. By default, the columns of details that are displayed for files in search results are: file name, file type, username of the user who uploaded the file, upload date,and assigned tag names.
Results features on the Files tab
You can use the following results features to change the display of search results:
-
Show additional metadata checkbox - when this feature is turned on, additional columns of metadata (for project name, related node name, and record ID) for the files are displayed in the search results. This feature is turned off to hide the above metadata columns by default.

-
Columns display menu - when you open the Columns menu, it lists the column names in the search results and their corresponding checkboxes turned on by default to show thse columns. To hide one or more of the columns, turn off the corresponding checkbox.
Perform a search for observations
The Observations tab in the Search view is used to perform a general search for observations that are saved in the database.

Select search filters for observations
In the left panel of the Search view, you can choose from the following objects to be defined as search filters to narrow your search for observations.
Notes
For each object name shown, click or tap the chevron down (![]() ) icon to expand the corresponding panel to show a list of object names or IDs.
) icon to expand the corresponding panel to show a list of object names or IDs.
To narrow an object list for easier selection, use the search field above each list of object names or IDs to define characters to narrow your selection by.
-
Records panel box - expand the panel box and select the checkbox of a record ID from the list to define a record search filter
-
Projects panel box - expand the panel box and select the checkbox of a project name from the list to define a project name search filter
-
Nodes panel box - expand the panel box and select the checkbox of a node name from the list to define a node search filter
-
Date range panel box - to define a date range to search by an upload date of observations, expand the panel box, click the From date field to select earliest date of the range from a calendar chooser and/or click the To date field to select the latest date of the range from a calendar chooser, as needed.
-
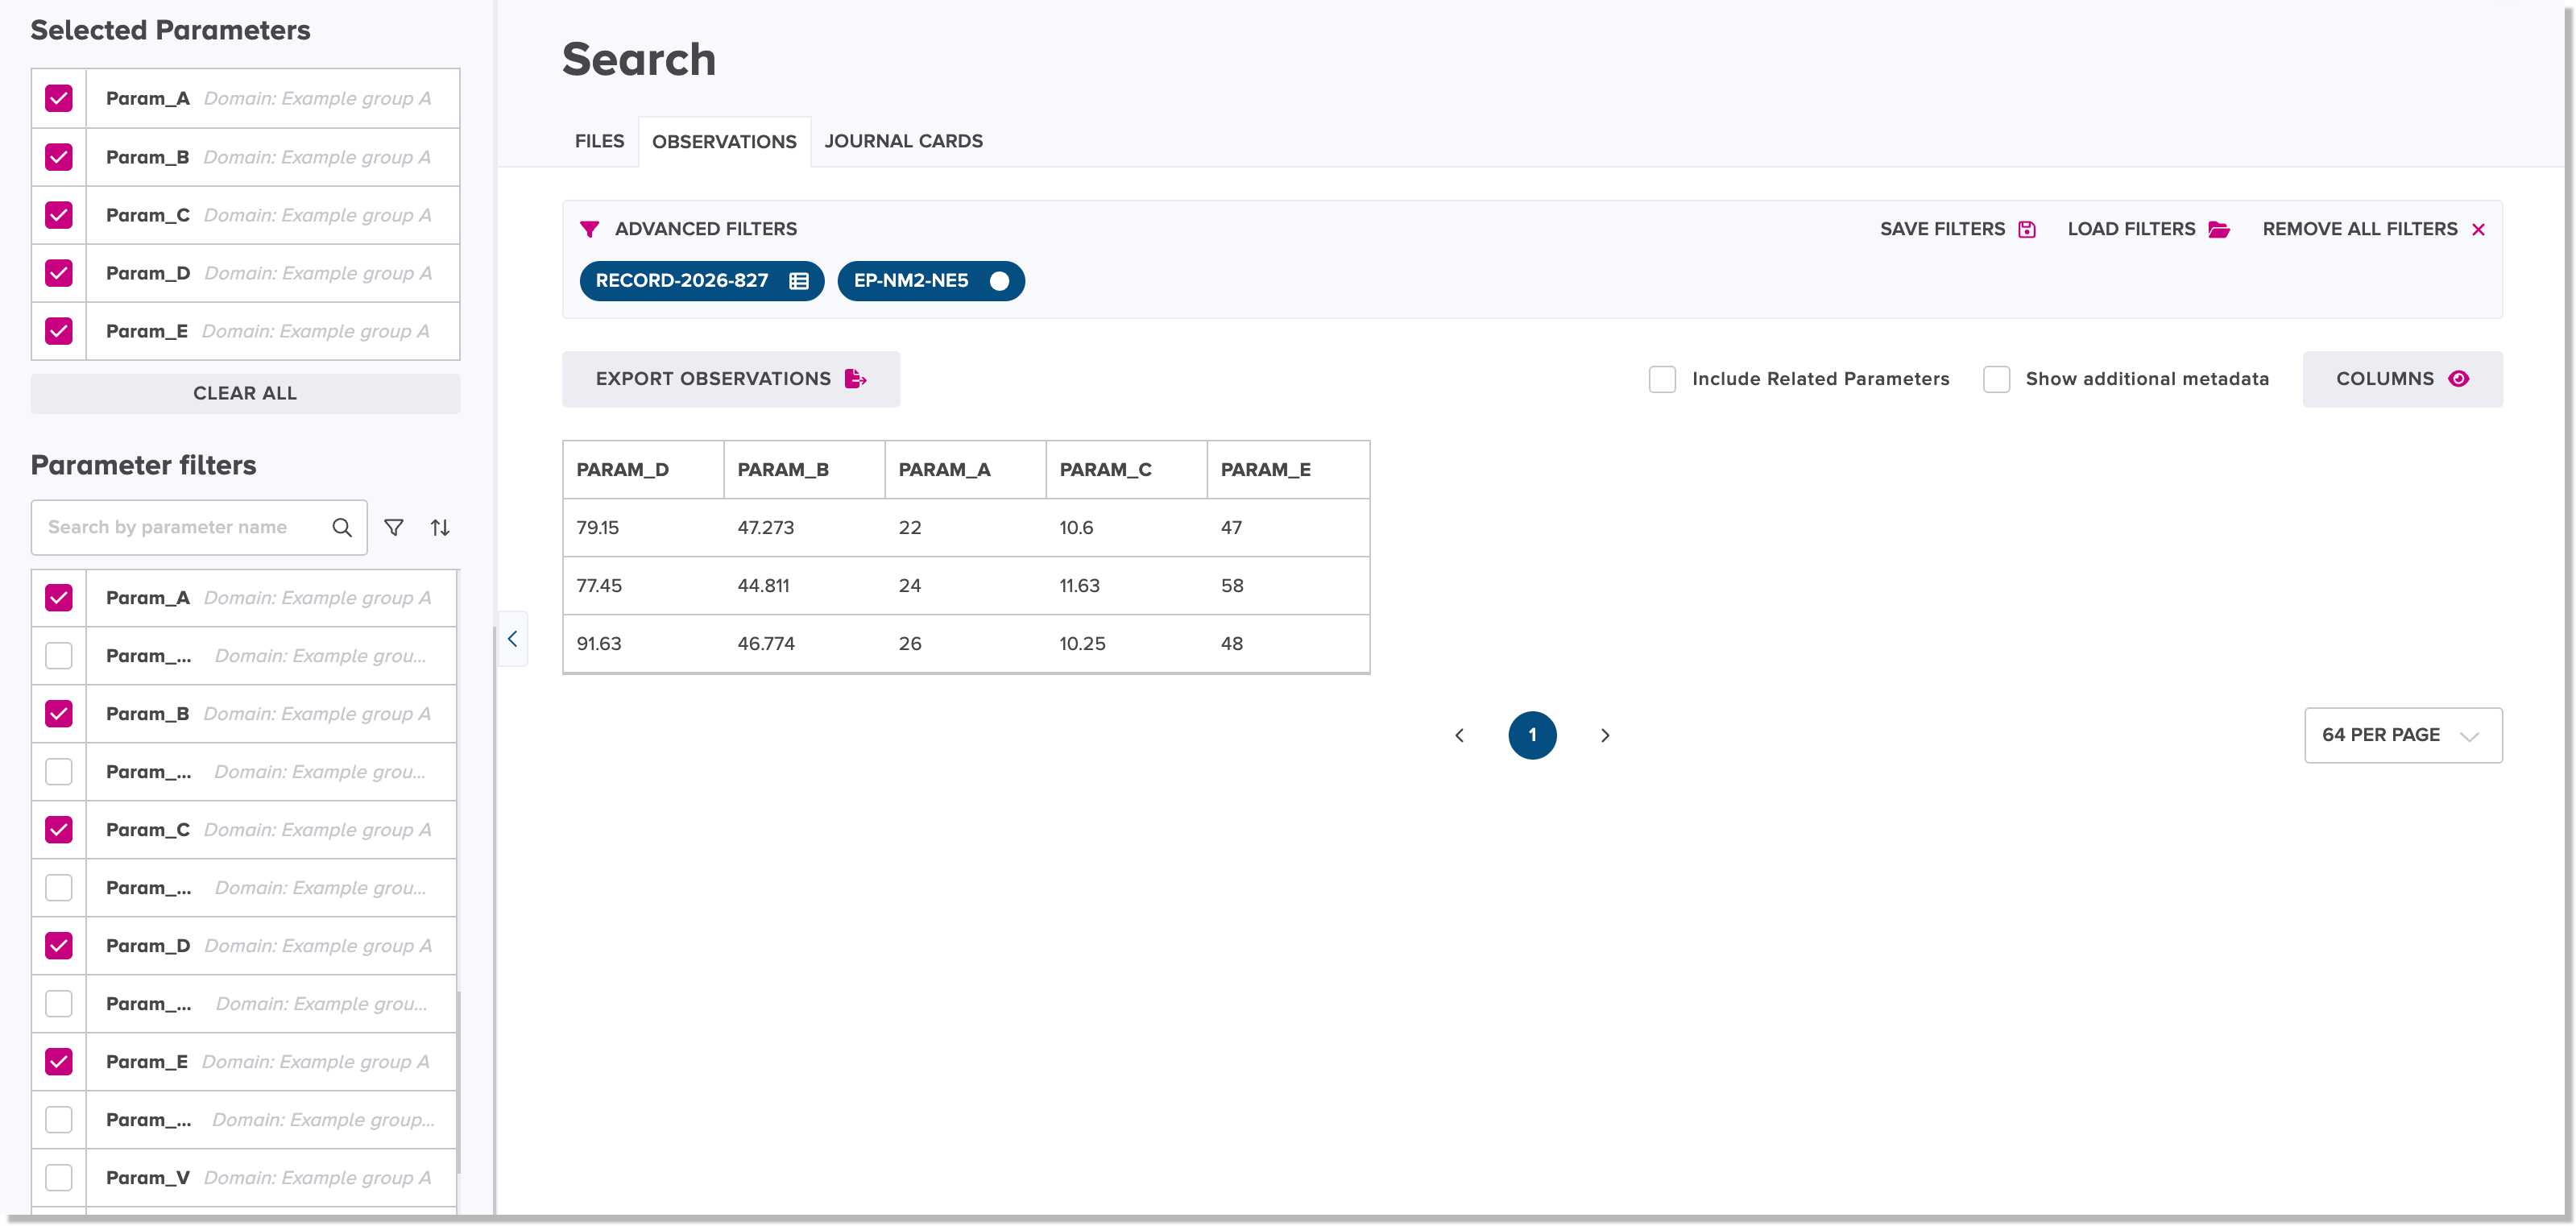
Parameter filters list - expand the panel box and select one or more checkboxes of parameter names from the list to define a parameter search filter. To narrow the list of parameters to choose from, you can use either of the following features:
-
Use the search parameters field to type in some characters to show similar or matching parameter names in the list.
-
Click or tap the Filter by domain button to display a list of domain names by which to narrow the list of parameter names.
Also, if you want to sort the list of parameter names either alphabetically or by created date, click the Sort button and select your preferred option to sort by.
-
Labels of selected search filters are displayed in the top section of the right panel on the Observations tab. Selected parameter filters are displayed in the Selected Parameters list in the left panel. Search results are displayed in the bottom section of the right panel.
View matching observations in search results
Matching observations are filtered and displayed by selected parameters in search results.
You can use results filters to change the display of search results, as follows:
-
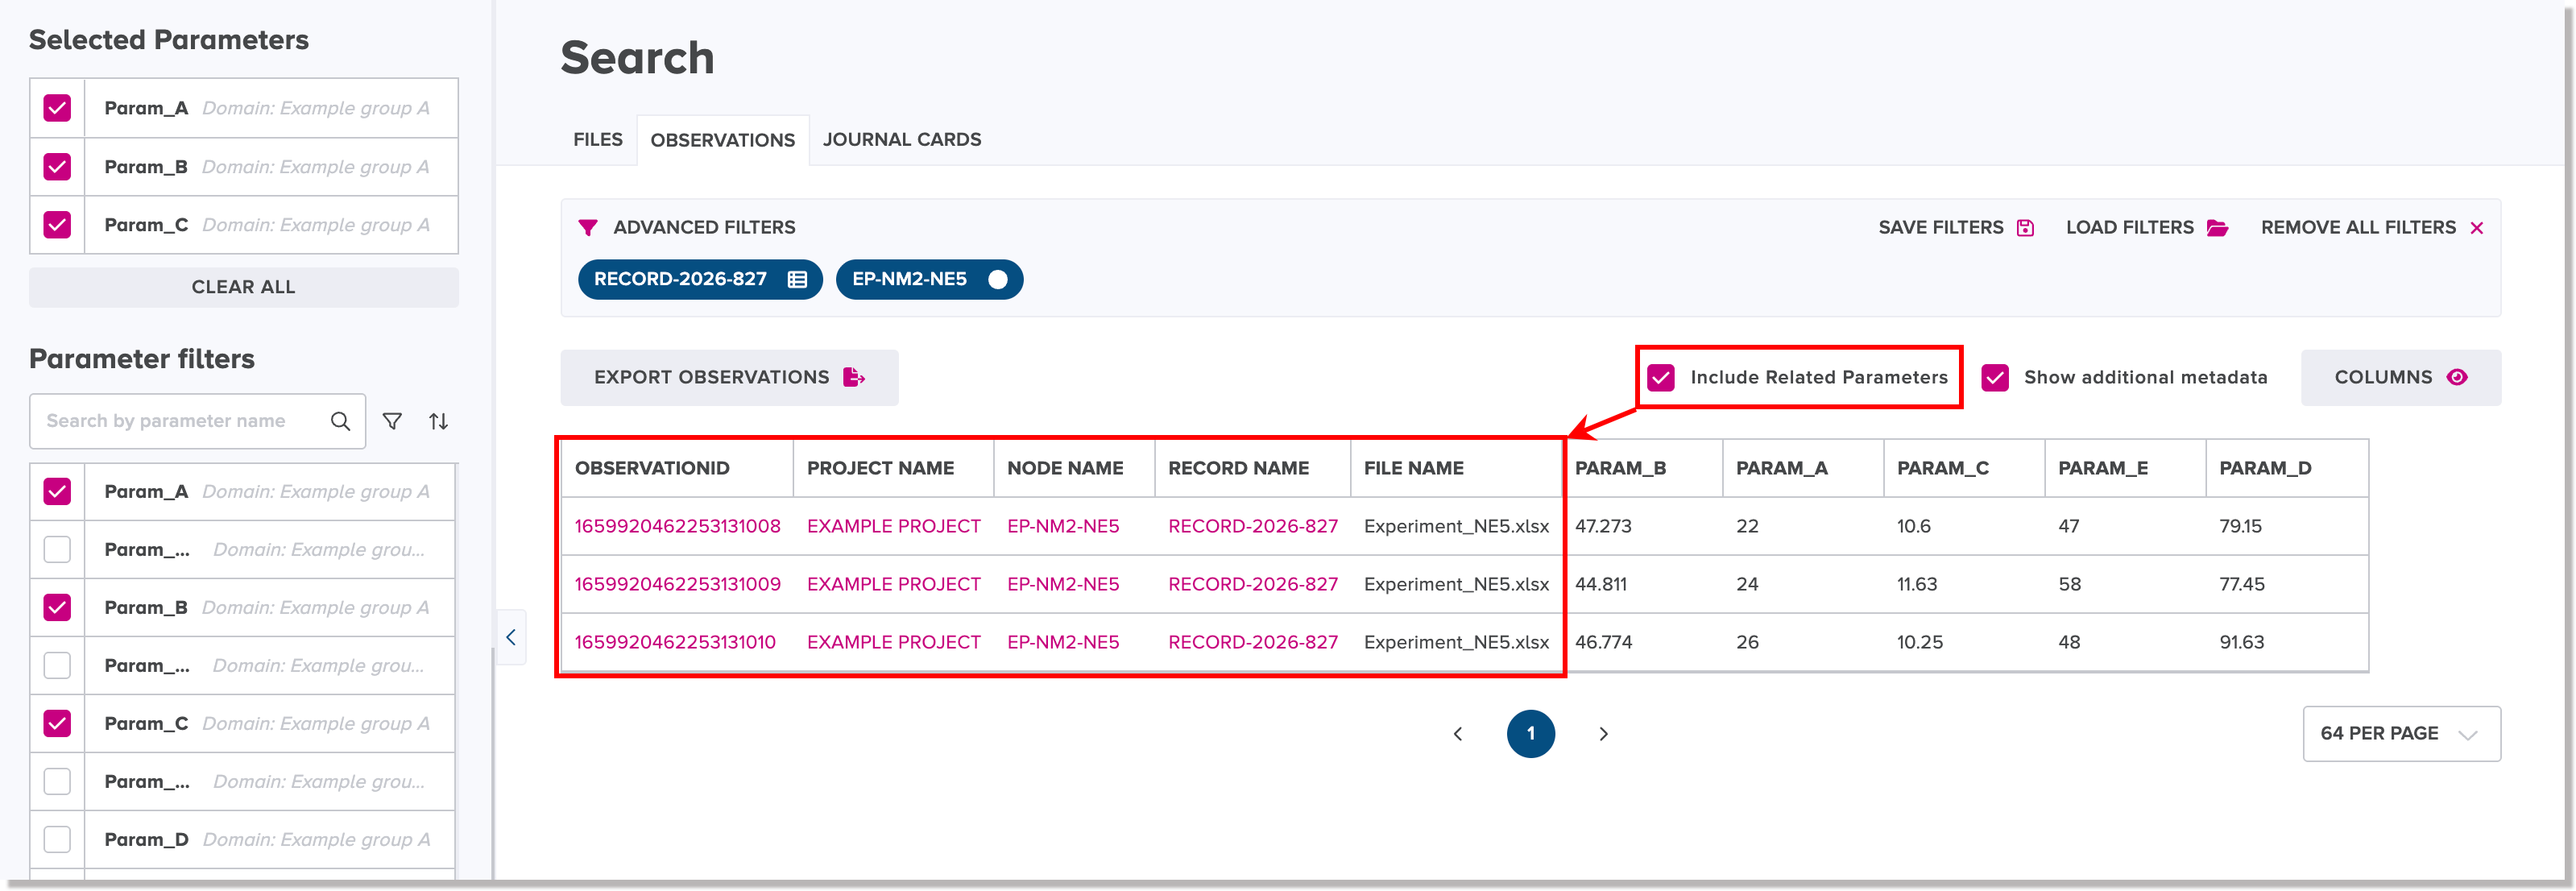
To show the observations of related parameters in the same data tables as the observations of selected parameters in search results, turn on the Include related parameters checkbox.
-
To display additional metadata for files in search results, turn on the Show additional metadata checkbox. This feature is turned off by default. The additional columns of metadata are for observation ID, project name, node name, record name, and file name.
-
To hide particular columns from being displayed in search results:
-
Click or tap Columns to view a drop-down list of checkboxes and names of columns, which are shown in the search results by default.
-
Turn off the checkboxes for the columns that you want to hide.
Note
When the Include related parameters checkbox and Show additional metadata checkbox are turned on, the corresponding extra column names and checkboxes will be displayed in the Columns drop-down list, so you can hide one or more individual extra columns, if desired.
-
Perform a search for journal cards
The Journal cards tab in the Search view is used to perform a general search for journal cards that are saved in the database.
Select filters for narrowing a search for journal cards
In the left panel of the Search view, you can choose from the following objects to be defined as search filters to narrow your search.
Notes
For each object name shown, click or tap the chevron down (![]() ) icon to expand the corresponding panel to show a list of object names or IDs.
) icon to expand the corresponding panel to show a list of object names or IDs.
To narrow an object list for easier selection, use the search field above each list object names or IDs
-
Tag names panel box - select the checkbox of a tag name to define it as a search filter
-
Usernames panel box - select the checkbox of a username to define it as a search filter
-
Record IDs panel box - select the checkbox of a record ID to define it as a search filter
-
Project names panel box - select the checkbox of a project name to define it as a search filter
-
Node names panel box - select the checkbox of a node name to define it as a search filter
-
Date range panel box - define a date range in which a journal card was saved
-
Parameter filters list - expand the panel box and select the checkbox of a parameter name from the list to define a parameter name filter
Labels of selected search filters are displayed near the top of the Journal Cards tab.
View journal cards in search results
Journal cards that match your search filters are displayed in the search results table on the Journal Cards tab.
Actions in search results
Download a file in search results
To download a file that is in the search results, click the download icon beside the corresponding file.
![]()
Preview icon for an image or PDF file in search results
To preview an image file or PDF file in search results, click the preview icon beside the corresponding file.
![]()
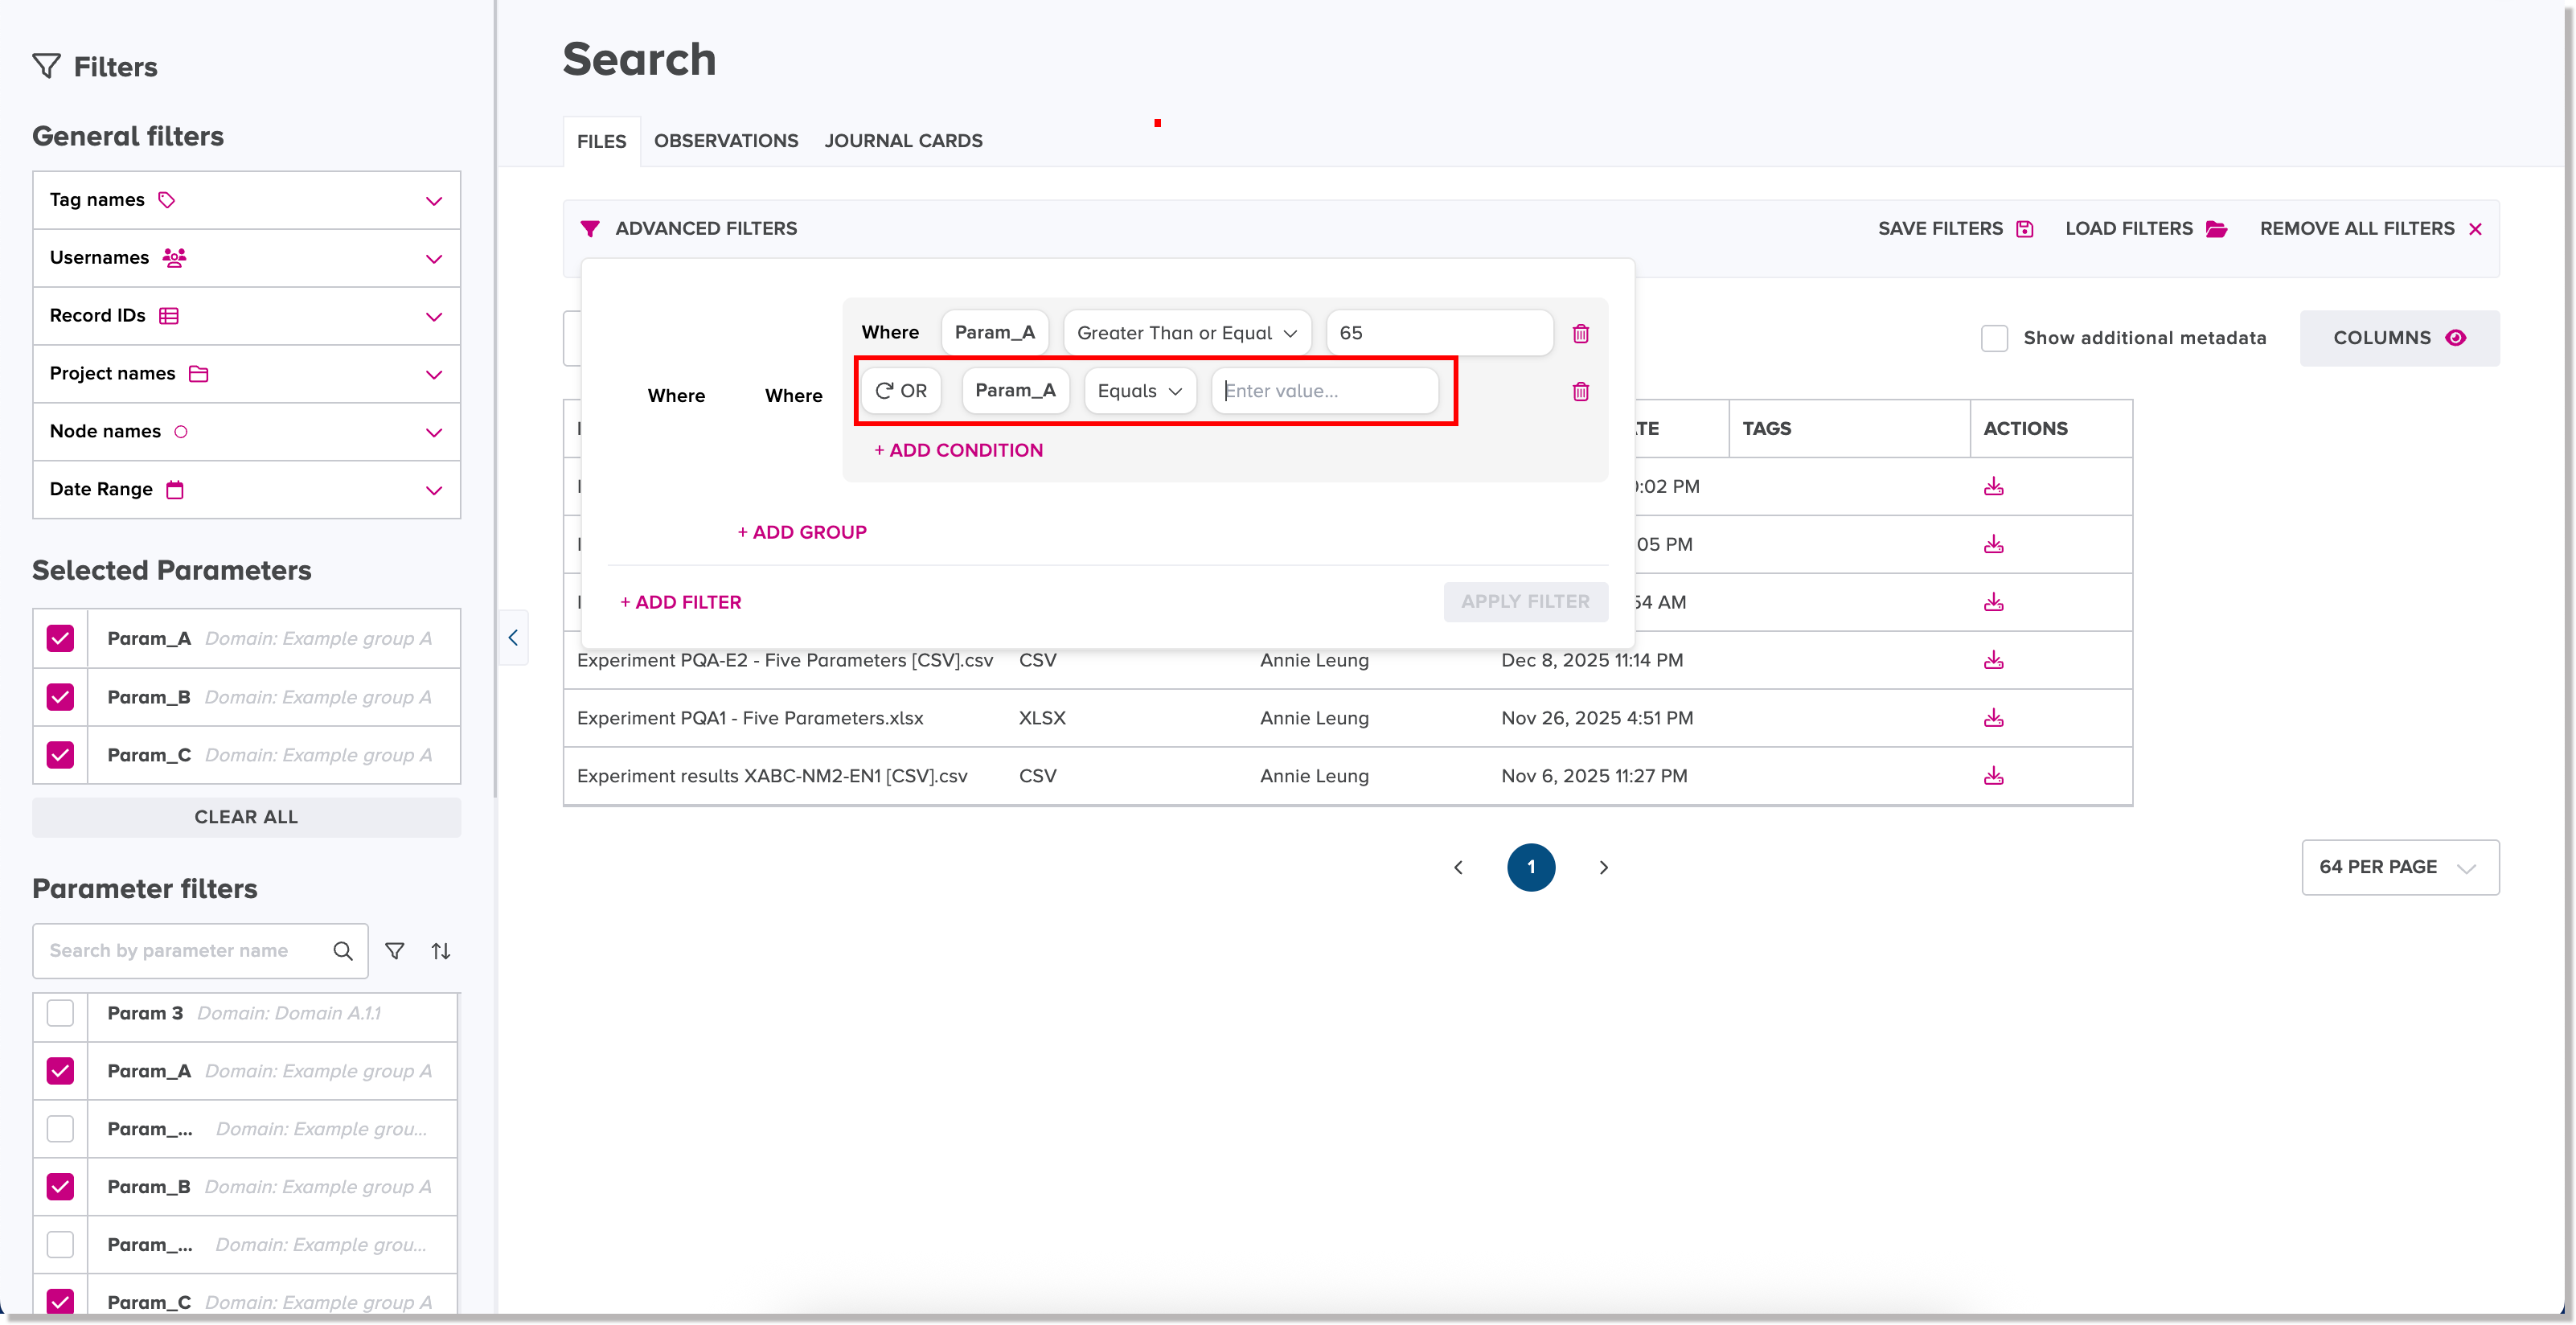
Advanced filter conditions for search
The Search view lets you define advanced filter conditions for complex searches for files or observations. The advanced filter conditions box lets you define one or more conditional statements for finding specific search results:
-
You can use the logical operators AND or OR to join multiple conditional statements.
-
You can define condition groups to group together specific conditional statements.
-
You can define one or more more filters for each selected parameter for one or more expressions of conditional statements or groups.
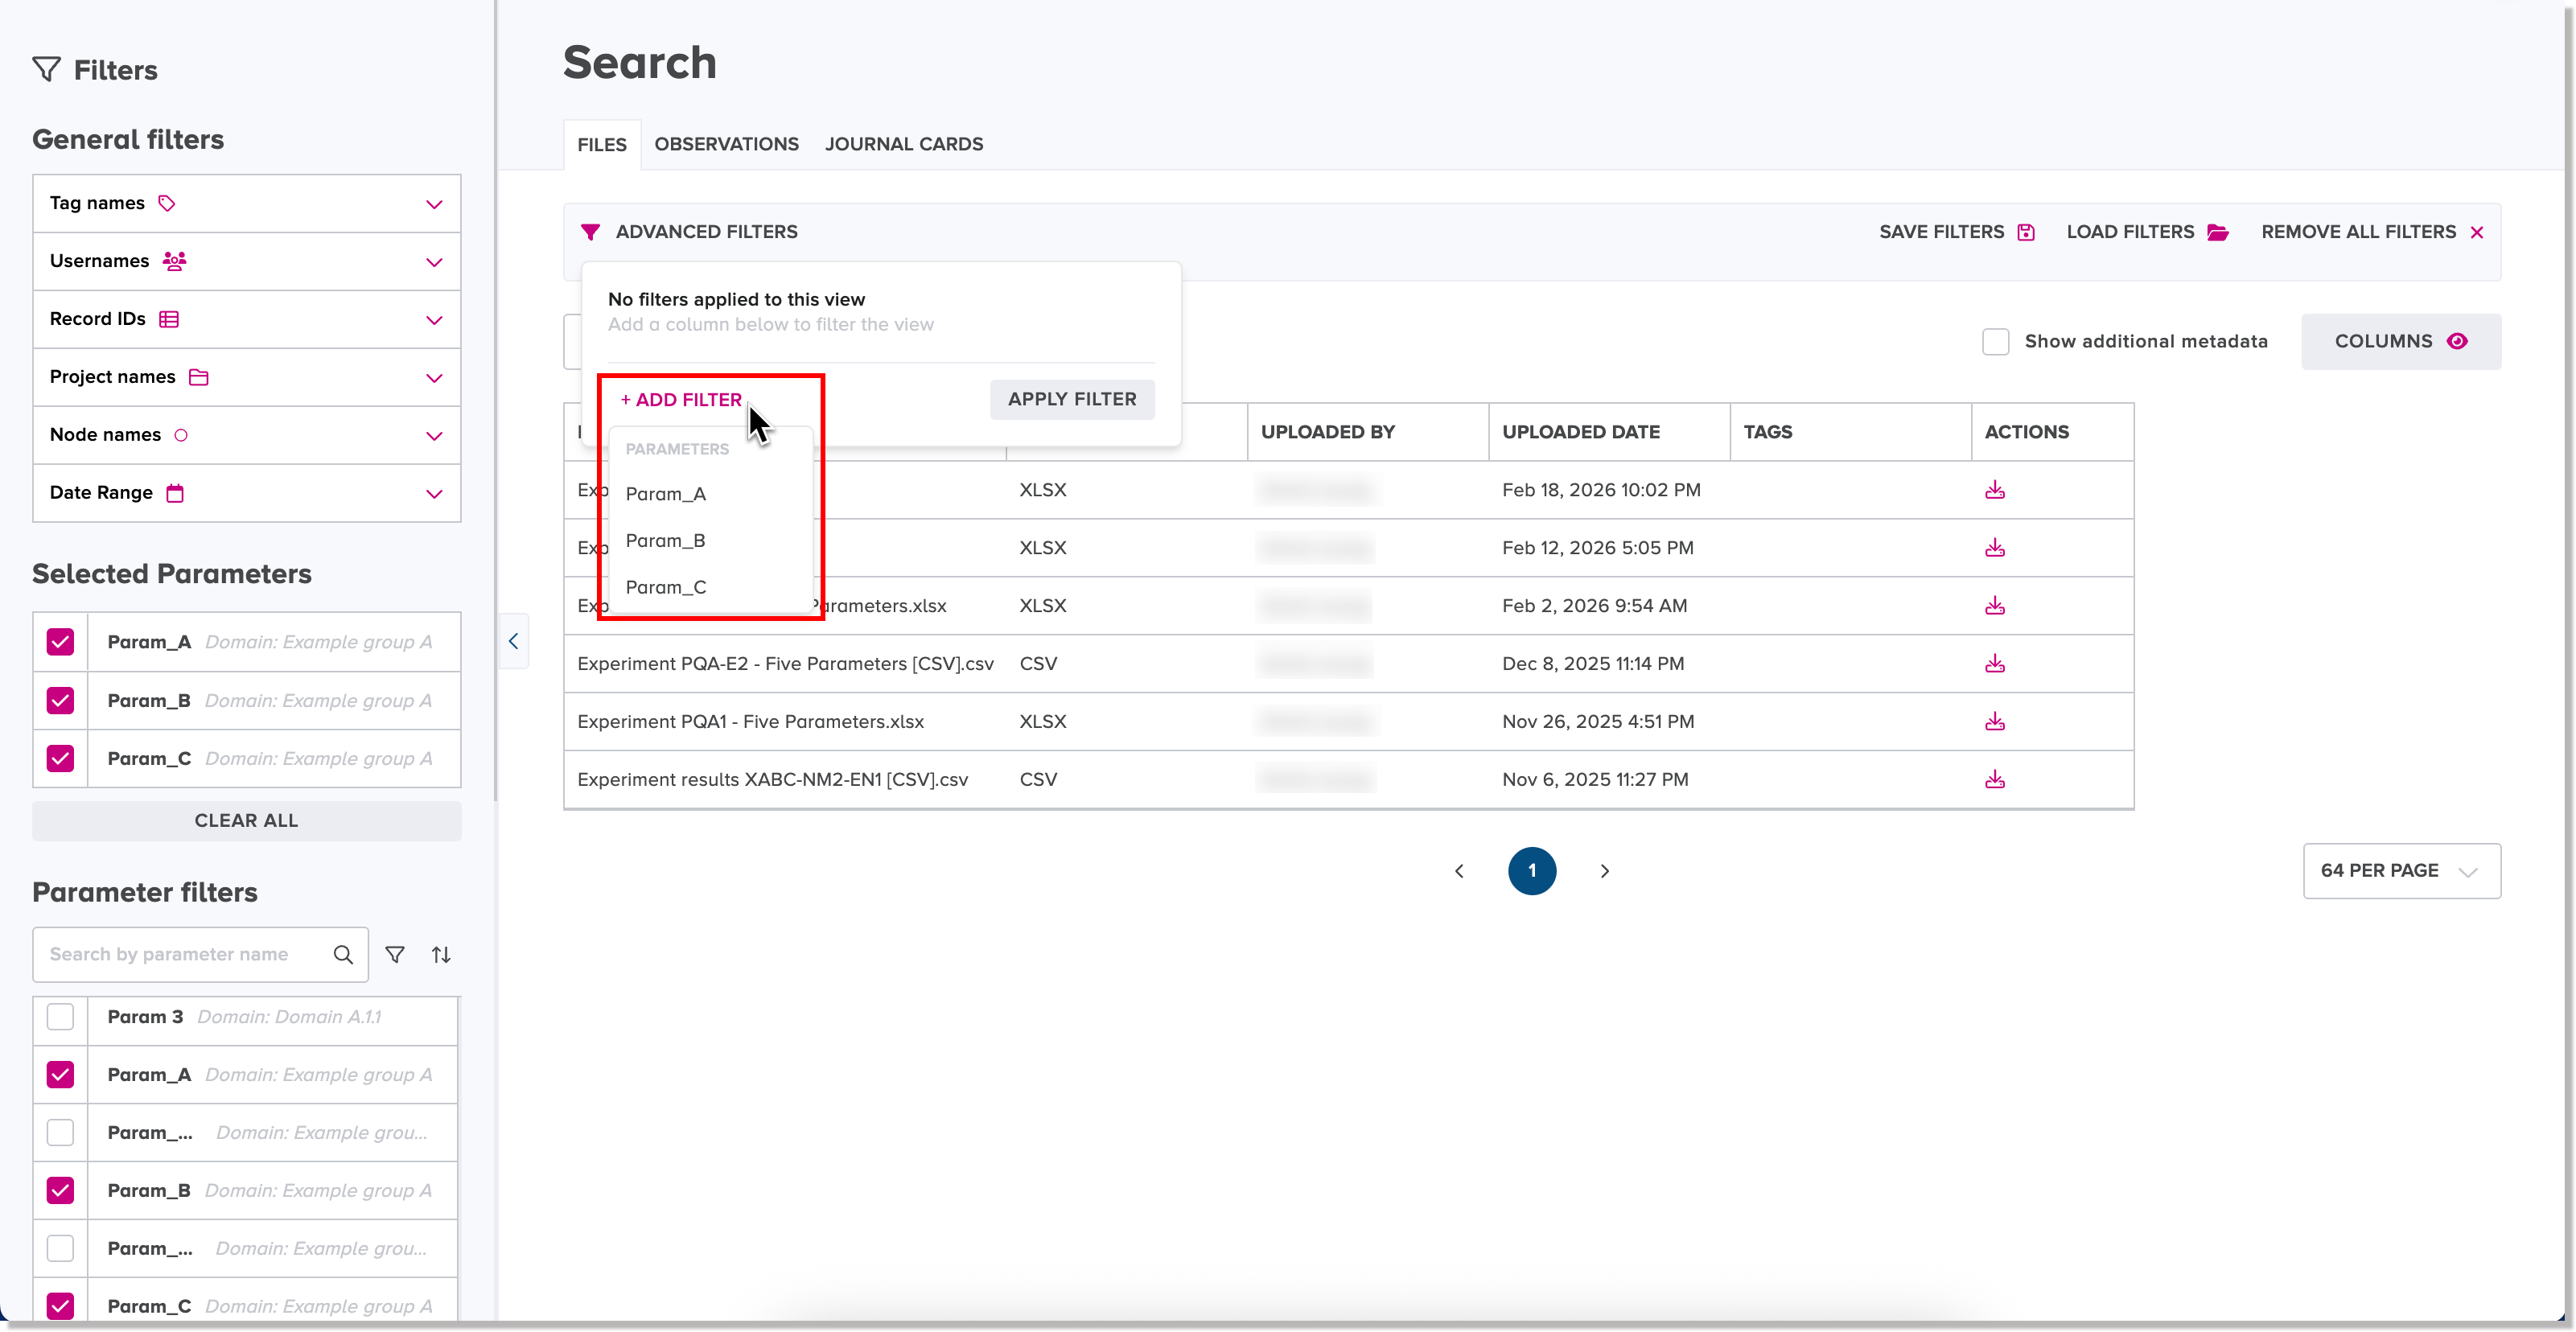
To define advanced filter conditions for a search:
-
In the left panel of the Search view, select one or more parameter filters.
-
Click or tap the Advanced Filters button.
The filter conditions box appears.

-
Click or tap the Add Filter function.
The Parameters list appears.
-
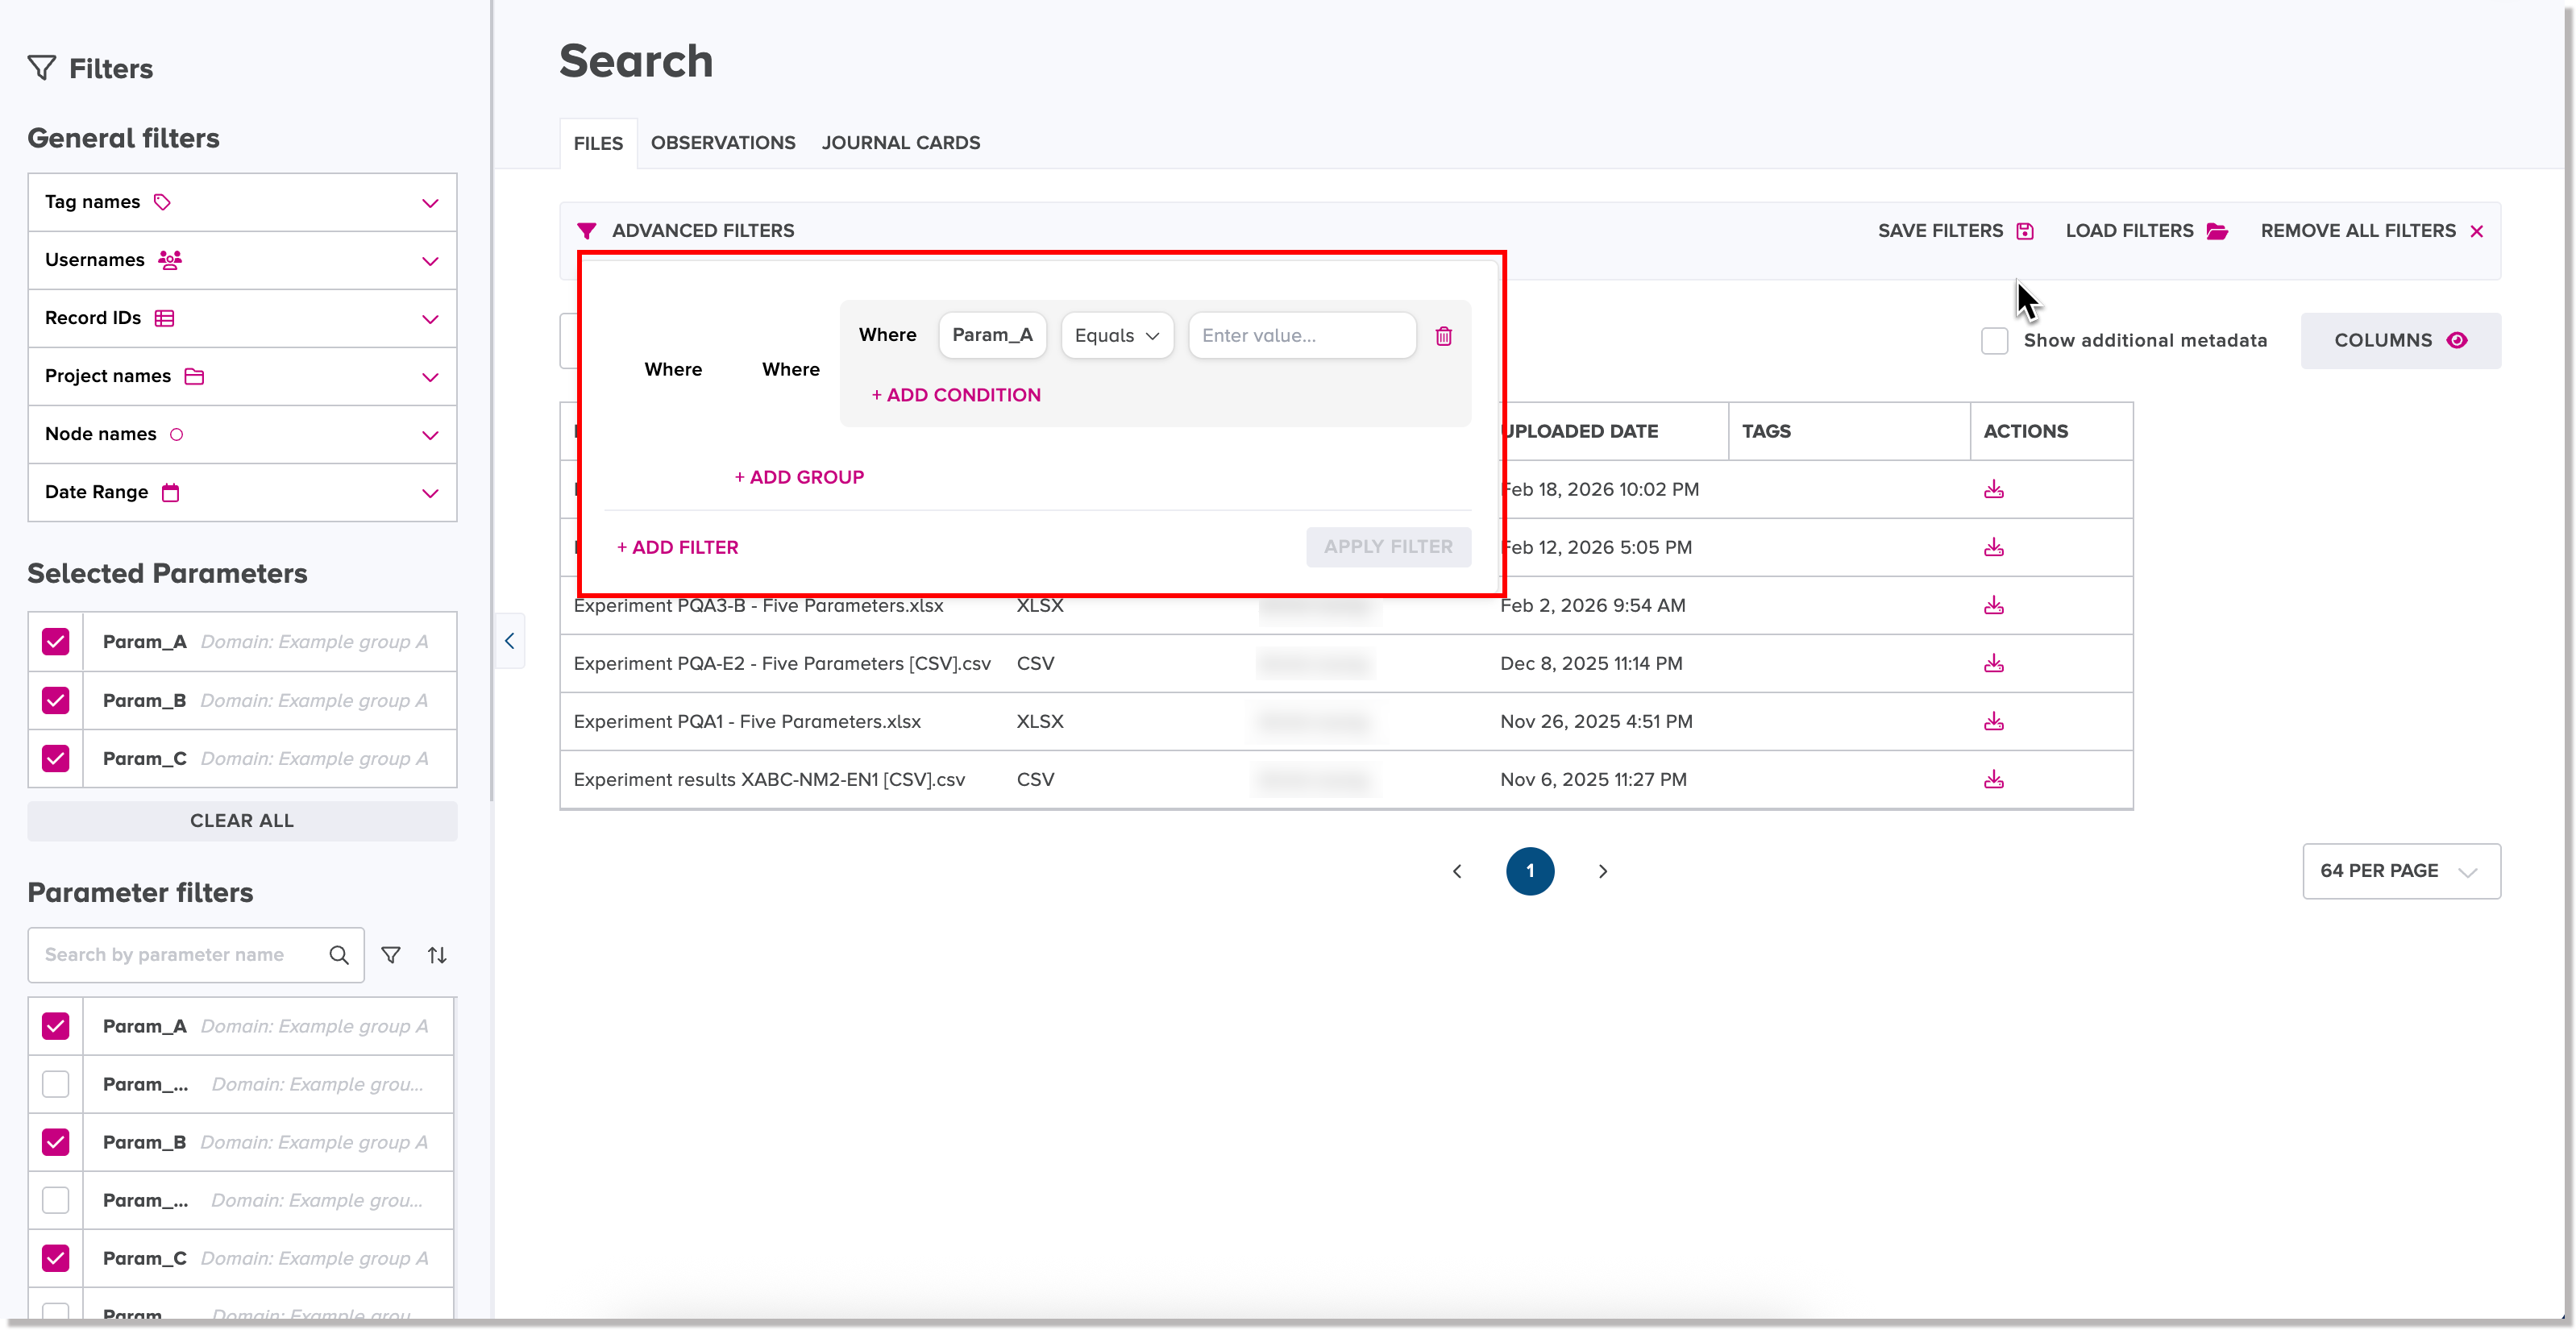
Choose a selected parameter name from the list.
The filter condition statements box appears. The selected parameter name is populated automatically in the first filter condition statement.
-
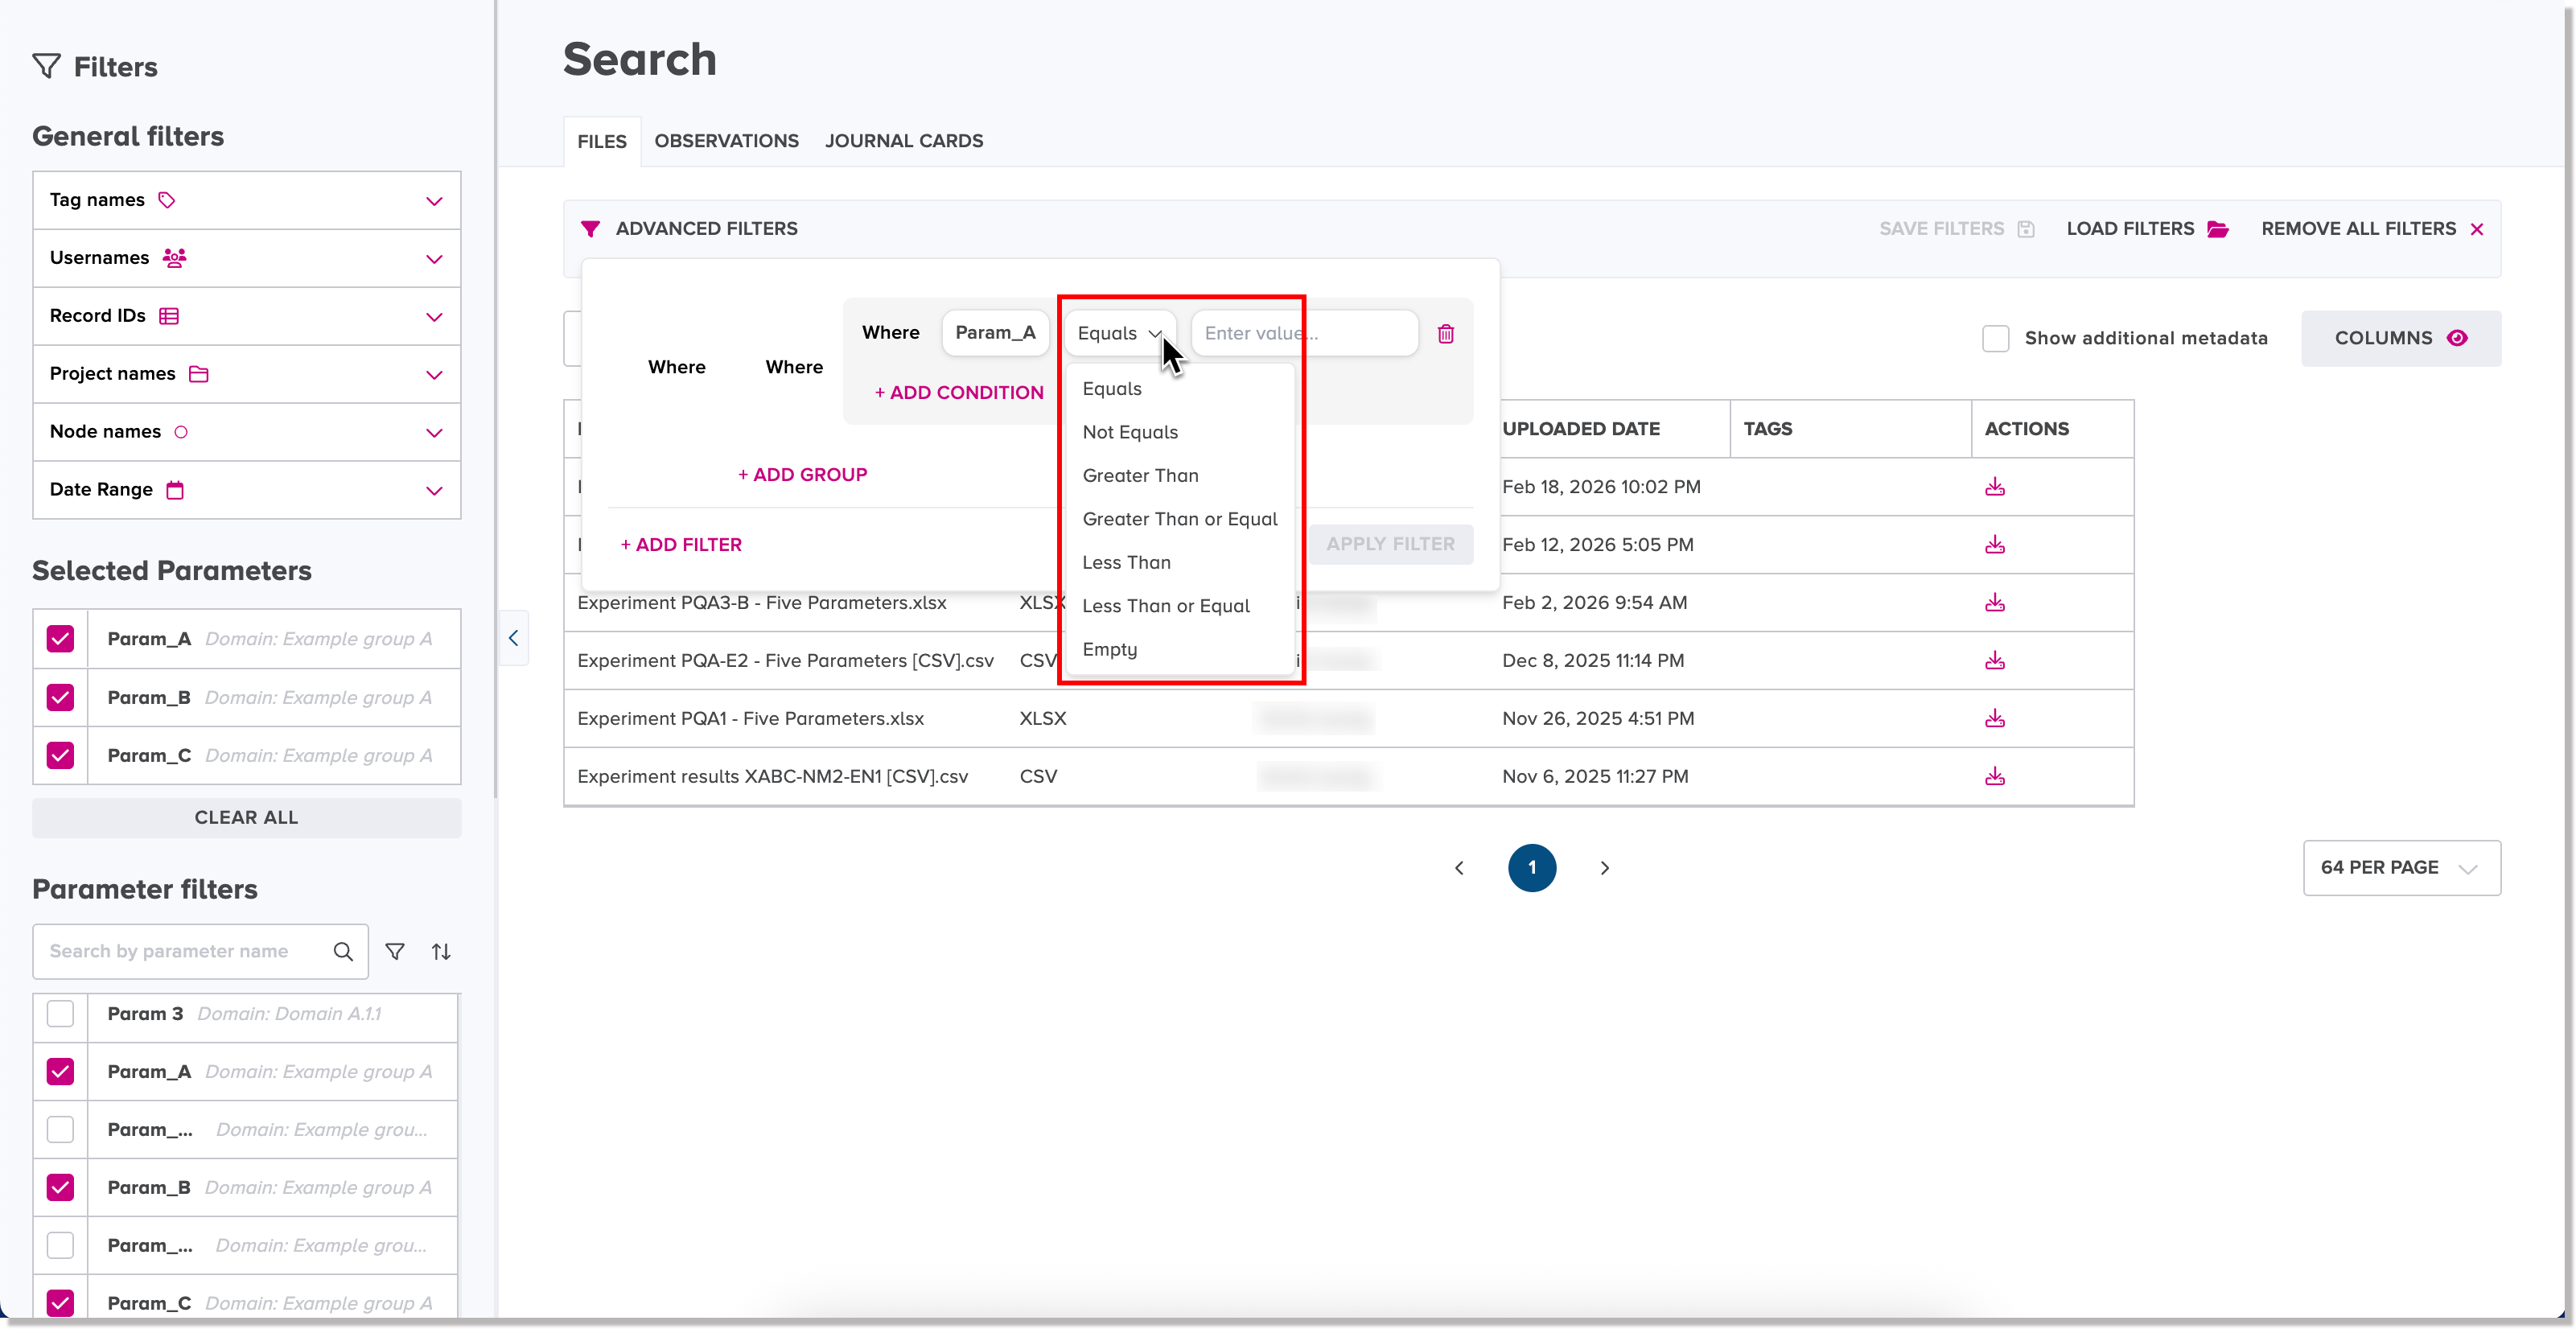
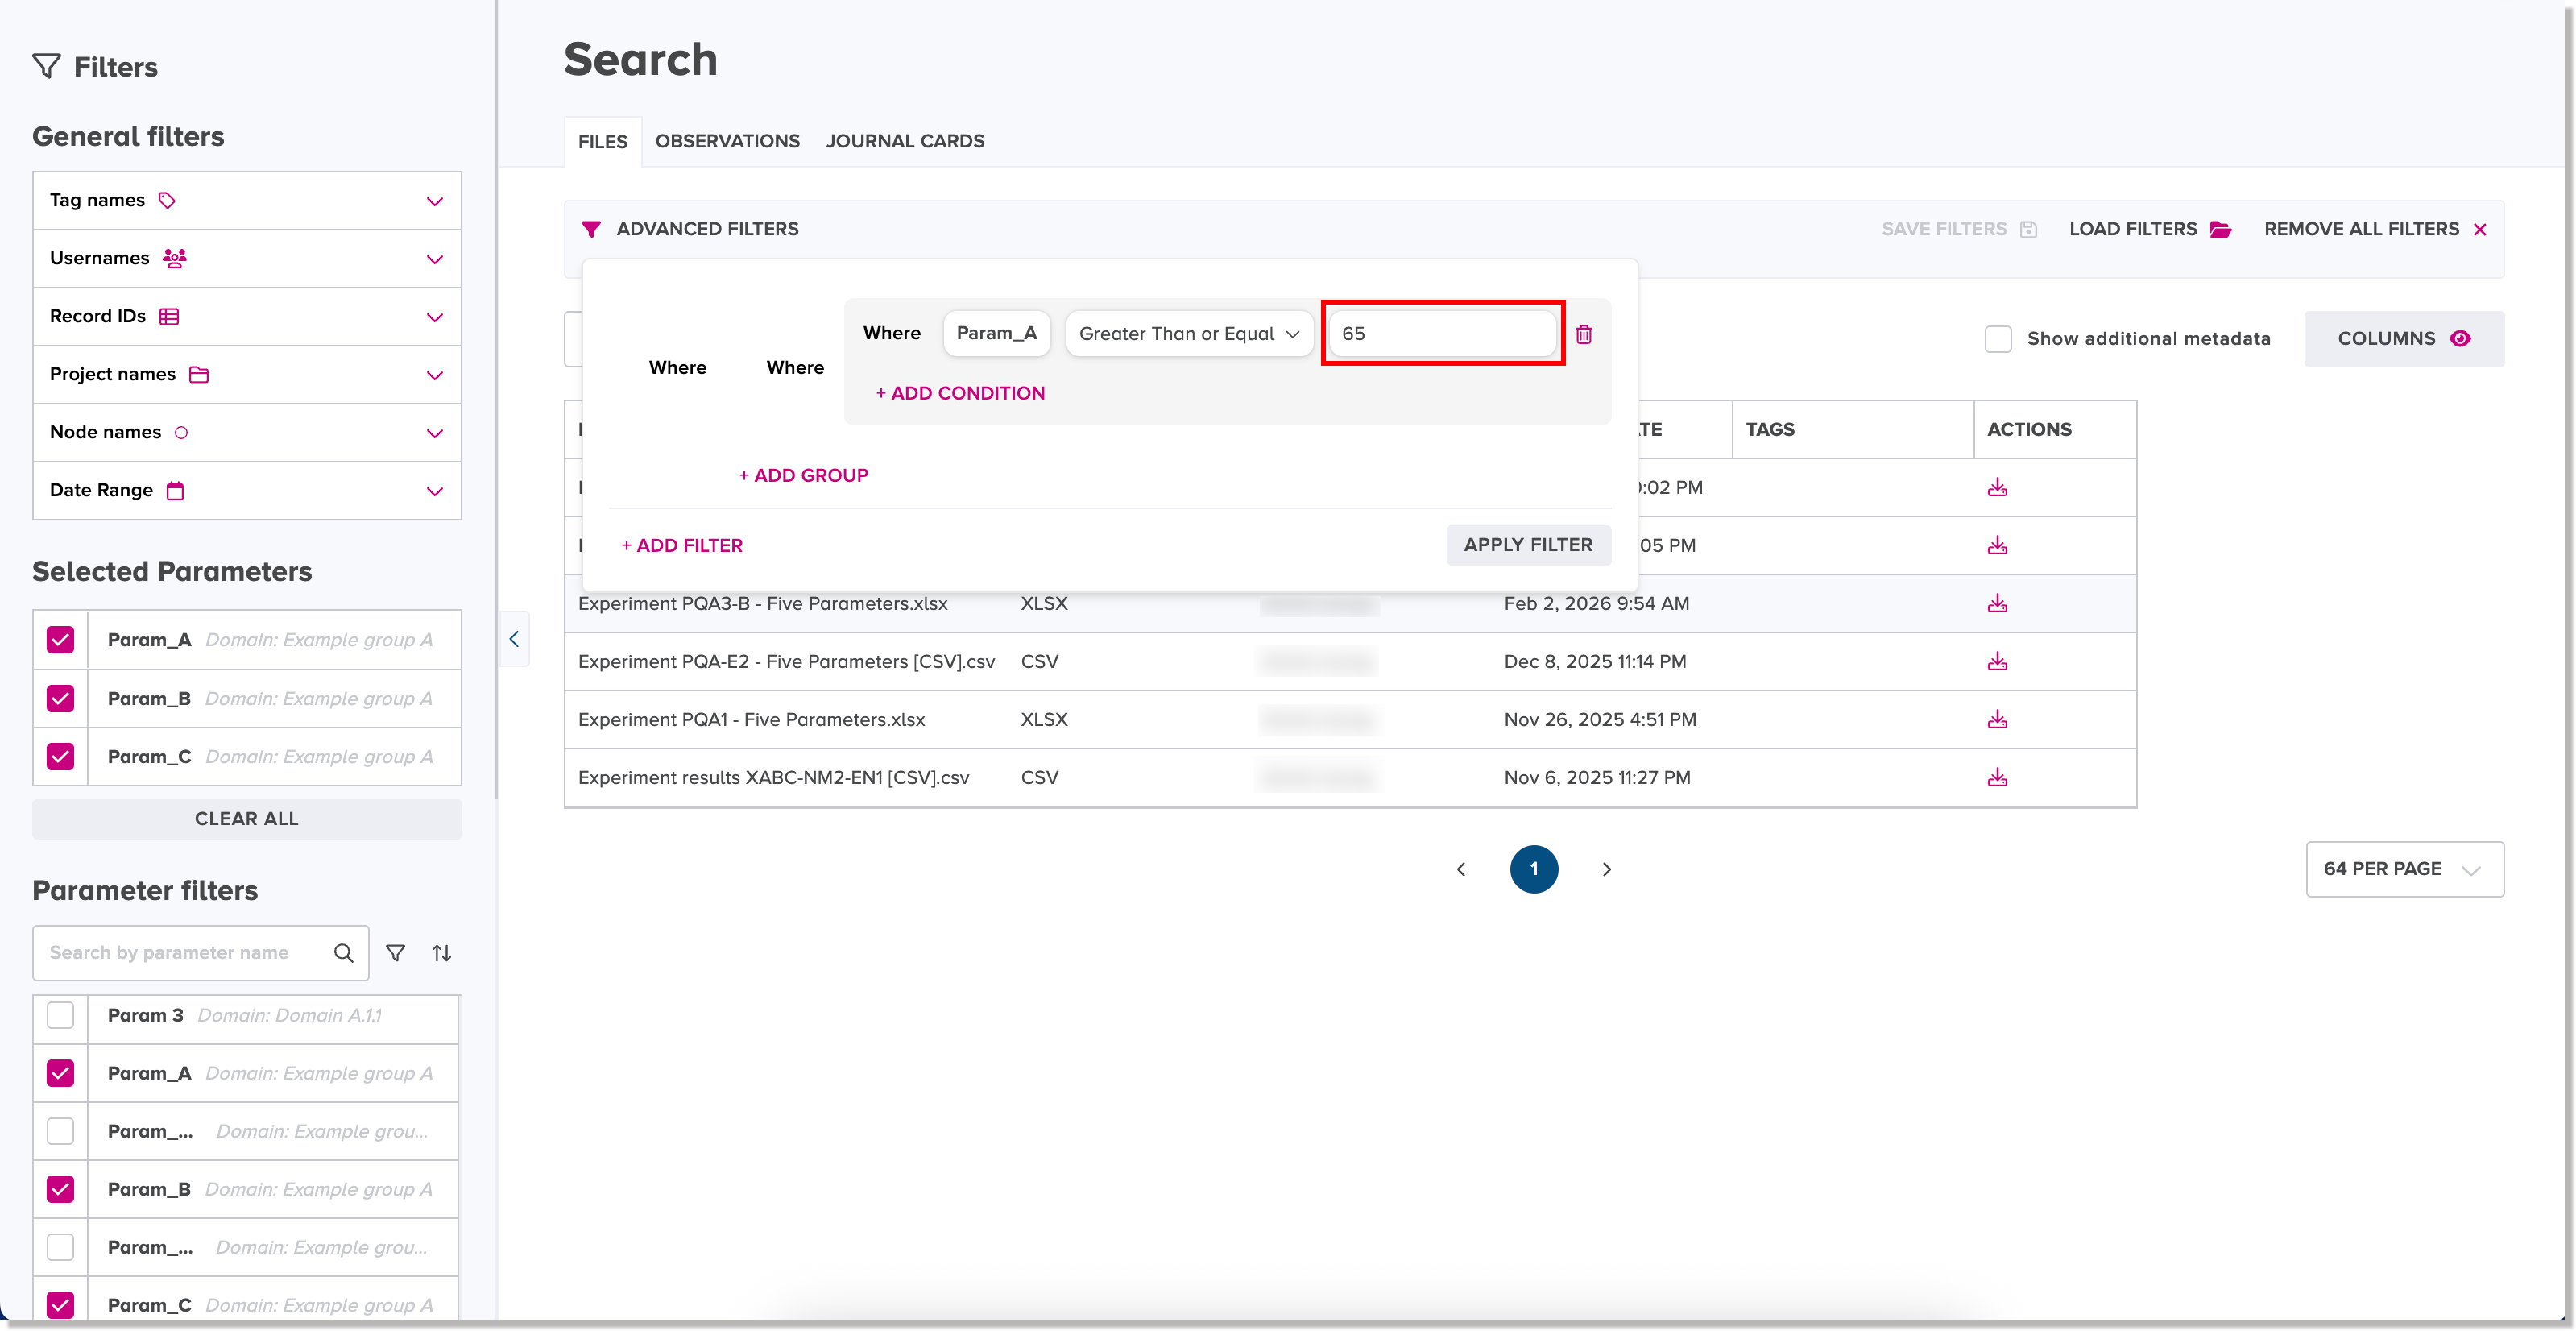
To the right of the selected parameter name, select an operator from the drop-down list.
-
Beside the operator drop-down list, type in a numeric value in the input field.
Note
To remove a condition statement, click the delete icon to the right of it.
-
To define another filter condition statement, click the Add Condition function.
A new condition statement for the selected parameter appears.
-
In the first toggle field on the left of the new condition statement, change the logical operator from the default OR to AND, if needed.
-
If desired, repeat steps 4 and 5 to define another condition statement.
-
To add a condition group, click or tap the Add Group function.
A new condition statements group appears.
-
Define one or more condition statements, as needed, for the new group.
-
Click or tap the Apply Filter button.
The filtered search results are displayed based on the defined conditional statements.
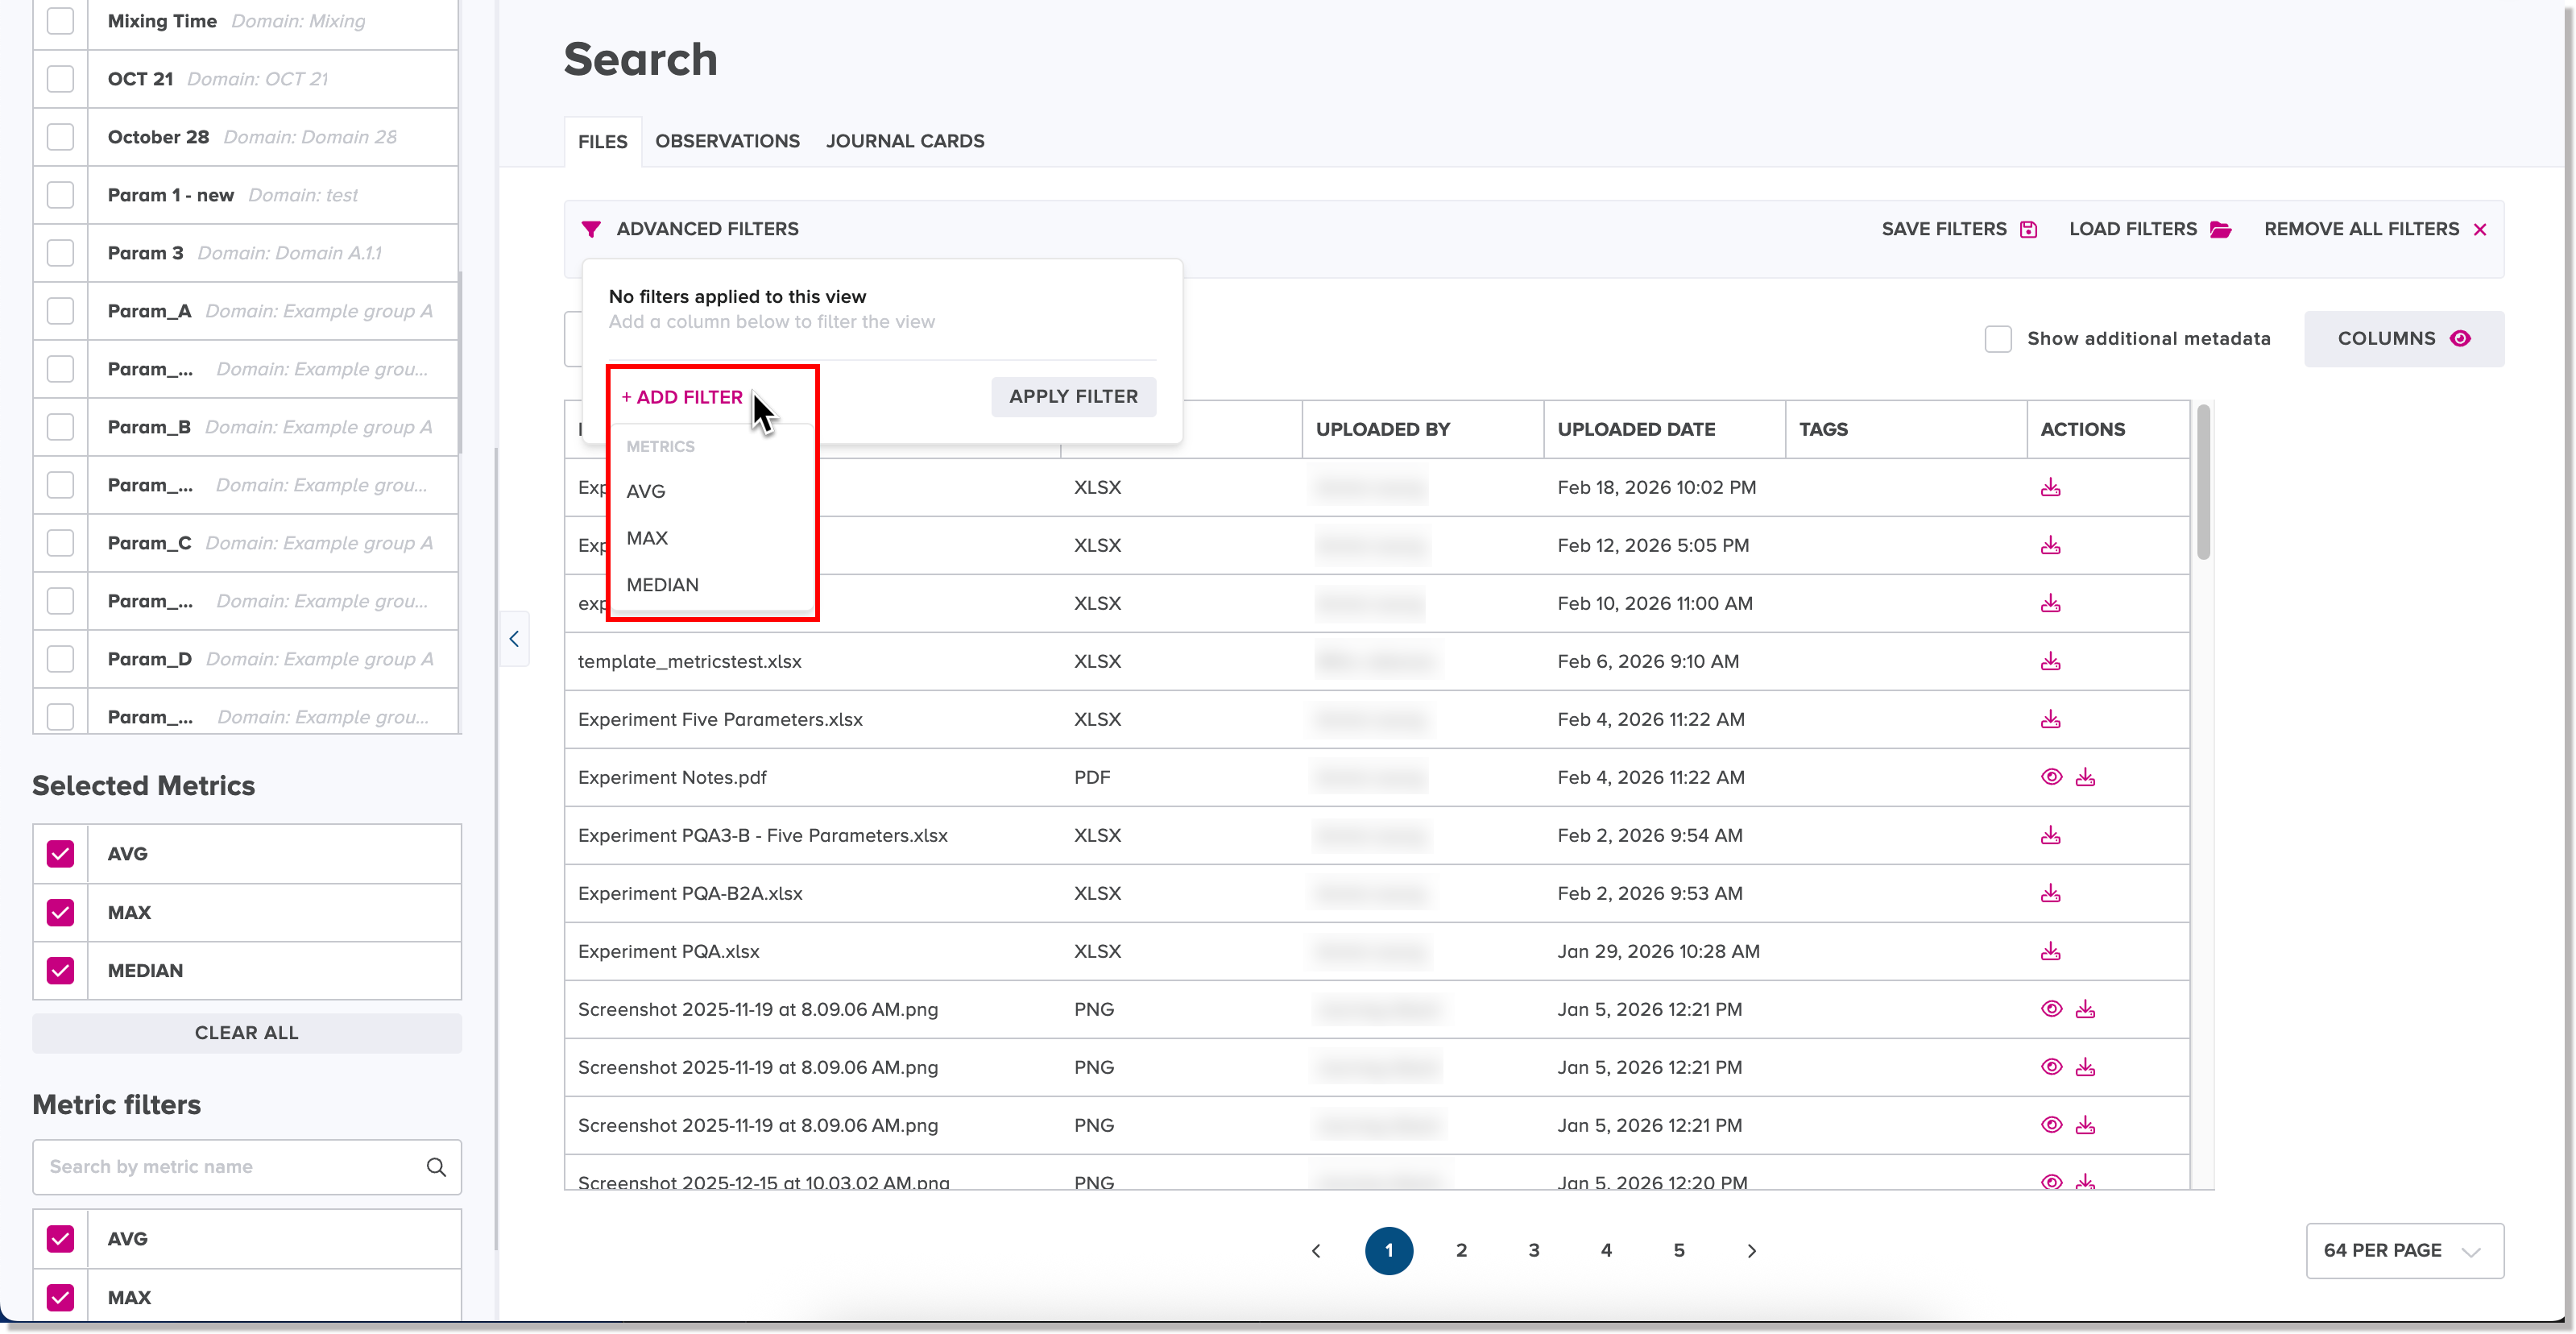
Metrics in advanced filter conditions
You can search for files by using advanced filter conditions with one or more metric names.
To define advanced filter conditions with metrics to perform a search:
-
In the left panel of the Search view, scroll down to the Metrics section and select one or more metrics.
-
Click or tap the Advanced Filters button.
The filter conditions box appears.
-
Click or tap the Add Filter function.
The selected metrics list appears.
-
Choose a selected metric name from the list.
The filter condition statements box appears. The selected metric name is populated automatically in the first filter condition statement.
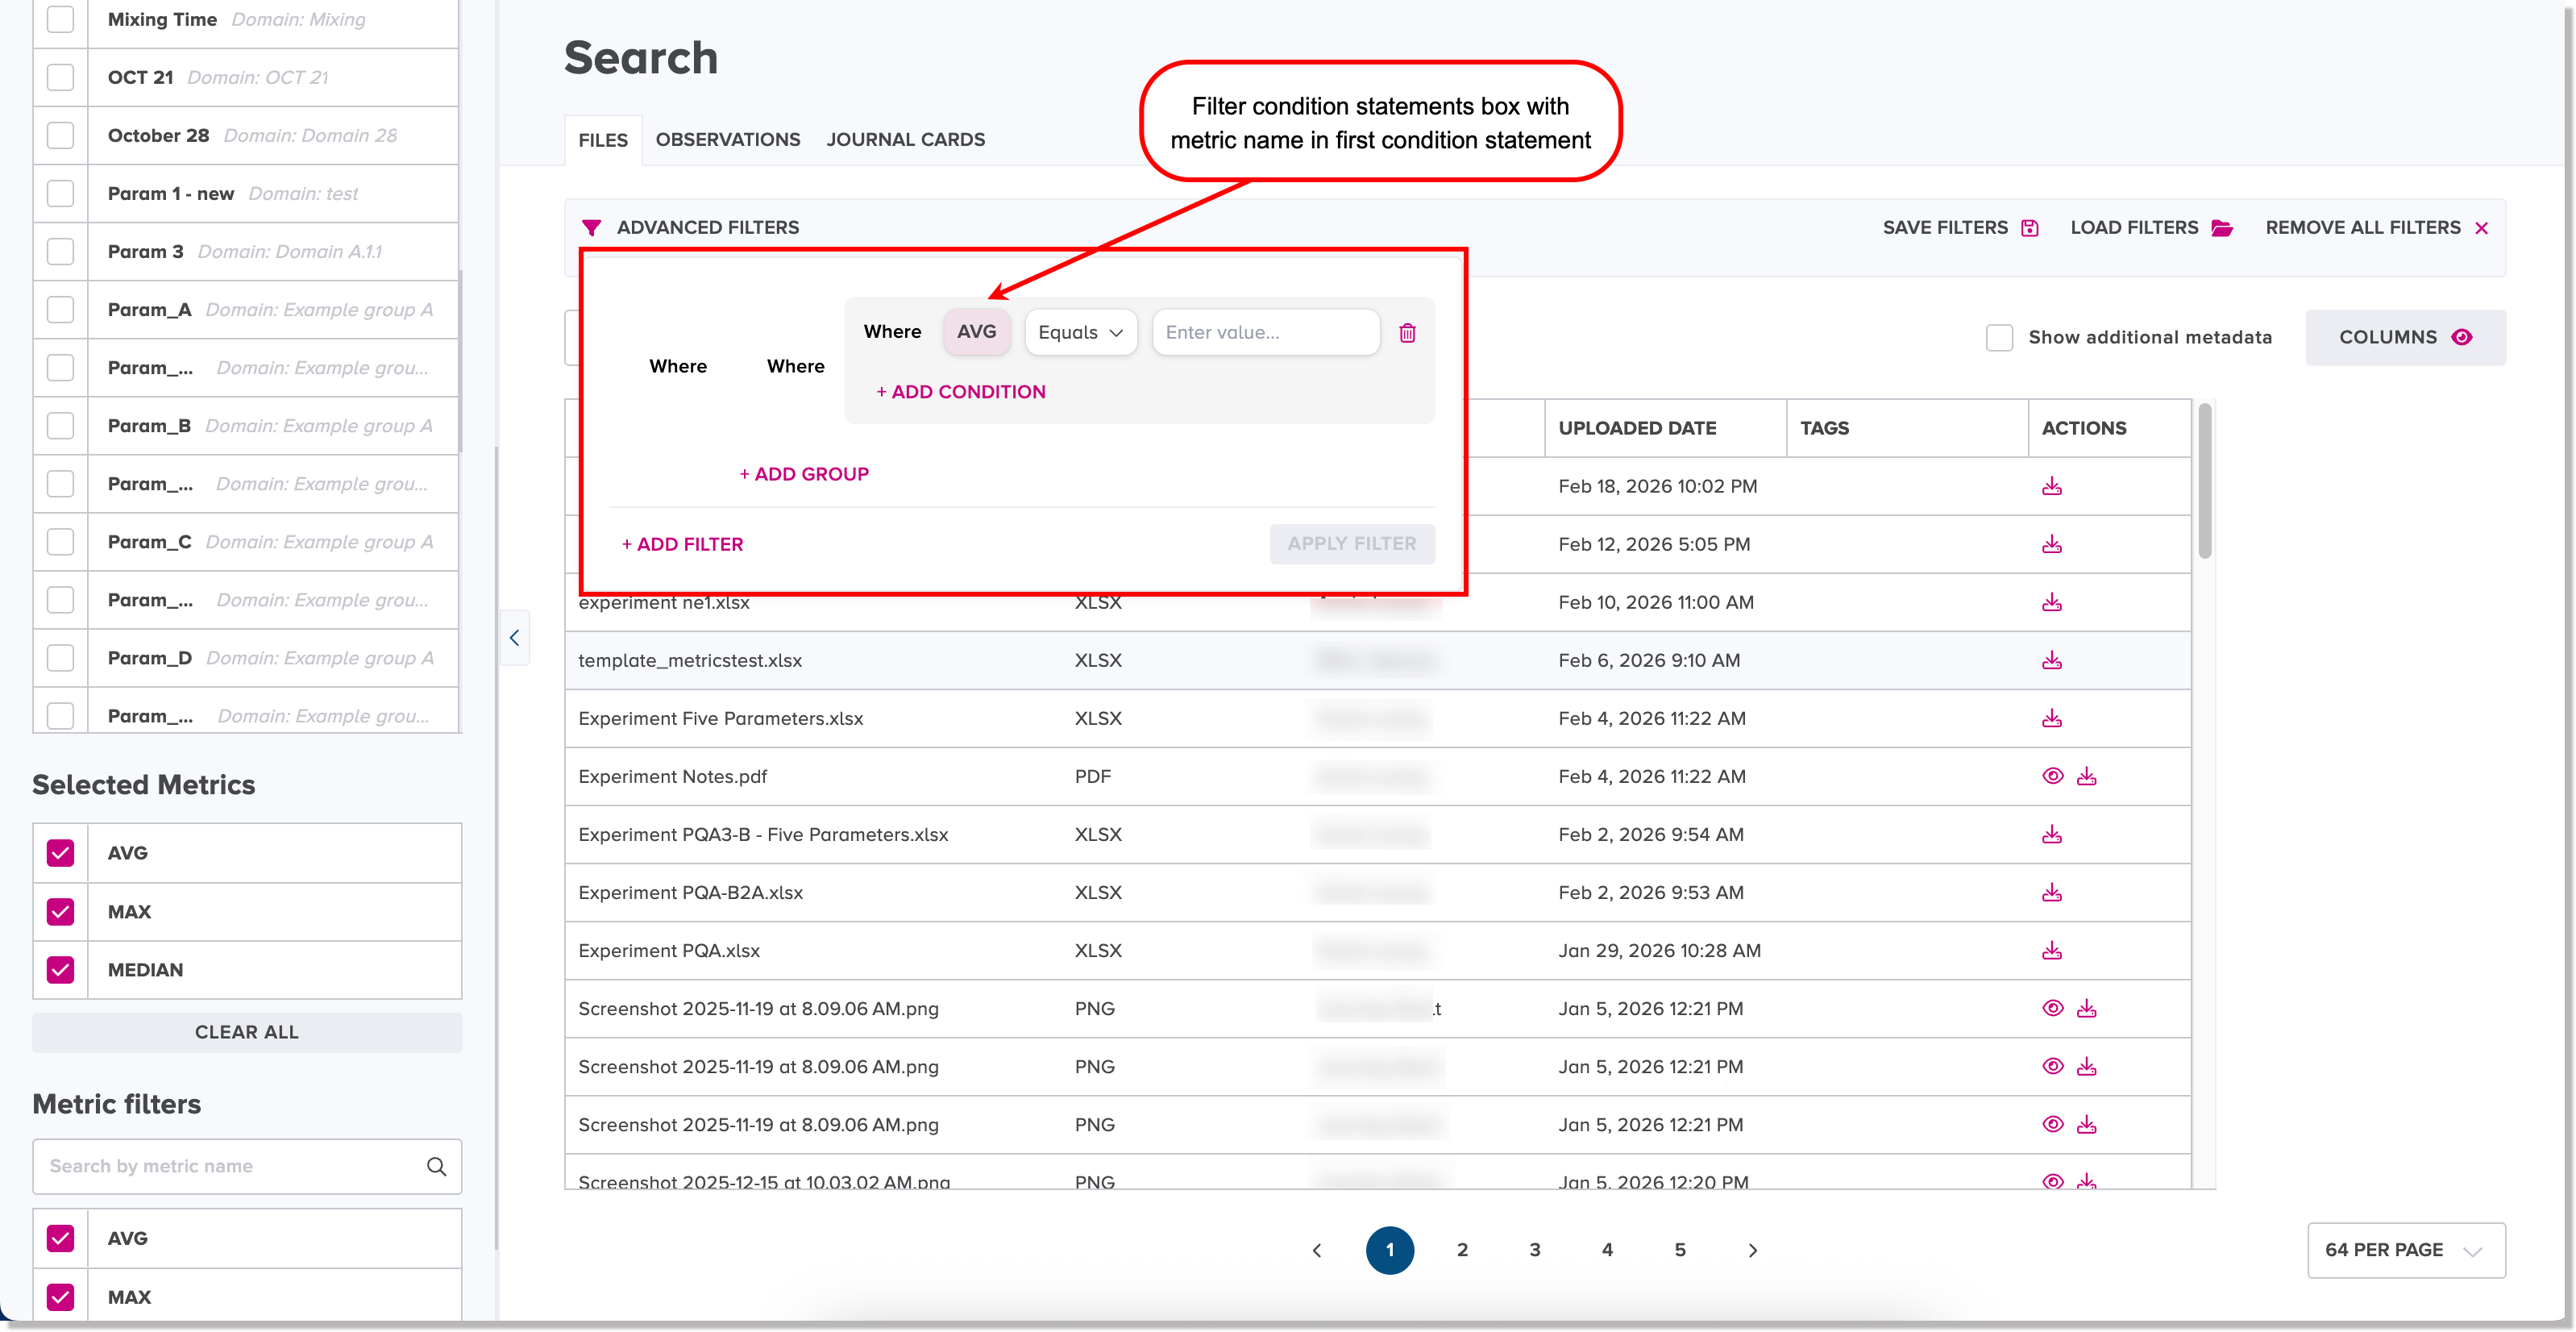
-
To the right of the selected metric name, select a logical operator from the drop-down list.
-
Beside the operator drop-down list, type in a numeric value in the metric value field.
Note
To remove a condition statement, click the delete icon to the right of it.
-
To define another filter condition statement, click the Add Condition function.
A new condition statement for the selected metric appears.
-
In the first toggle field on the left of the new condition statement, change the logical operator from the default OR to AND, if needed.
-
If desired, repeat steps 5 and 6 to define another condition statement for the same metric name.
-
To add a condition group, click or tap the Add Group function.
A new condition statements group appears for the same metric name.
-
Define one or more condition statements, as needed, for the new group.
-
To define another advanced filter for a different metric, click or tap the Add Filter button.
-
Repeat any of the steps 4 to 11, as needed.
-
When you have defined the required metric filter conditions, click or tap the Apply Filter button.
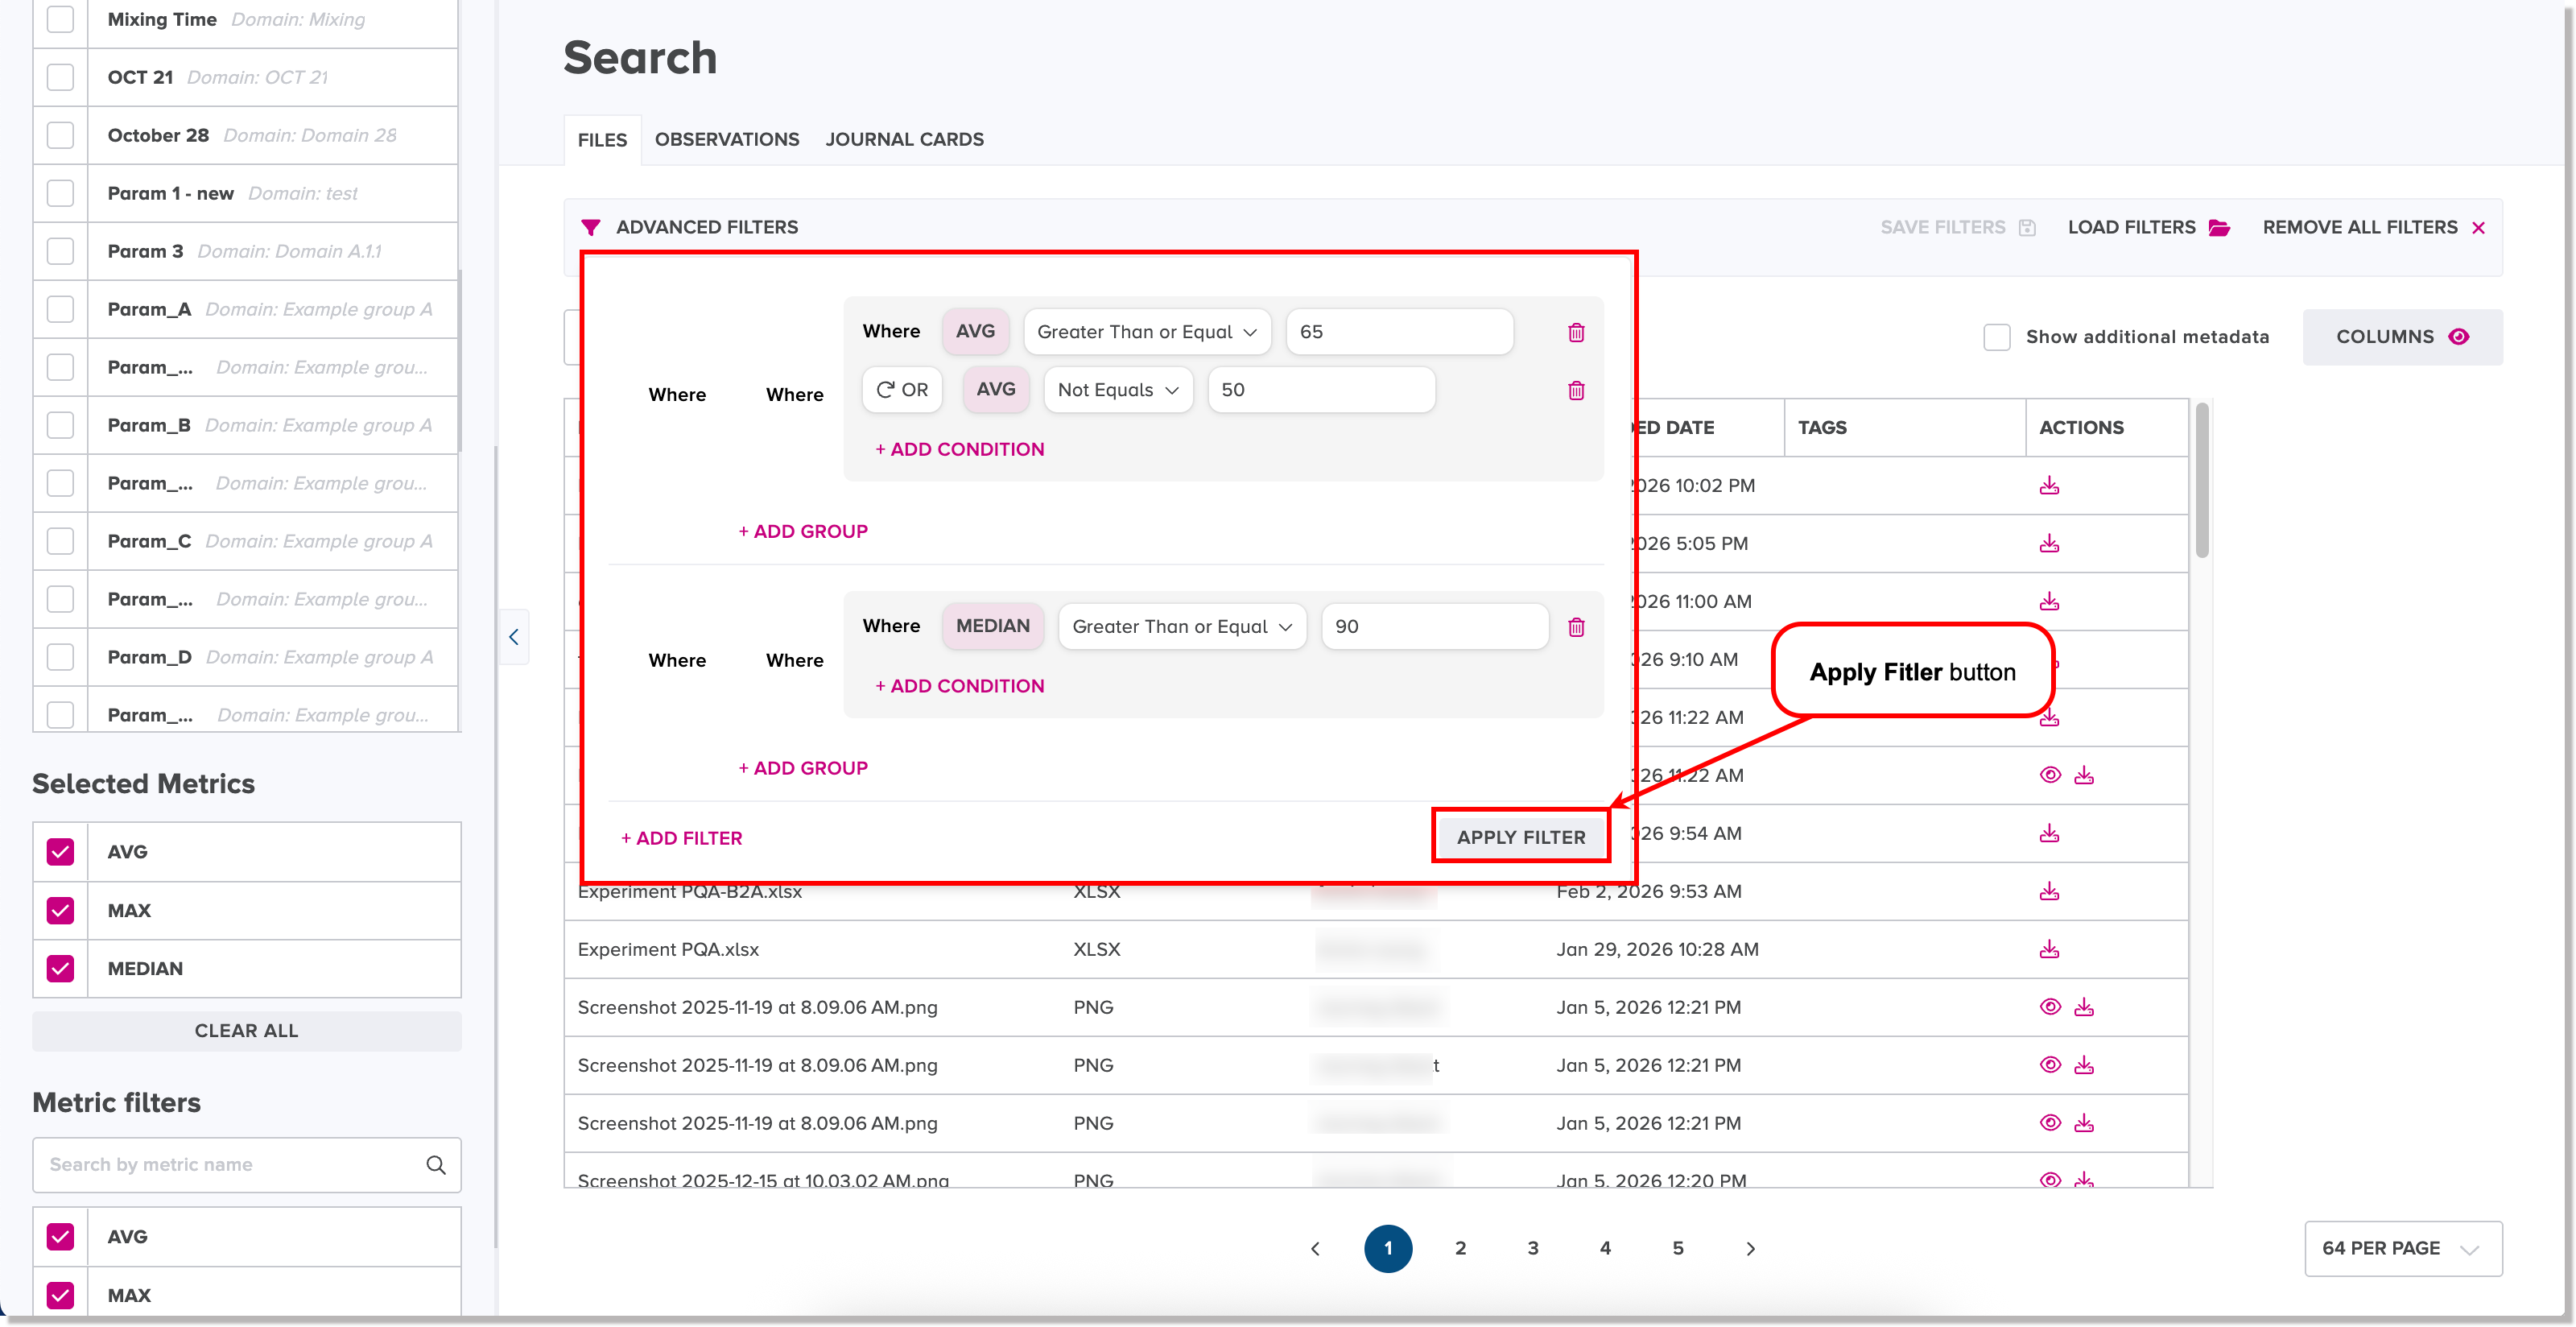
The filtered search results are displayed based on the defined metric conditional statements.