Upload files using the web client
Permissions and access
Minimum role: Researcher
CoBaseKRM enables you to upload files to the database for research and experimentation work that is related to assigned projects. Files can be uploaded at various stages of a project at a node of a project's network map.
CoBaseKRM supports uploading files of various formats to the database, including:
-
JMP data tables
-
Files in Excel and comma-separated values (CSV) formats
-
Image files of common formats (for example, JPEG/JPG, PNG, SVG, etc.)
-
Portable Document Format (PDF) files
If the administrator has assigned a process template to a given project, for which you are planning to upload files, the application will perform a validation check of parameter names in the files before allowing the upload to be completed successfully.
The workflow for uploading files to the database involves the following tasks:
-
Select files for an upload
-
Resolve unmatched parameter names
-
Add a journal card to the related node for an upload (optional)
-
Save a draft of an incomplete upload
-
Complete an upload
Note
Each selected file for upload is restricted to a maximum size of 30 MB and containing a maximum of 500 columns.
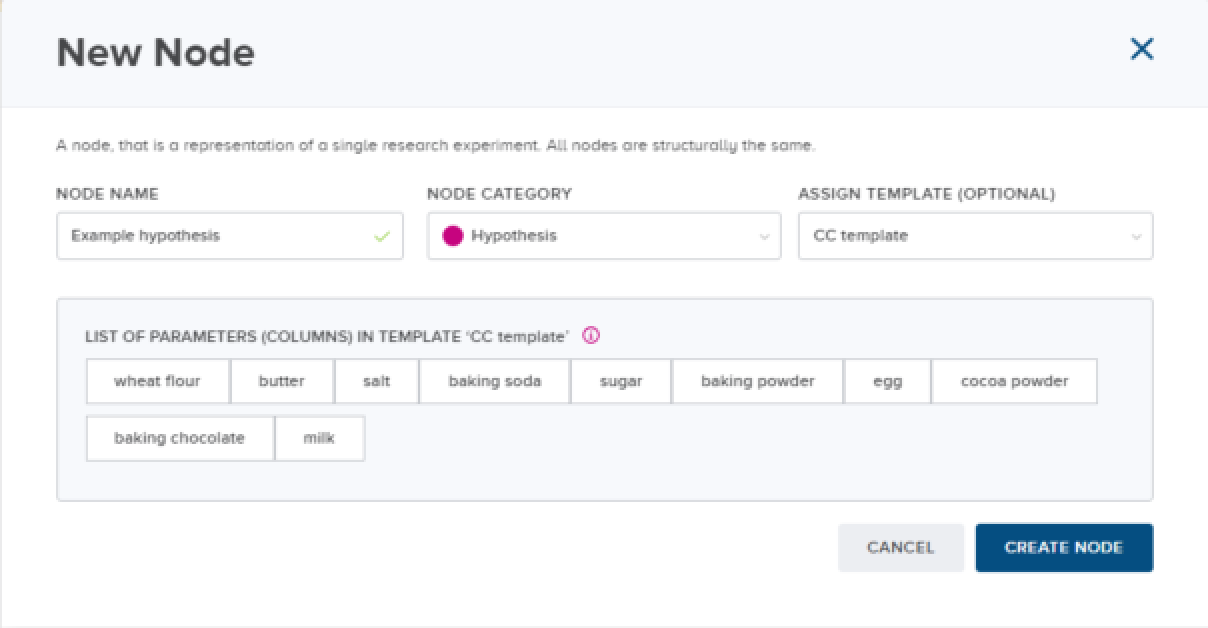
Define an template for the parameter matching process
Assigning a template for parameter matching to a node of a network map is optional. However, if an existing template has been assigned to a given project, the corresponding template name is automatically displayed in the Assigned Template field and will be assigned in turn to the selected node. You can select a different template to be assigned to the node, if needed.
Or you can clear the field if you don't want to assign a template to the node, which means that CoBaseKRM will perform parameter matching using all existing parameter names in the database. In this scenario, CoBaseKRM will automatically generate a hidden template with an auto-assigned template ID to be used with the parameter process.
To define an optional template for the parameter matching process, in the Assign Template field, select a template to be assigned to the new node (optional).
The parameters from the assigned template are listed in the New node dialog.
Select files for upload
The first task in the upload workflow is to select one or more files from a local directory or server, which is accessible by your computer.
To select files for upload:
-
Navigate to the Projects view.
-
Click or tap a project name to navigate to the Network Map tab.
-
Select a node that will be related to the file that you will select to be uploaded:
-
First node of a network map: If you want to create the first node in a network map :
-
Click or tap the Create First Node button.
The New node dialog appears.

-
In the Node Name field, type the name of the new node.
-
In the Node Category field, select a note category.
-
Click or tap the Create Node button.
The new node is displayed in the network map area.
-
-
Existing node: If you want to upload files to an existing node:
-
Click or tap an existing node within a network map to place the focus on it (an outline surrounding the node appears).
-
In the node panel below the network map area, click or tap the Data tab.
-
-
-
On the Data tab, click or tap the Upload button.
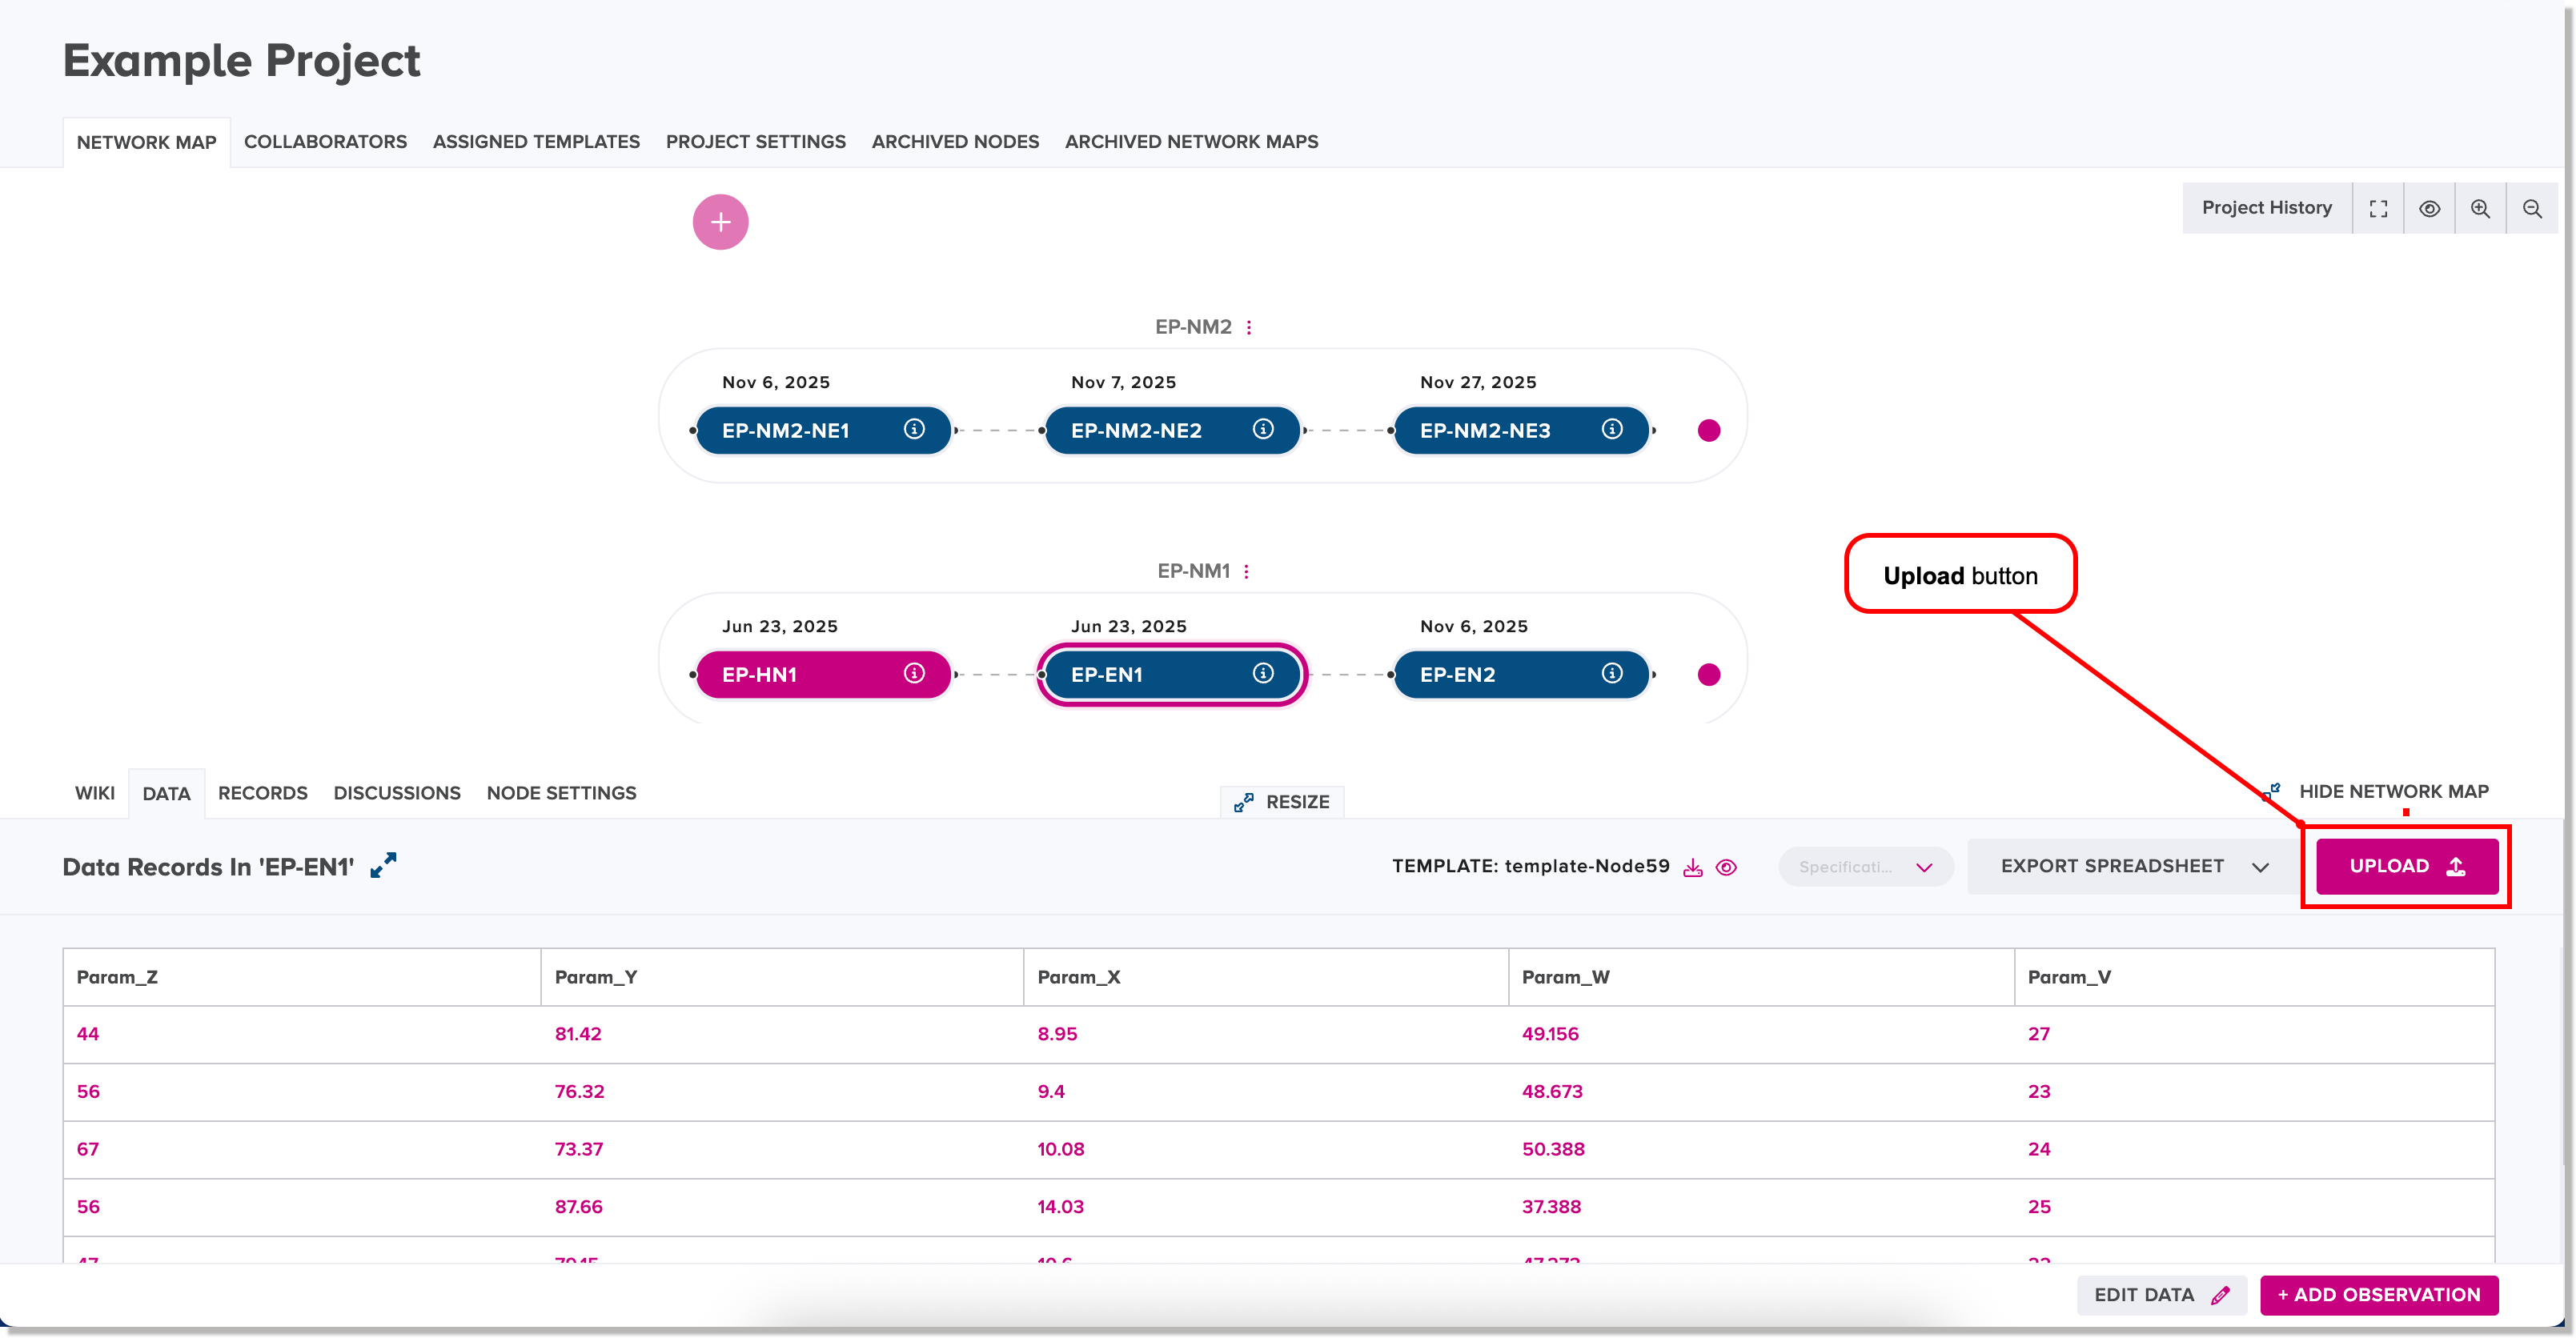
The New Record dialog appears.
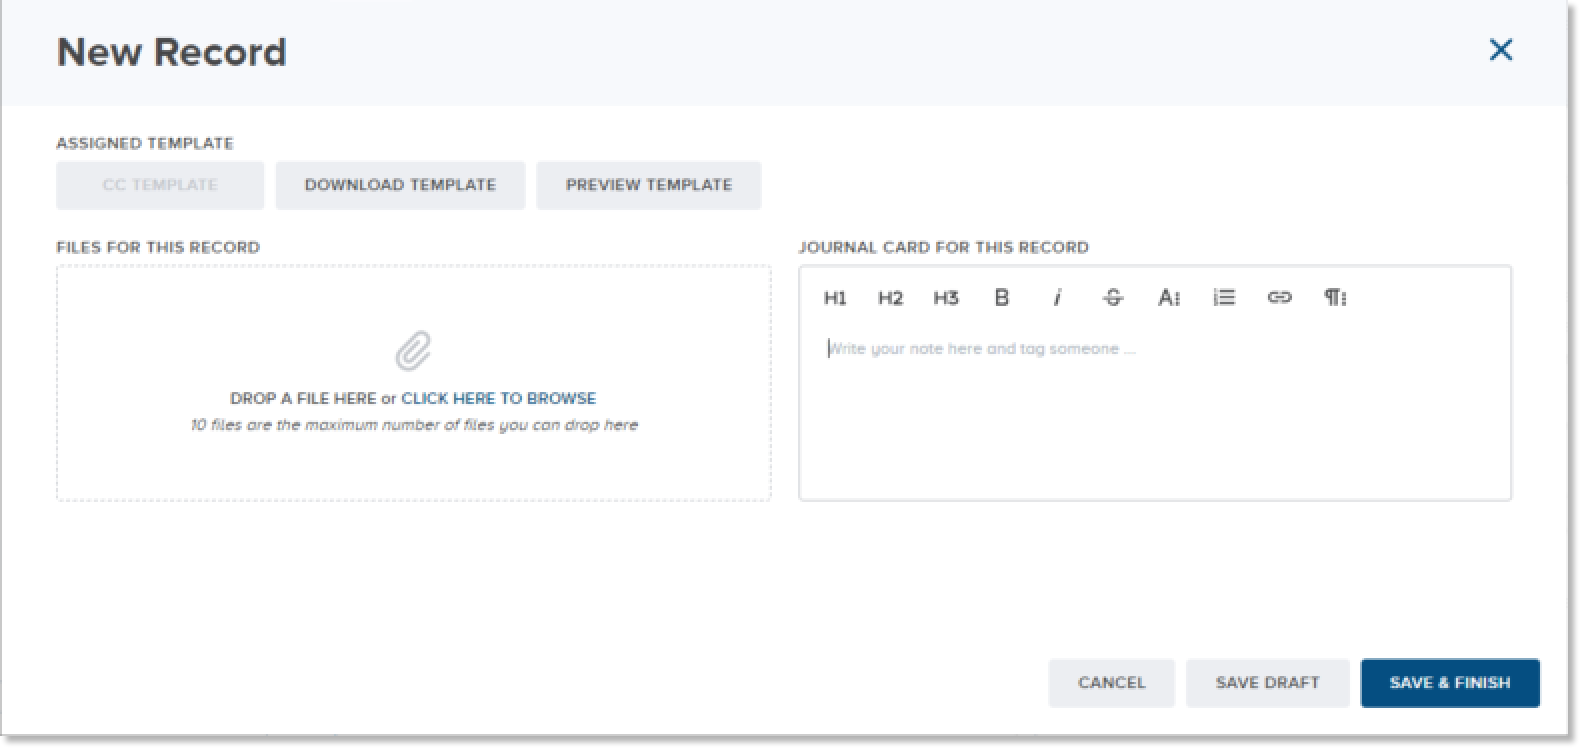
-
From the window of a local directory, select one or more files that you want to upload and drag them to the specified area of the New Record dialog.
Note
Each selected file for upload is limited to a maximum size of 30 MB and a maximum number of 500 columns.
Alternatively, click the "Click here to browse" link in the Files for record field to open the window for a local directory, select a file, and click Open.
Important Note
If you select a file that is detected as a duplicate (namely, it has the same contents as an existing file that is associated to the same workspace and is already saved in the database), a warning message appears.
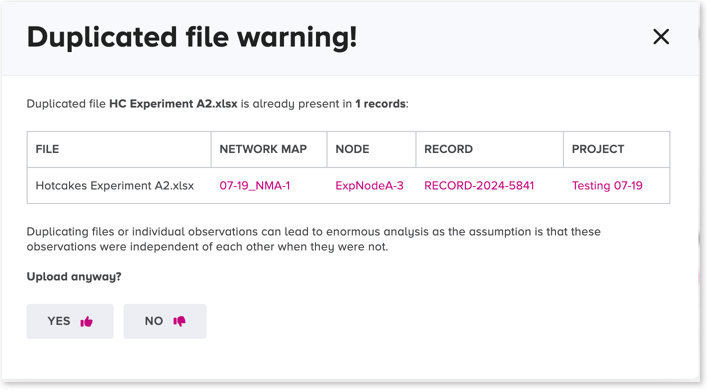
If you want to view details of a file that is detected as a duplicate, click any of the hyperlinks shown in magenta text beside a listed file name, which allows you to see whether or not the selected file is an actual duplicate of an already uploaded file.
-
Choose one of the following actions to resolve the flagged duplicate files:
-
To remove the duplicate file that is selected for the upload, click or tap No.
-
To keep the selected file for the upload, click or tap Yes.
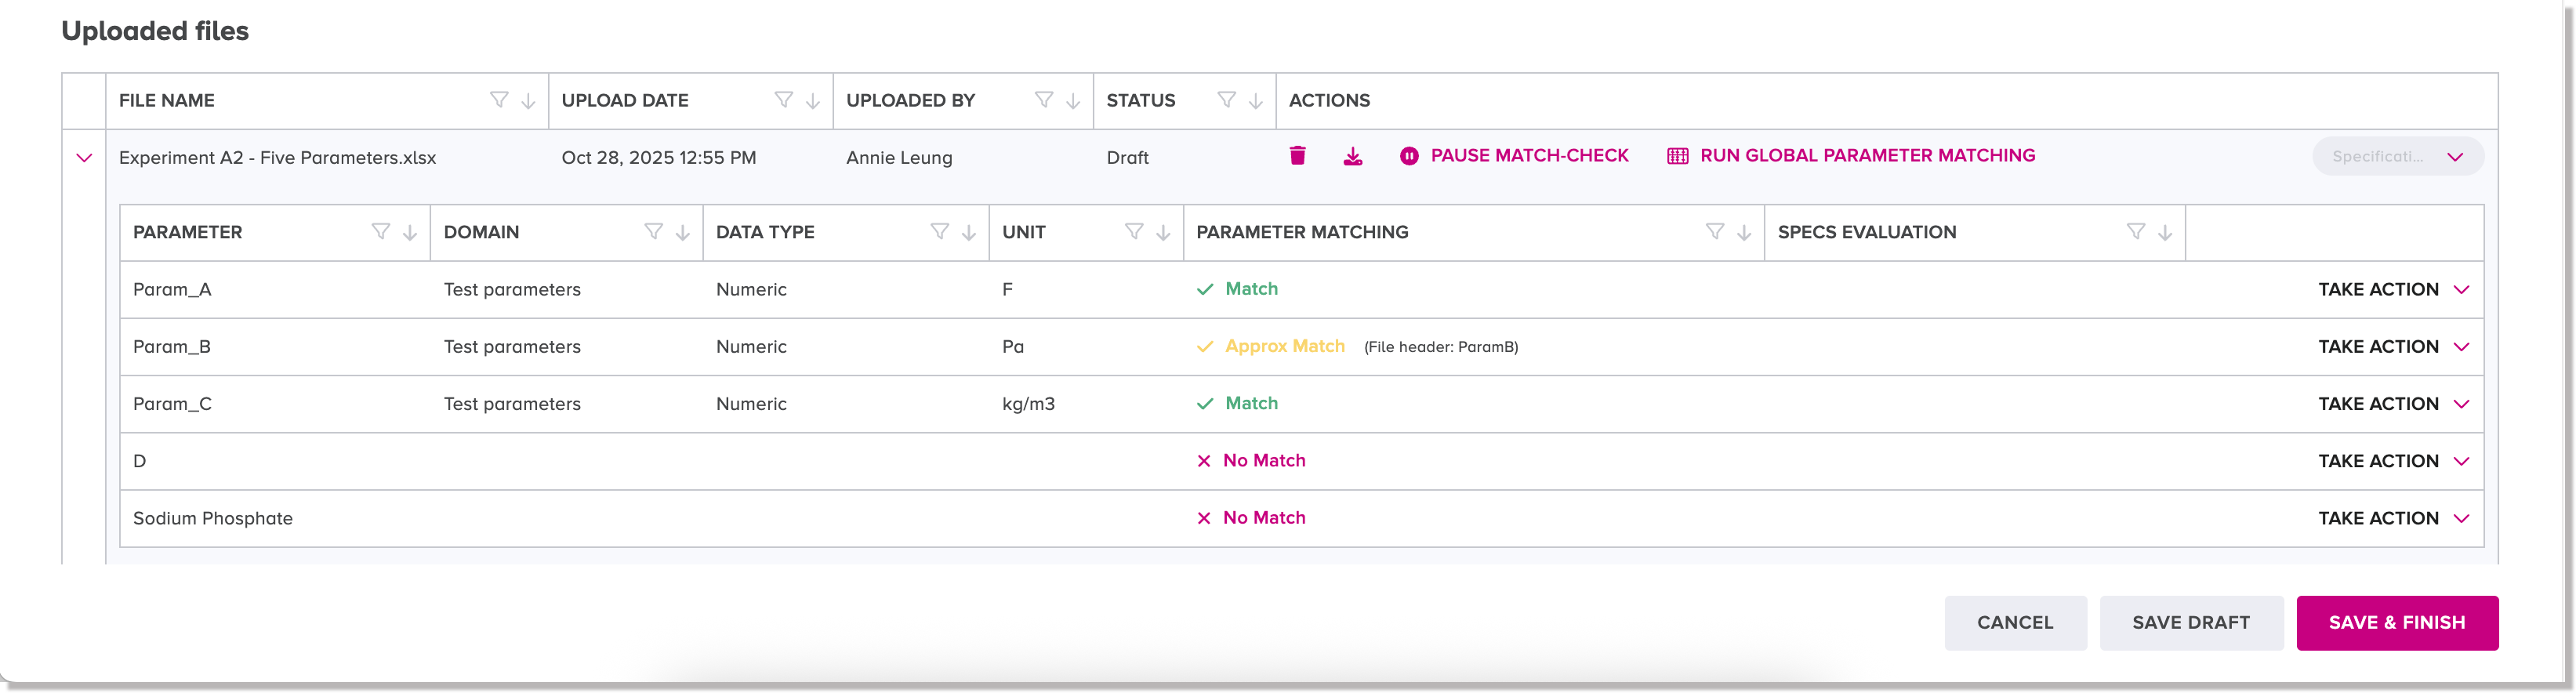
The Files Uploaded table appears, displaying the names of the parameters, associated domains, and units of measurement in the files and a status for each to indicate whether they match the valid values defined in the assigned template.
-
For more information about the parameter matching process, see the following section Parameter matching.
For more information about resolving unmatched parameter names in selected files, see the section Resolve actions for unmatched parameter names.
Classify files as managed or supplementary
When you select a file for upload, it will be classified as "managed" or "supplementary":
-
Managed - applies to a data table of observations for a given node and path of a network map. A managed file is upversioned when it is reuploaded to the database.
-
Supplementary applies to other file types (for example, PDF file, image file, etc.) that supplements a managed data table and supports a given node and path of a network map.
Note: The Supplementary toggle button is turned on by default when you select such a file and cannot be changed.
The setting of the toggle button for the managed or supplementary file depends on which file type is selected for upload.
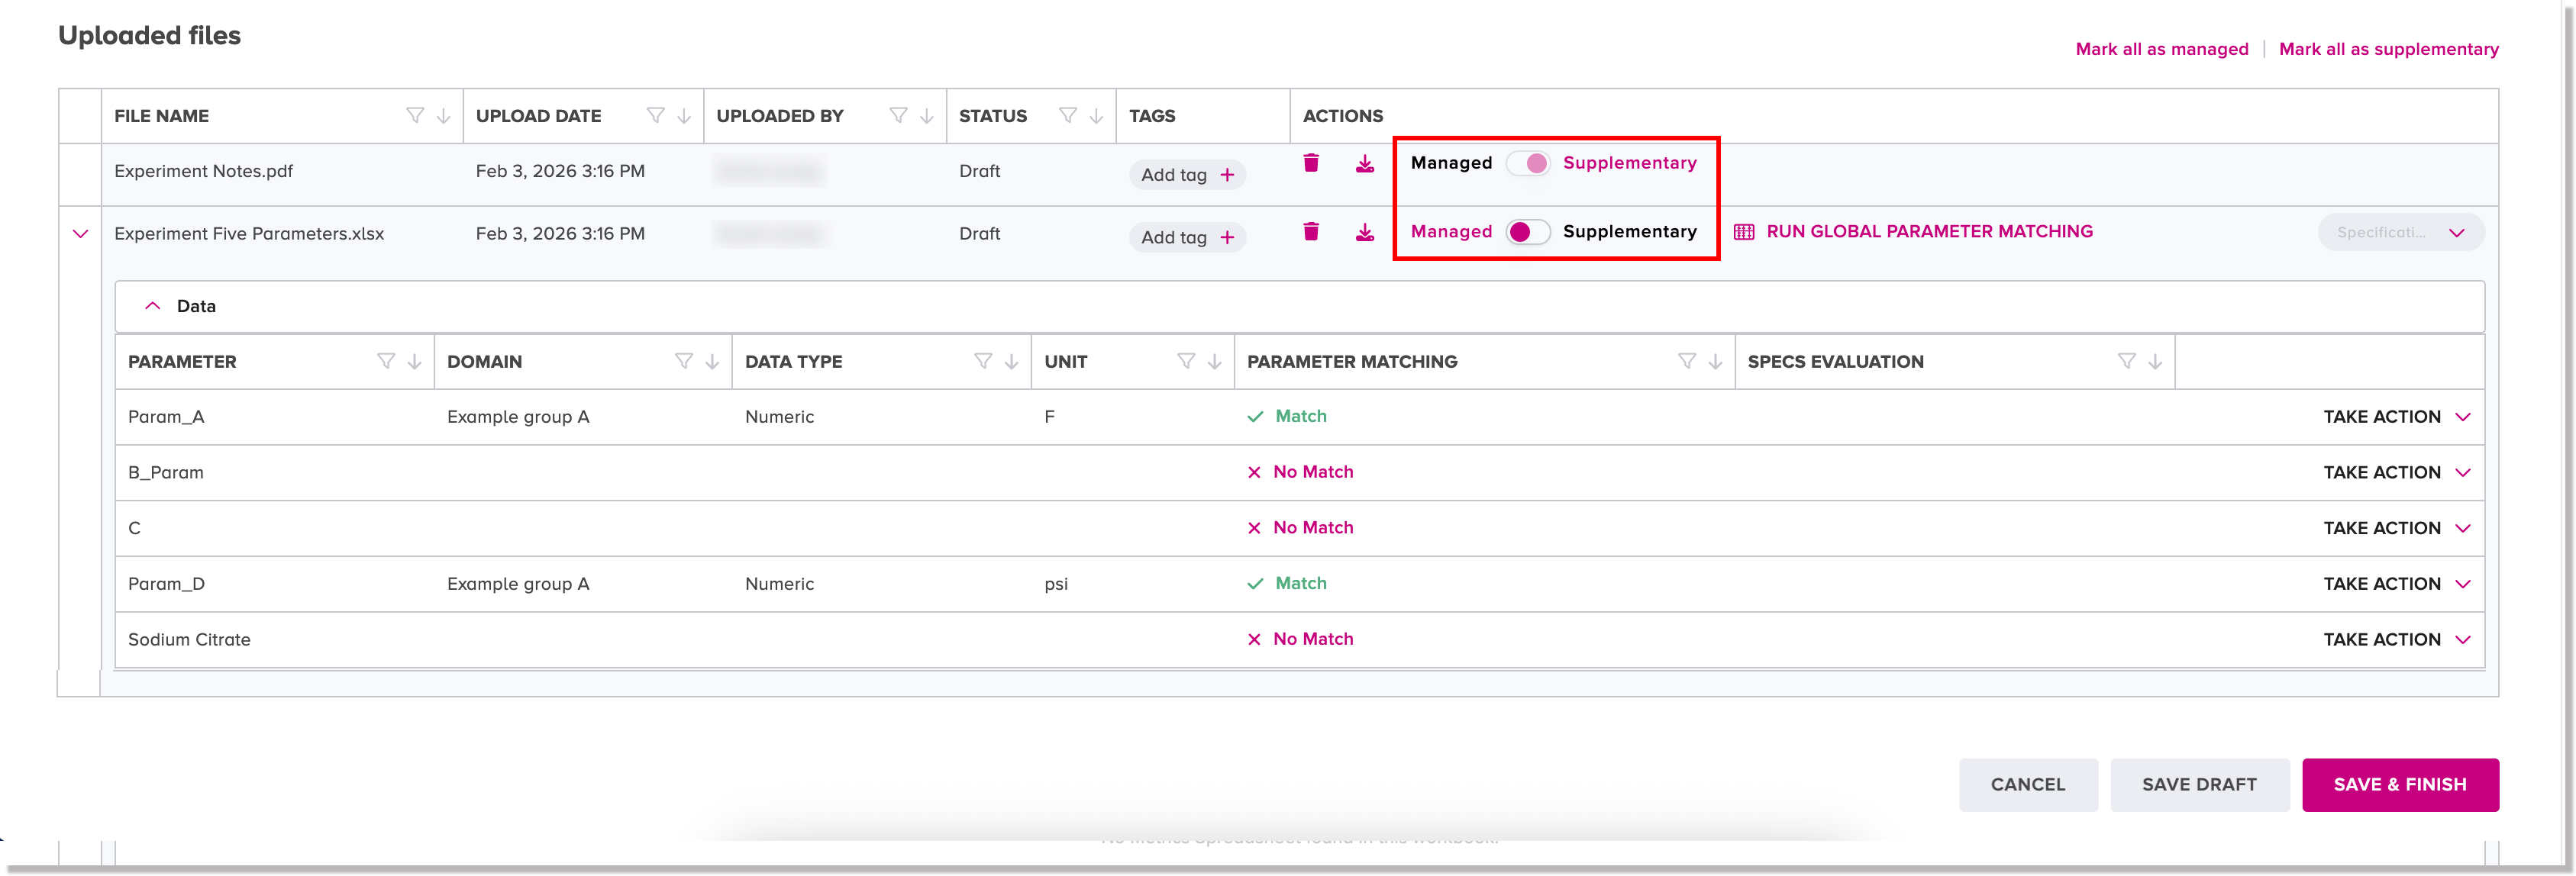
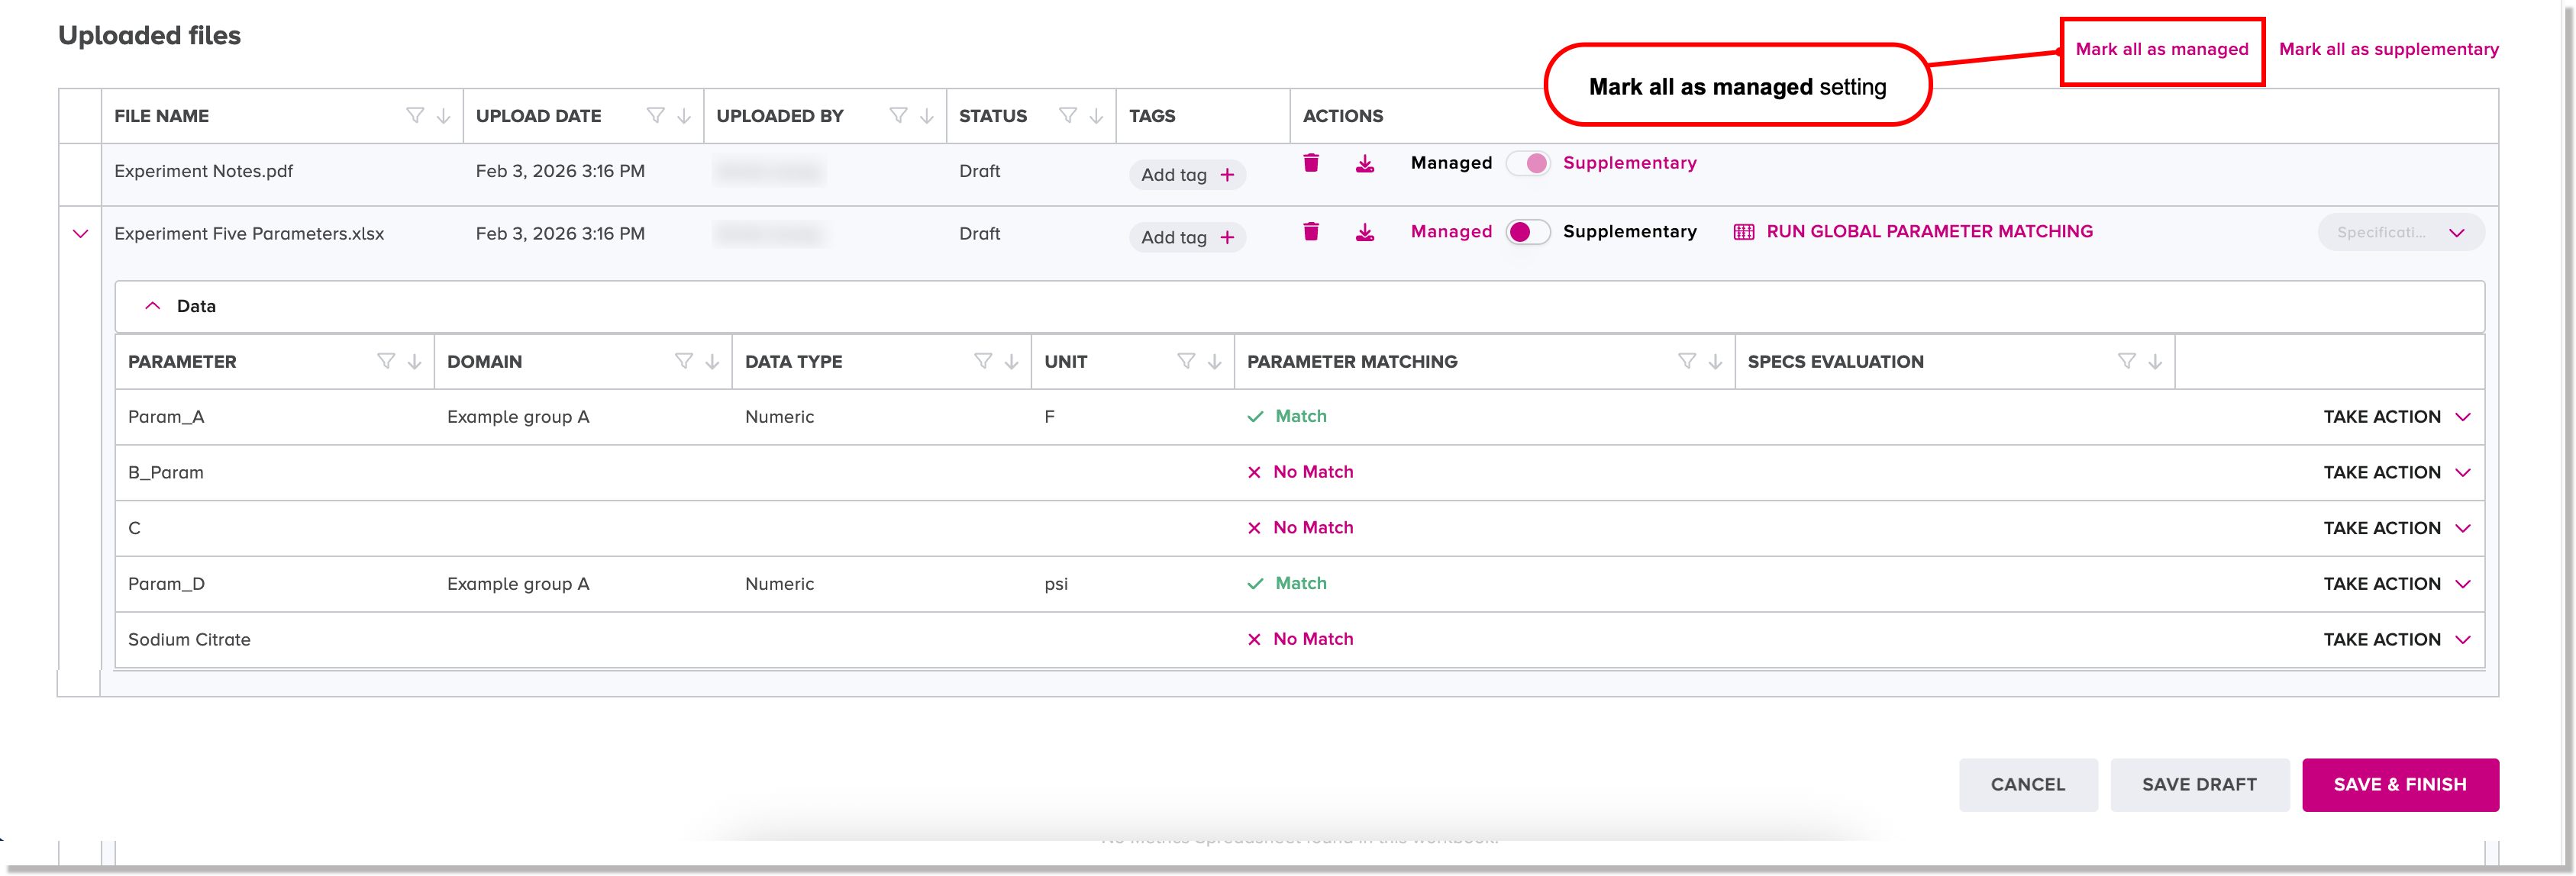
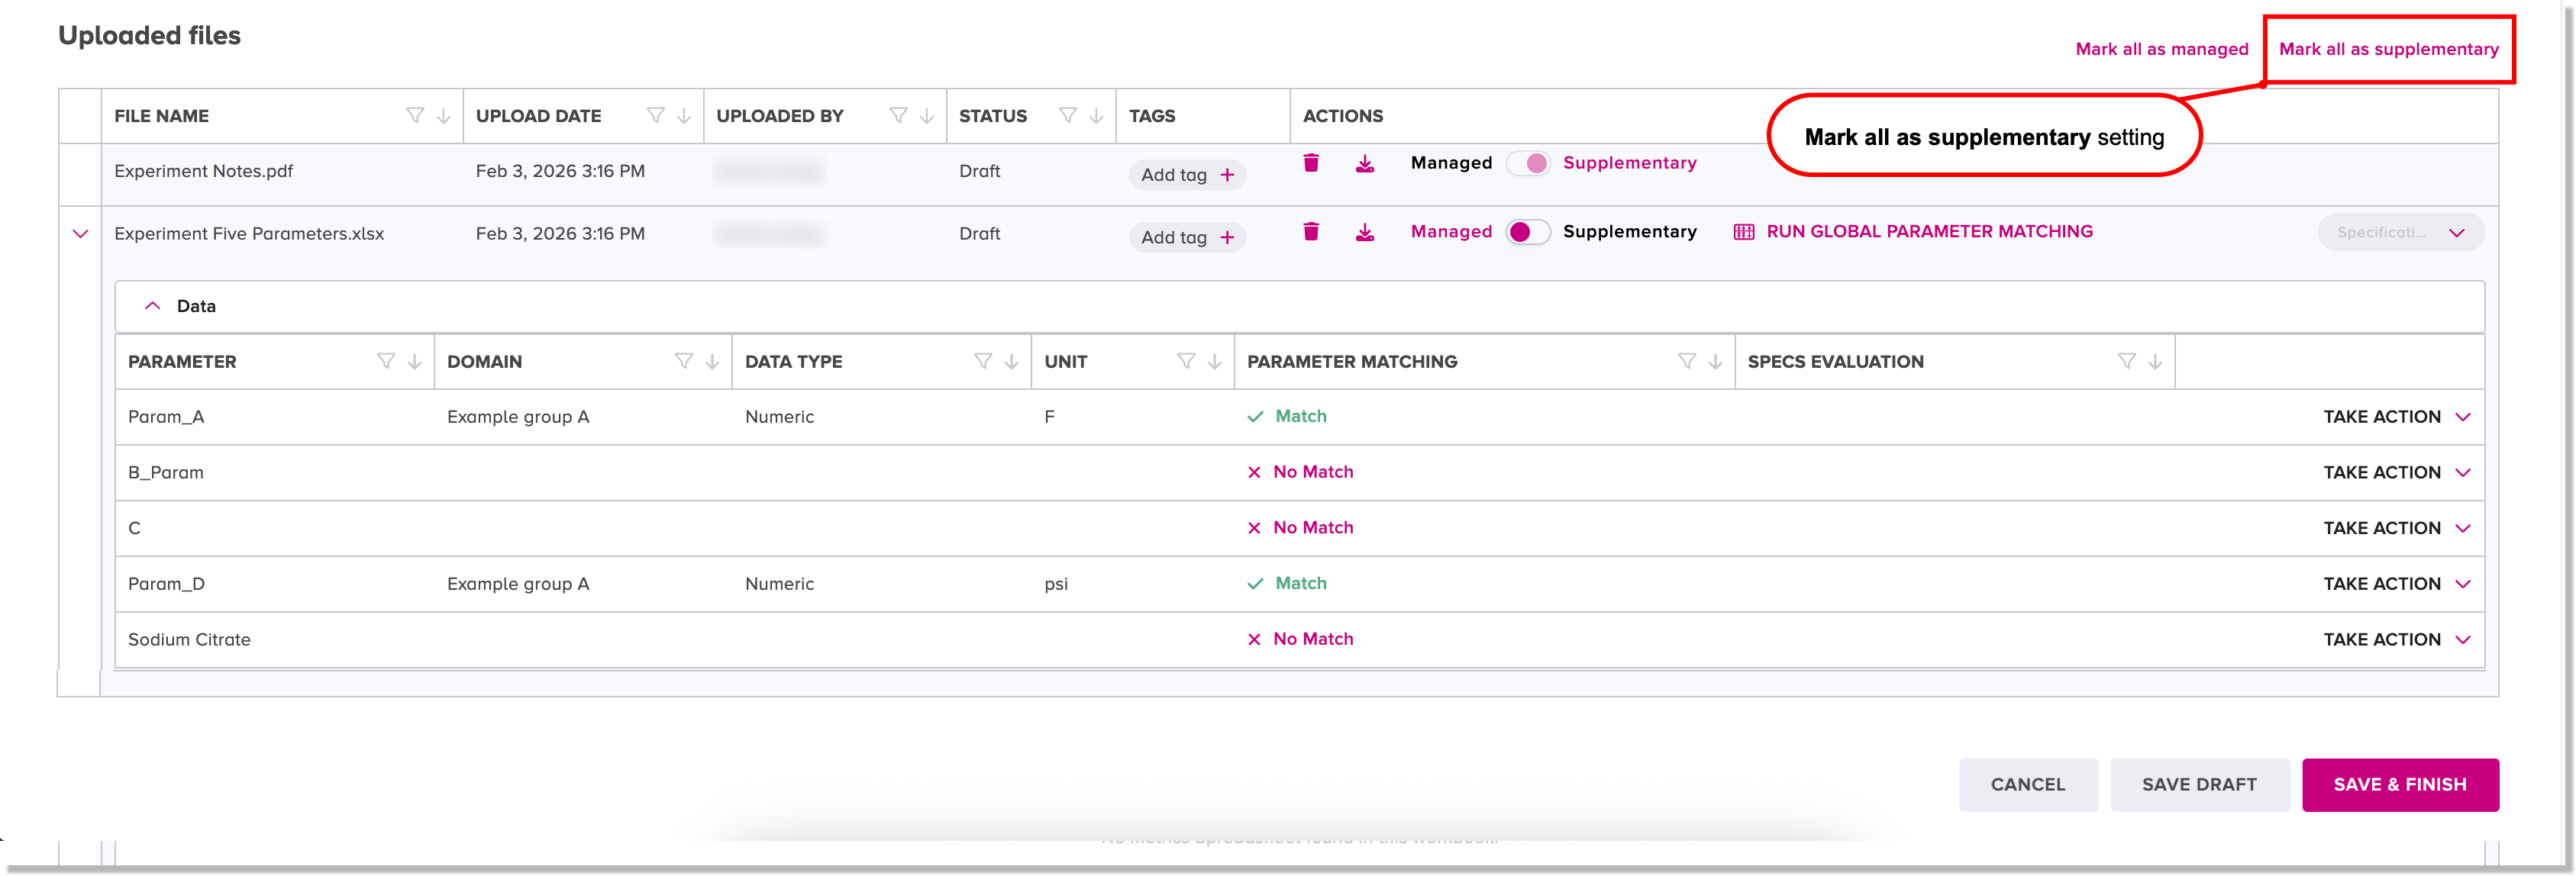
Mark all files as managed or supplementary
If you select multiple data tables for upload, you can click the Mark all as managed setting if you want to mark all of the data tables to be upversioned.
If you select multiple, other file types for upload, you can click the Mark all as supplementary setting if you want to mark all of the files as supplementary.
Parameter matching
When you select a data file to be uploaded to the database, the web client performs parameter matching automatically as part of a process to evaluate and harmonize all parameter names for an organization that are saved in the database.
The web client first checks whether a template is assigned to a related node for an upload. If so, it uses the assigned template for parameter matching. If no template has been assigned to the related node, it performs global parameter matching against all existing parameter names in the database.
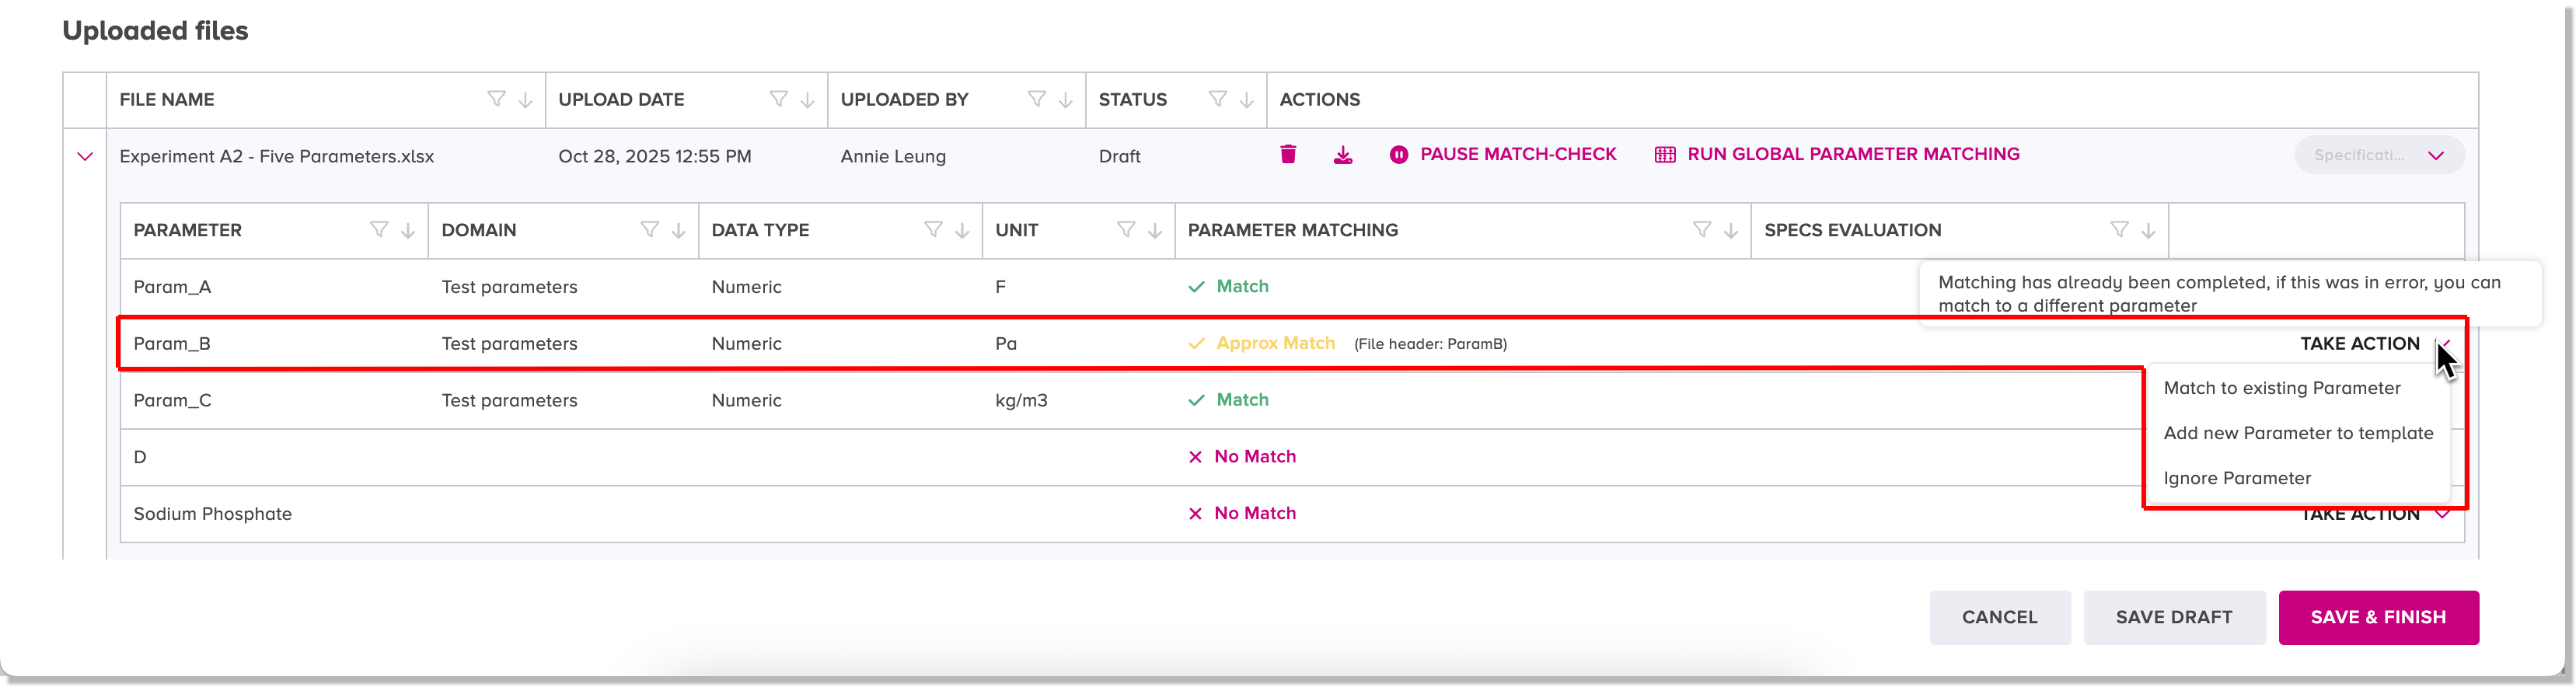
If CoBaseKRM detects any unmatched parameter names in the selected files for upload, a status of No match is displayed beside each unmatched parameter name.
For each unmatched parameter name, you are required to choose one of the resolve actions for unmatched parameter names before you are allowed to complete the upload.
The statuses of the parameter names after the parameter matching has been performed are described as follows.
| Status | Description |
|---|---|
| Match | A given parameter name in a selected file matches an existing parameter name in the database and is acceptable for upload. |
| Approx Match | A given parameter name in a selected file nearly matches an existing parameter name in the database. The web client updates the given parameter name to the existing parameter name, which is acceptable for upload. Beside the status, the original parameter name is displayed for comparison. Note: If the web client has matched the given parameter name incorrectly, you can select an action to match to a different parameter name, or create a new parameter using the original parameter name. See the following section for supported resolve actions and their descriptions. |
| History Match | A given parameter name in a selected file matches an existing parameter name from your upload history in the database. Note: If the web client has matched the given parameter name incorrectly, you can select an action to match to a different parameter name, or create a new parameter using the original parameter name. See the following section for supported resolve actions and their descriptions. |
| No match | A given parameter name doesn't match any existing parameter name in the database. See the following section for supported resolve actions and their descriptions. |
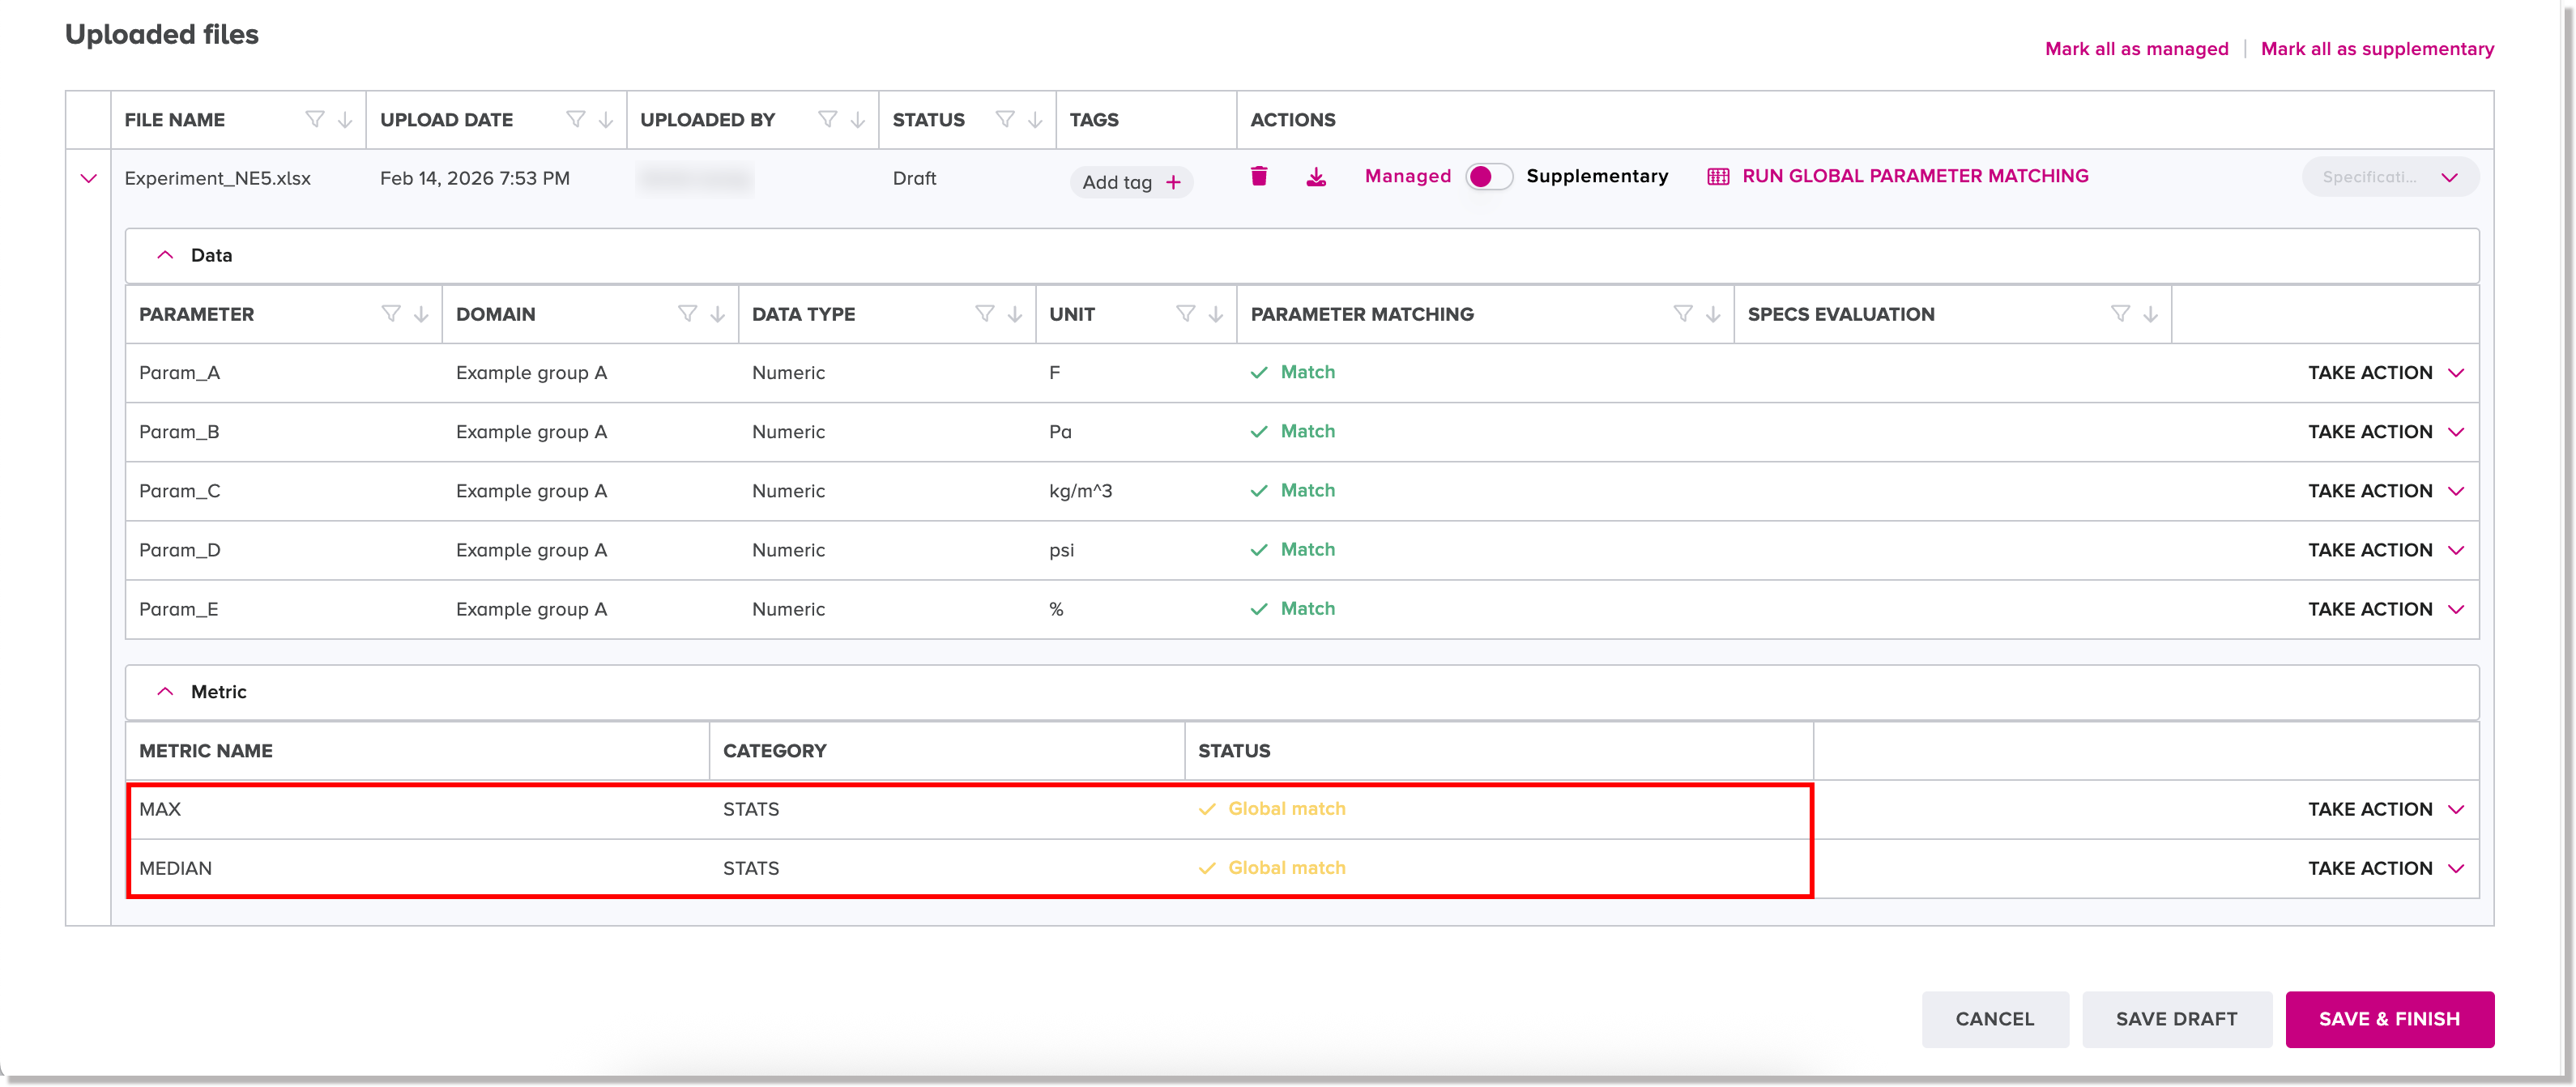
Run global parameter matching
If you want to override the template used for parameter matching and perform global parameter matching of all parameters saved in the database, click the Run global parameter matching setting.
Once you have clicked the Run global parameter matching setting, if there is a match in the database, the status is Global match. The other statuses relatatively are Global + \
Resolve actions for unmatched parameter names
This task is only required if any unmatched parameter names in your selected files need to be resolved. When an unmatched parameter name is marked with a status of No match, you are required to resolve any unmatched parameter names so that the status becomes Match before the upload will proceed successfully.
You have three options in the Take Action menu for resolving unmatched parameter names:
-
Match to existing parameter - CoBaseKRM updates the unmatched parameter name to match an existing parameter with the closest name in the assigned template for the related node.
-
Add new parameter to template - CoBaseKRM makes a new parameter object from your parameter name in the preview and changes the status to Match.
-
Ignore parameter - CoBaseKRM will ignore the given parameter name and it will not be uploaded to the database. The original data table will still contain the given parameter name when it is downloaded from the database.
When you have resolved unmatched parameter names, you are ready to complete the upload.
Compare observation values of parameters related to a node with sets of specification limits
In the Upload dialog for a node, you can select one or more specification sets to show a visual representation of how observation values for parameters having a numeric data type withing a selected data table fall within or outside acceptable specification ranges.
The Upload dialog features specifications sets in a drop-down list field that you can select for a comparison with parameter values.
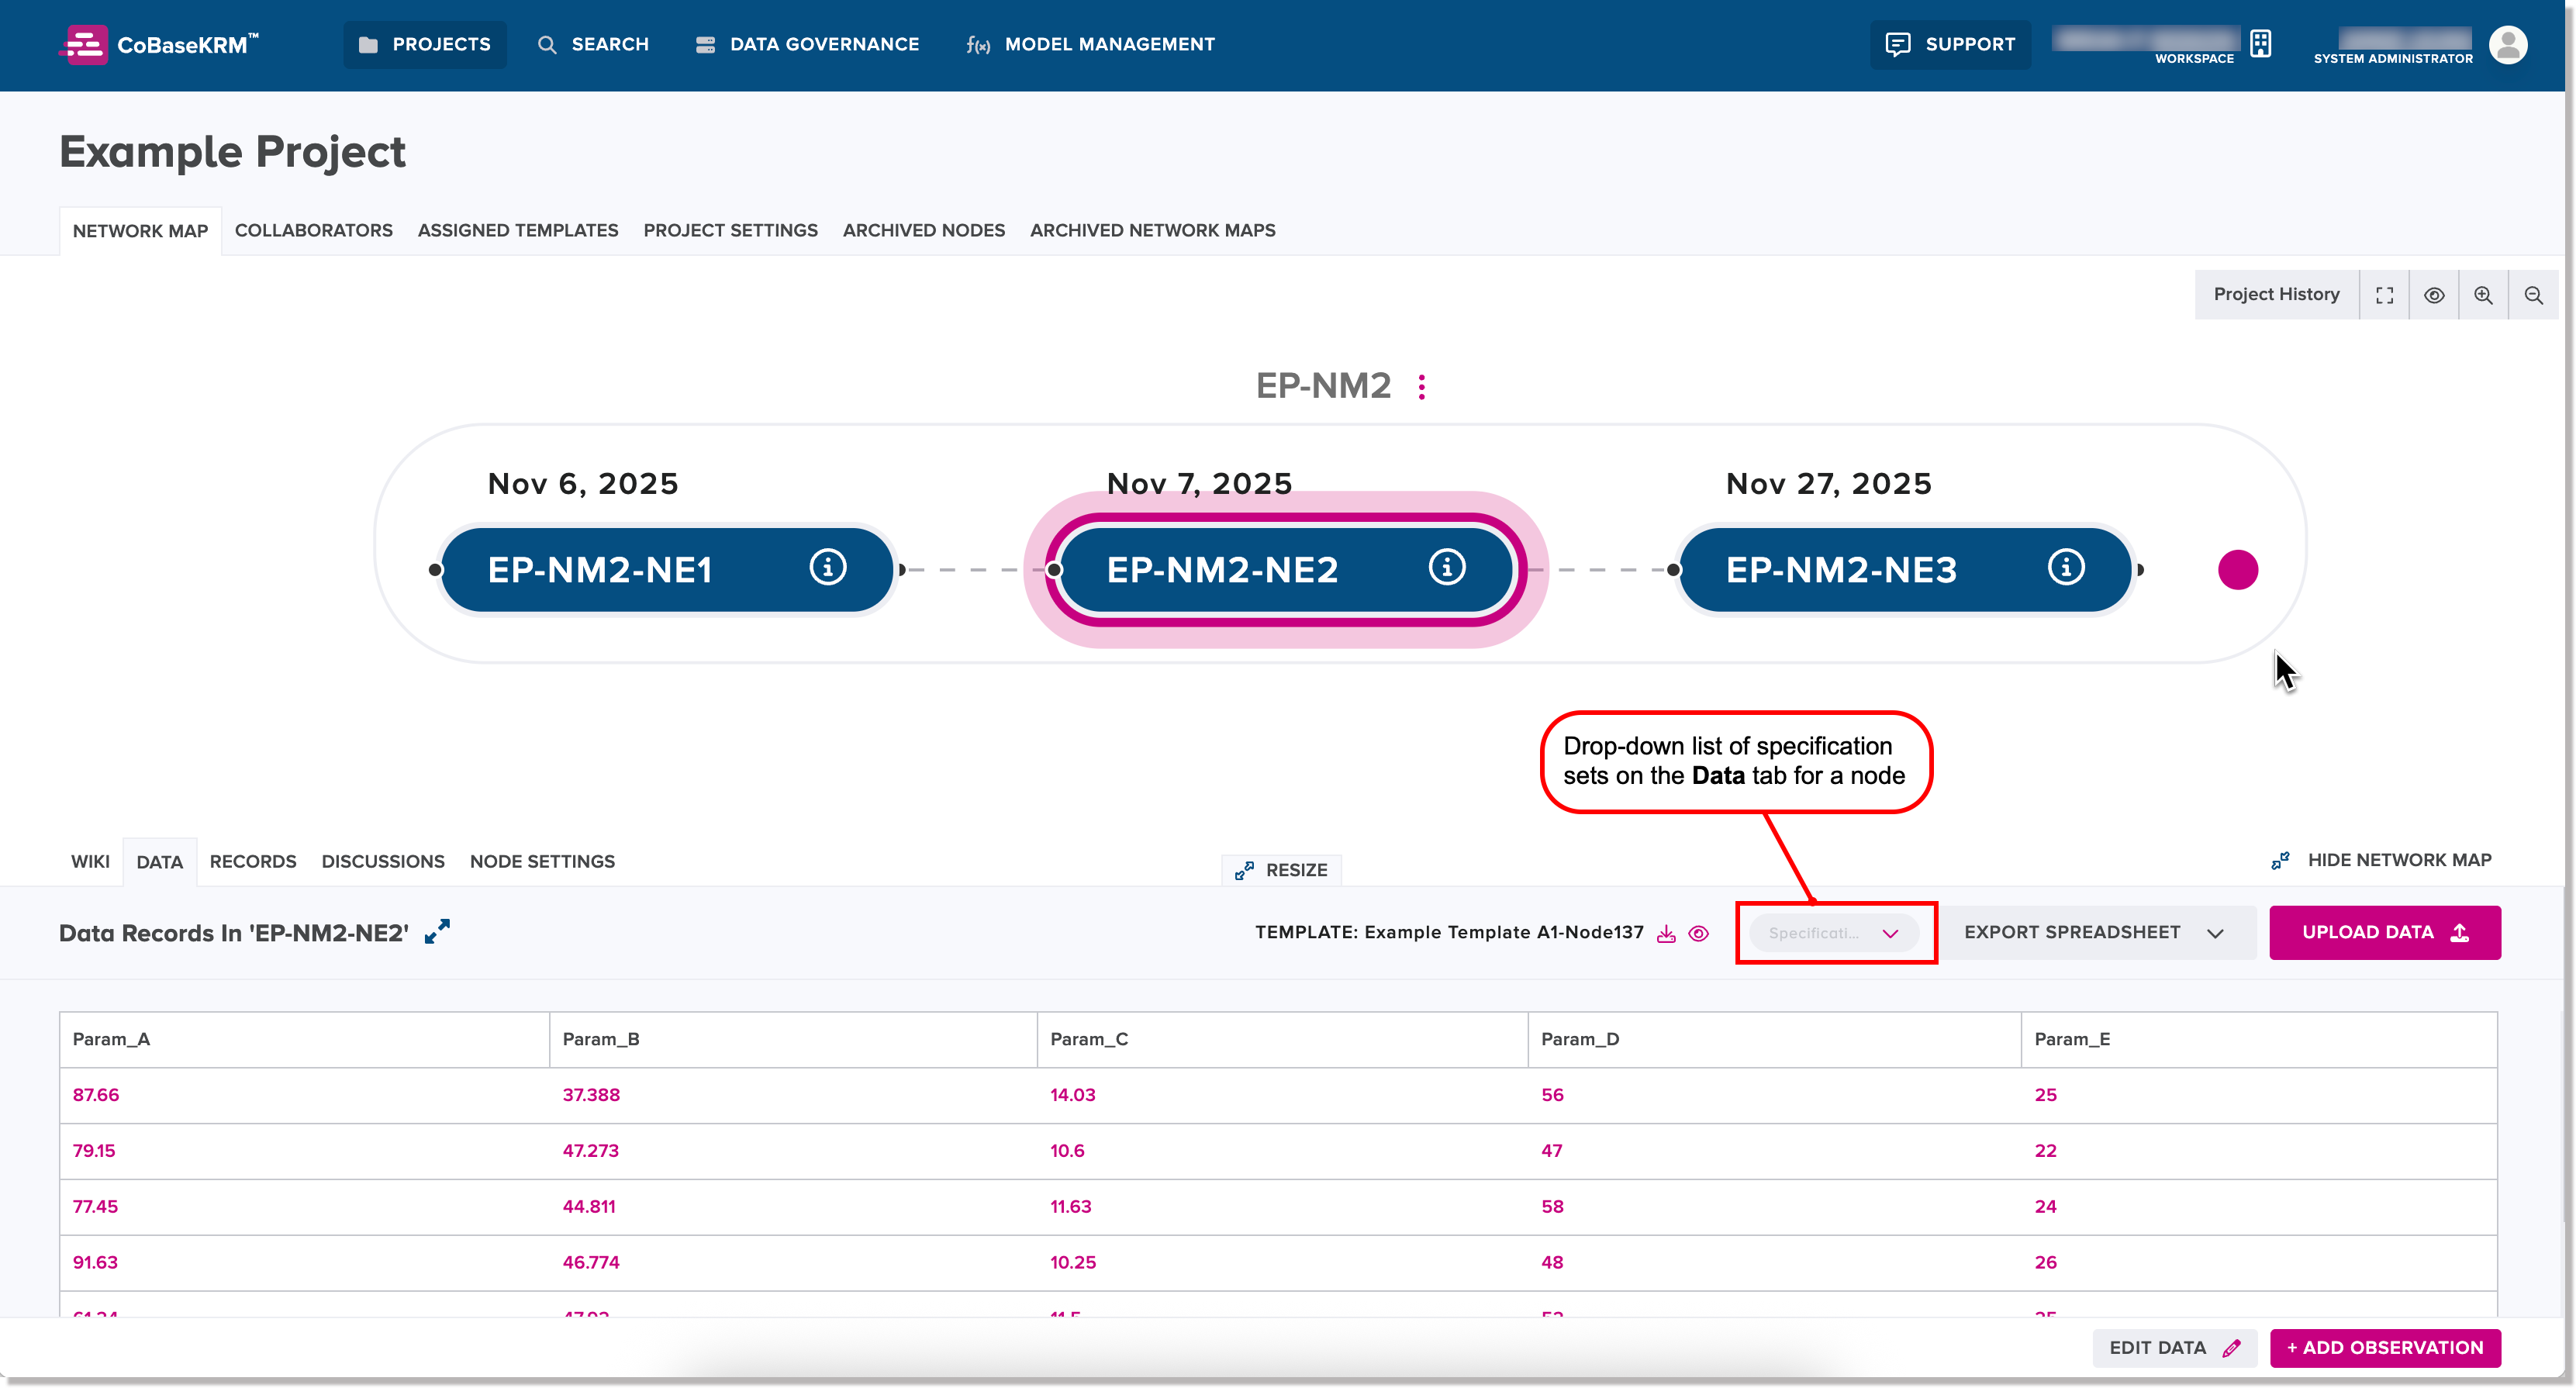
When you select a specification set, the web client visually represents the acceptable range for each parameter having a numeric data type that has a defined specification range as a grey capsule. If a specification range has no defined lower limit, double arrowheads are shown on the left side of the grey capsule. If a specification range has no defined upper limit, double arrowheads are shown to the right of the grey capsule. For example:

The distribution of observation values for each parameter that has a defined specification range is shown as an orange line that overlays a grey capsule.
When you select multiple specification sets, the web client takes the highest Lower Specification Limit (LSL) value and the lowest Upper Specification Limit (USL) value and configures a single range of values that all of them have in common, as represented by a grey capsule.
To remove a selected specification set from a comparison, click or tap the drop-down list of specification sets and unselect the corresponding specification set name.
Metrics matching
When you select a data file for upload, the web client performs metric matching automatically of the metric names in your data file. On the Metrics tab of your data file, the list of metric names is matched against all of the existing metric names in the database. If any metric name in your data file matches, the status value is shown as "Global Match." If any metric name in your data file doesn't match, the status value is shown as "No Match."
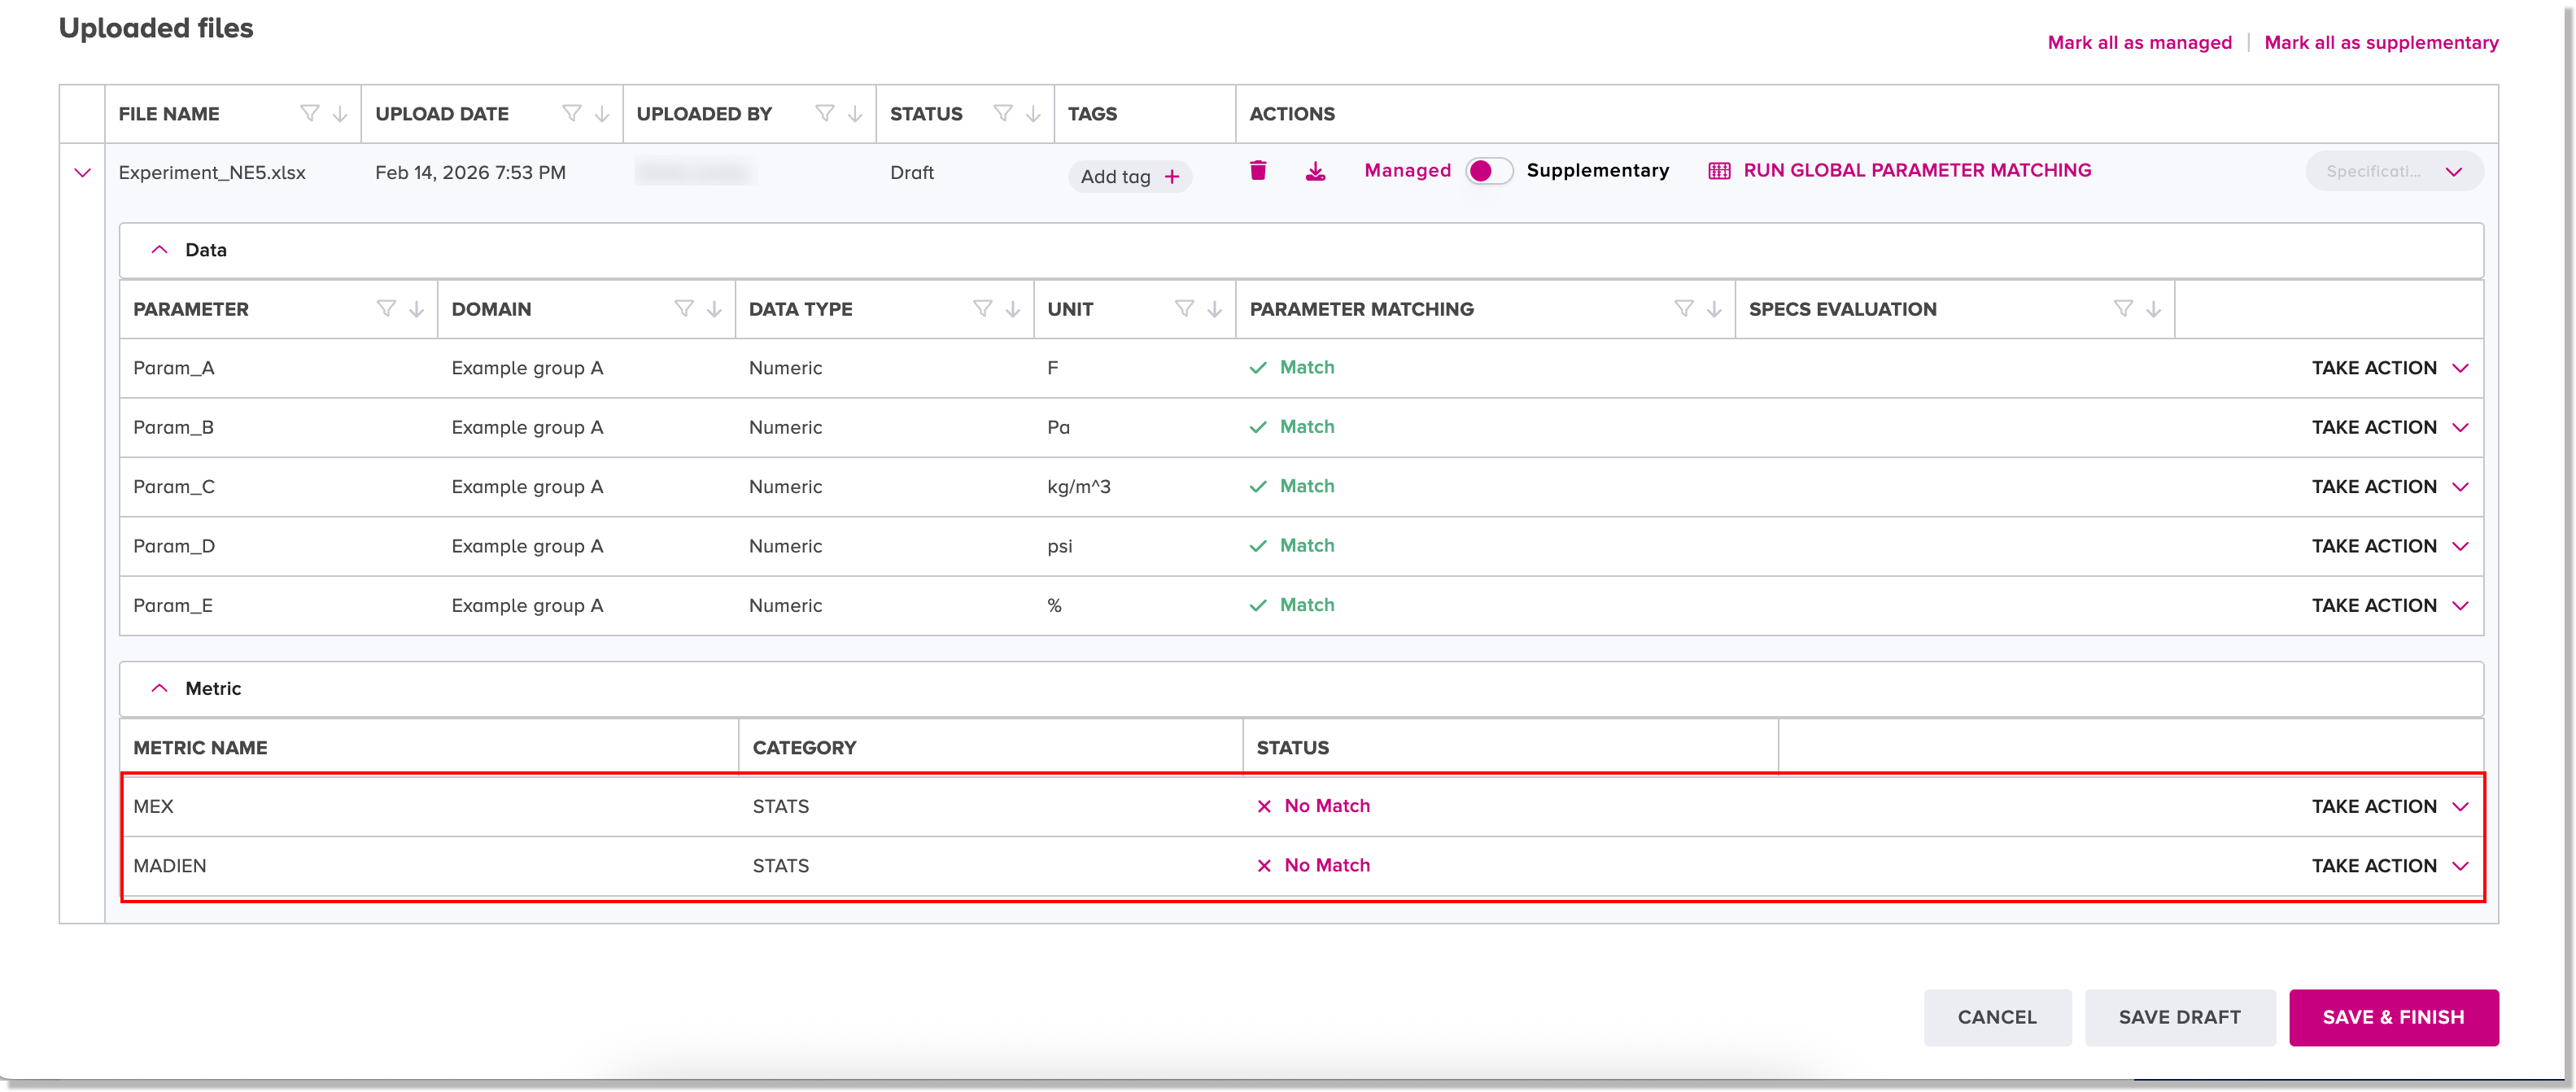
For each unmatched metric name, you are required to choose one of the resolve actions for unmatched metric names to harmonize them with existing parameter names before you are allowed to complete the upload.
Resolve actions for unmatched metric names
This task is only required if any unmatched metric names in your selected data file need to be resolved. When an unmatched metric name is marked with a status of No Match, you are required select an action so that the status becomes Match before the upload will proceed successfully.
You have three options in the Take Action menu for resolving unmatched parameter names:
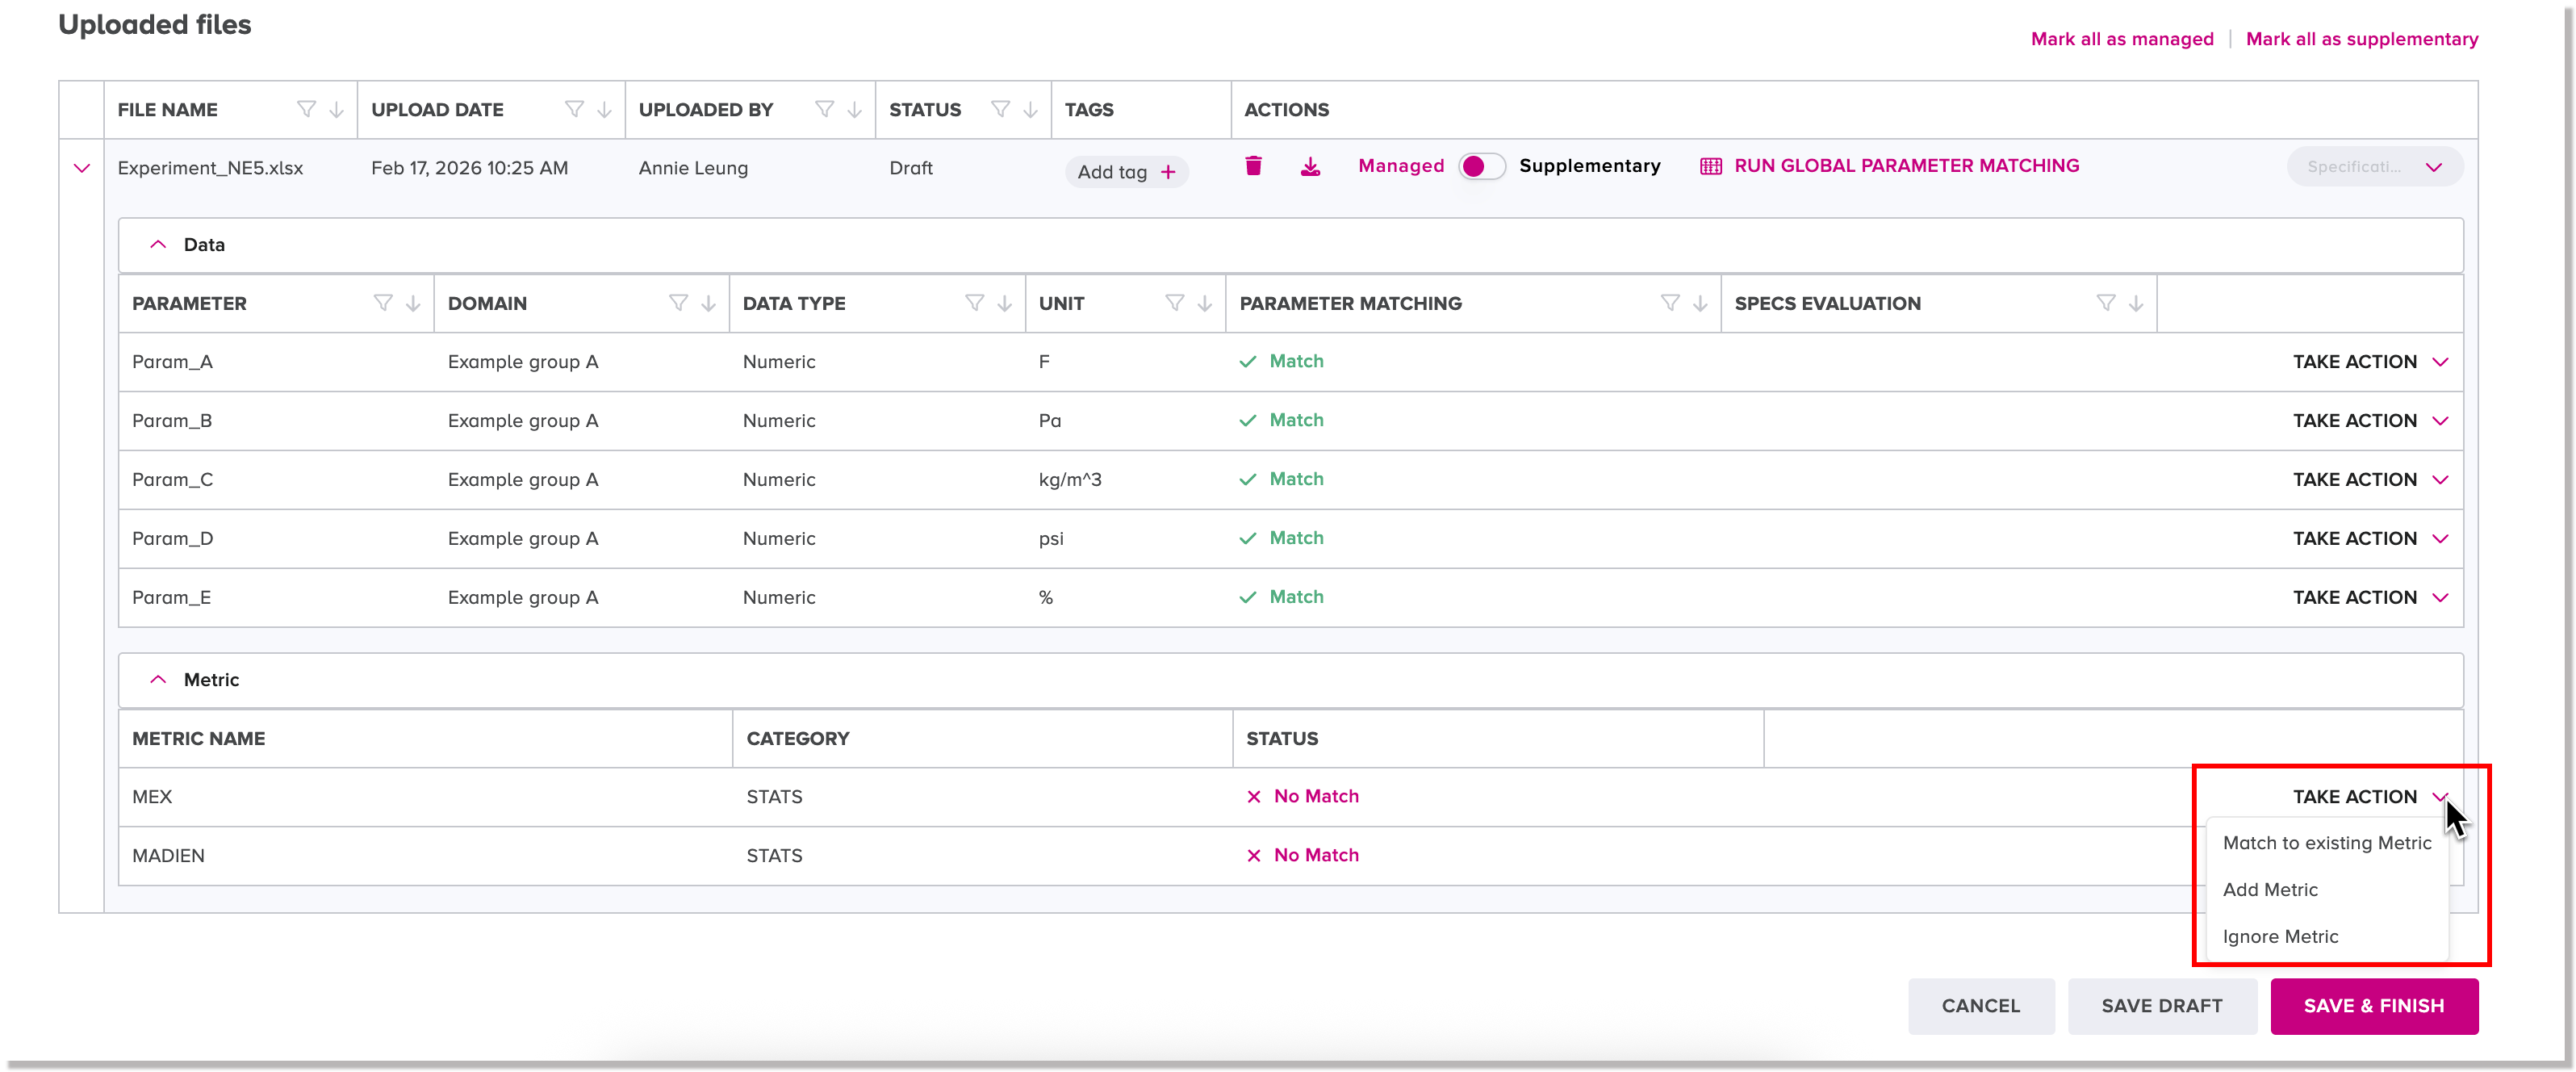
-
Match to existing metric - lets you select an existing metric name in the database to be matched the given metric name.
-
Add new metric - lets you add the given metric name to the database.
-
Ignore metric - CoBaseKRM ignores the given metric name and it will not be be uploaded to the database. The metric name will still be contained in the original data file when you download it from the database.
When the metric names have a status value of "Global Match" or are ignored, you are ready to complete the upload.
Add a journal card to the related node for an upload
The Journal card field in the Upload view lets you optionally assign a journal card containing relevant notes, comments, and feedback to an upload record. This feature is optional. After an upload has been succesfully completed, you can view the journal card on the Discussions tab for the related node.
The Journal card field in the Upload view supports the following capabilities:
-
Apply styles for formatting text and headings
-
Insert images of common file formats (PNG, JPG or JPEG, etc.), which will be displayed at a smaller aspect ratio by default to conserve space on the user interface
-
Mention a team member by his/her username using the @ (at) symbol and select a username from a drop-down list. After the upload has been completed, the web client will send the mentioned user an automatic email notification. You and other team members belonging to the same project can view the assigned journal card on the Discussions tab for the related node.
-
Assign a tag to a journal card to enable the journal card to be discoverable through the search feature
To assign a journal card to the related node for an upload:
-
In the journal card field for a record, type notes, comments, or feedback about the data tables and other files in the upload and the related project activity. Use the heading styles and text formatting options, as desired.
-
To add an image to the journal card:
-
Click or tap the image icon to open a local directory.
-
Select the file of the image to be added and click or tap Open.
The image is attached and displayed at a smaller aspect ratio in the journal card field.
-
-
To mention a team member in the journal card:
-
Type the @ (at) symbol, which displays a drop-down list of team members assigned to the same project.
-
Click or tap the username of the team member to be mentioned.
The mentioned team member's username is formatted and displayed in the journal card. Once the upload has been completed, an automatic notification is sent to the mentioned user to let him/her know about it.
-
-
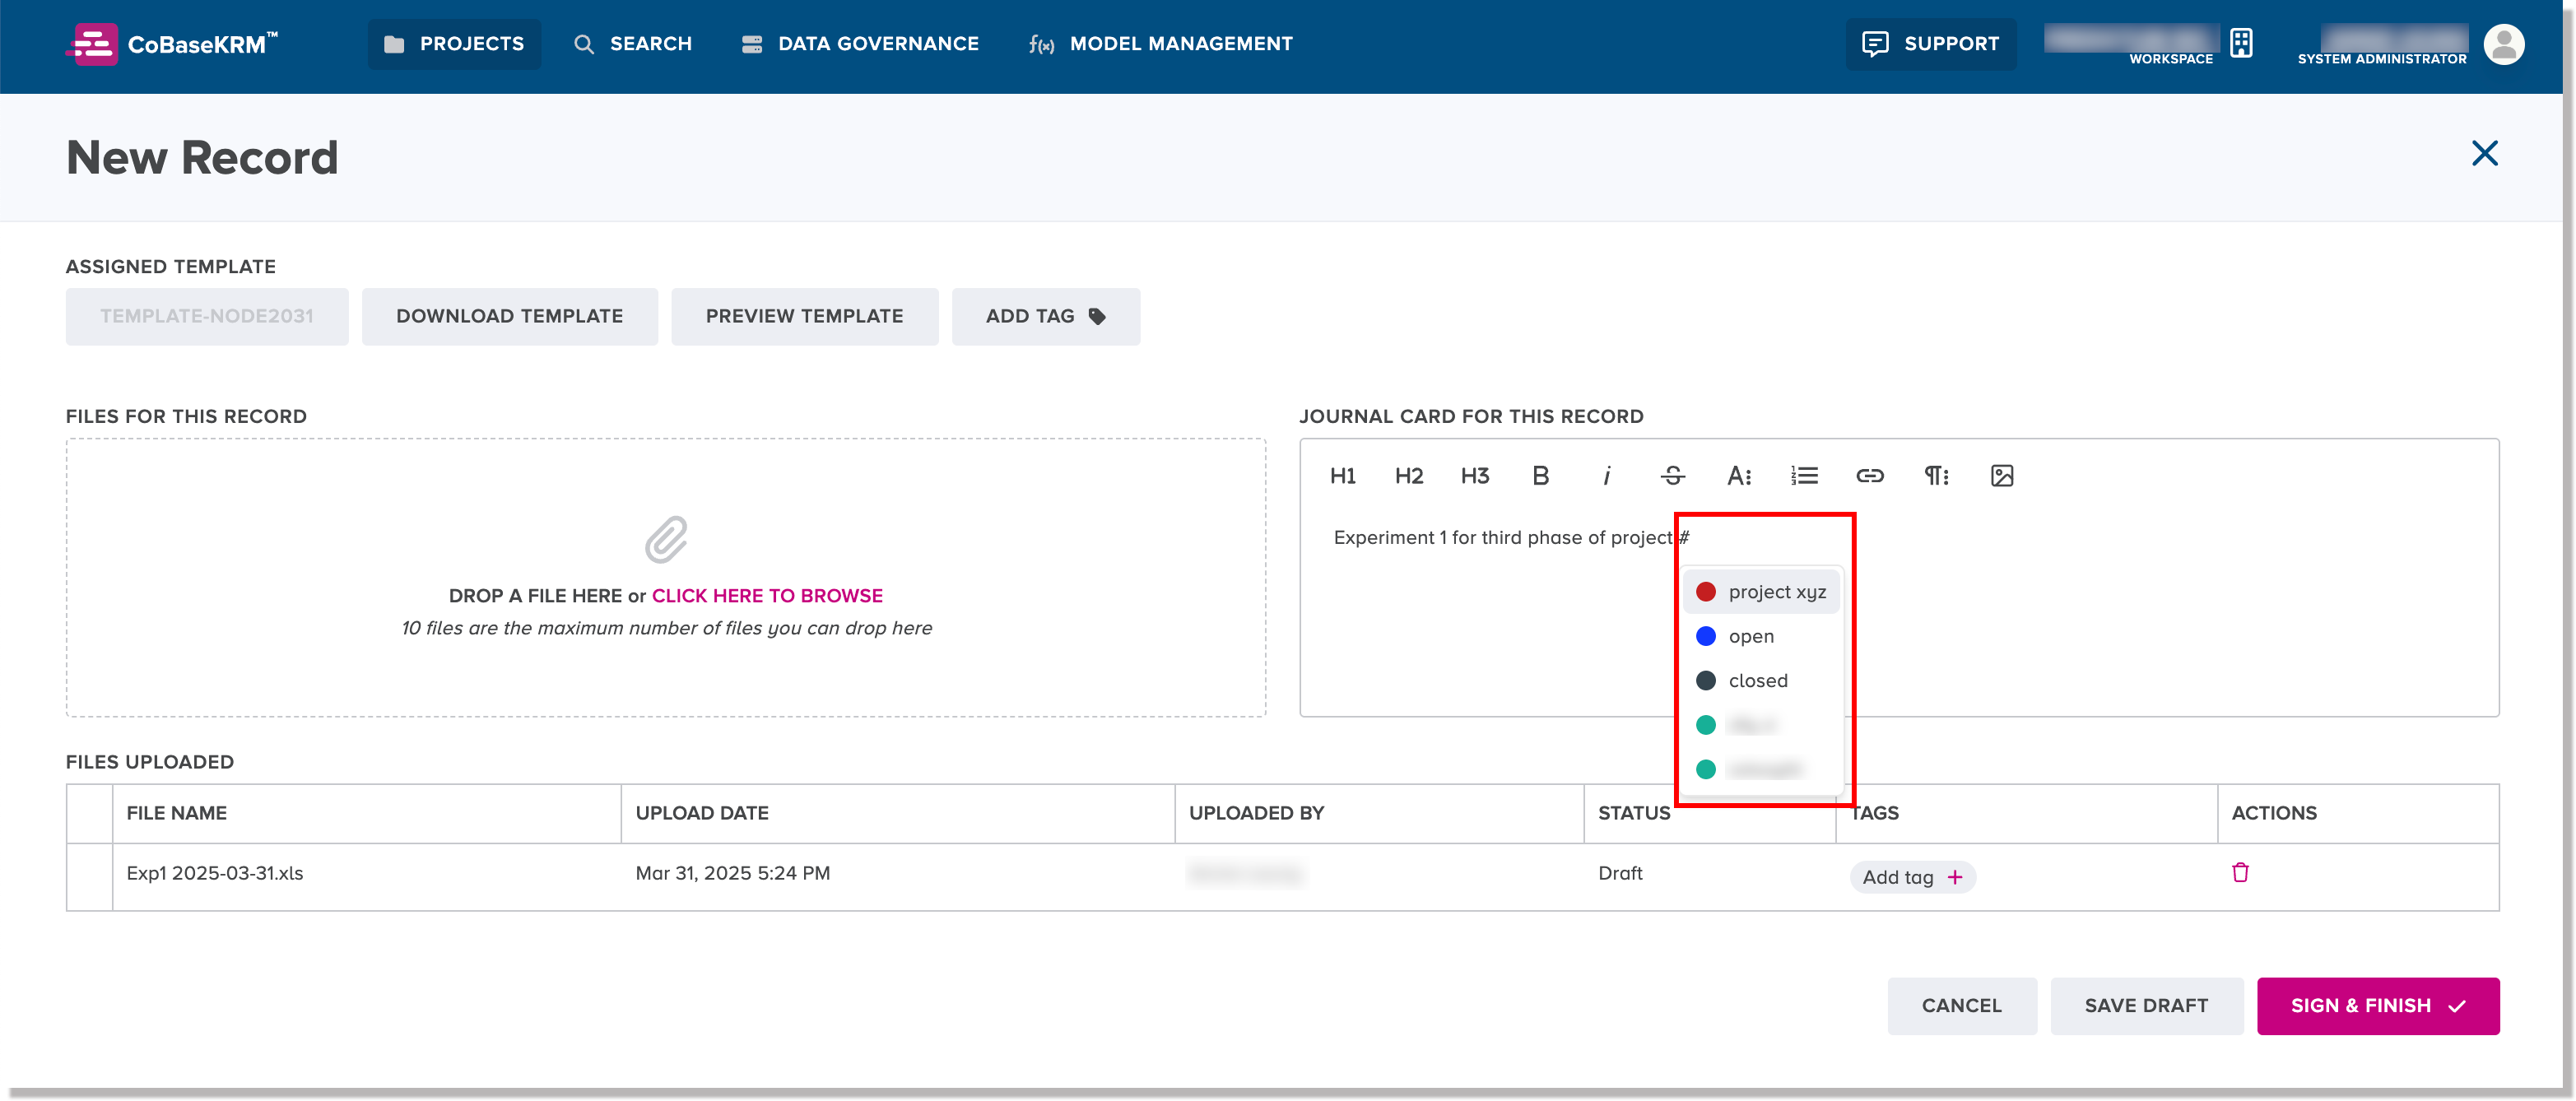
To assign a tag to the journal card, type the hash symbol (#), which displays a list of existing tags, and click or tap one to select it.
Upload selected files
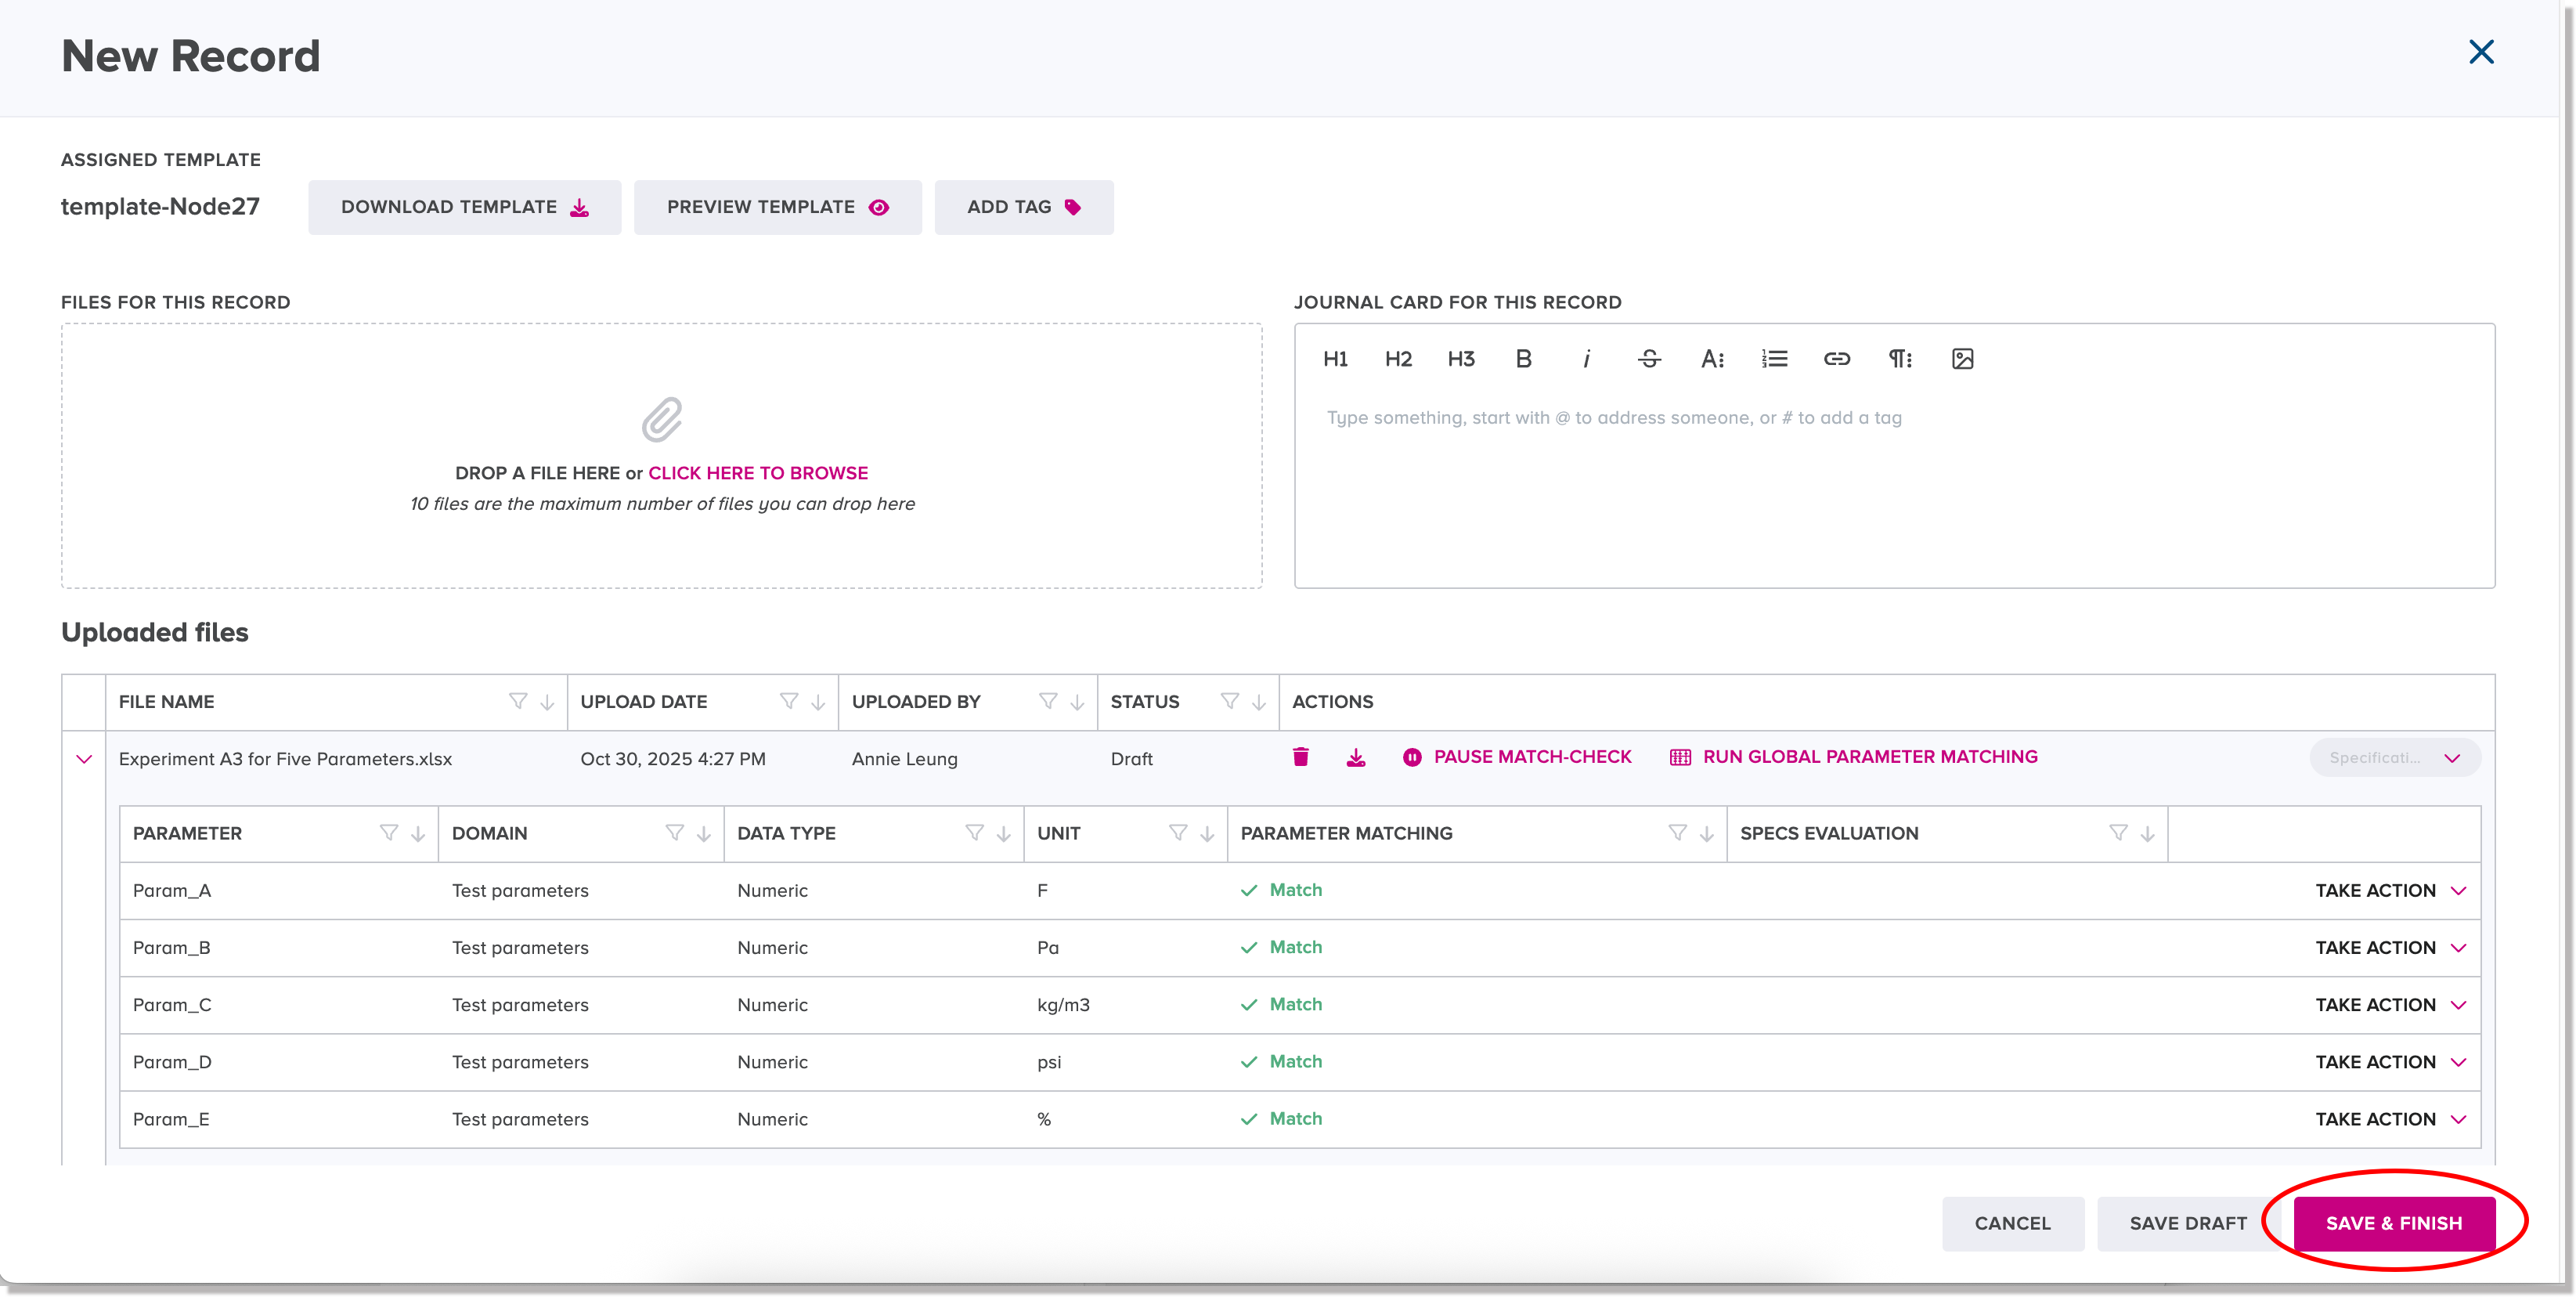
To complete an upload of selected files, click or tap the Save and finish button to save the record of your uploaded files to the database.
E-signature
E-signature collection may be required
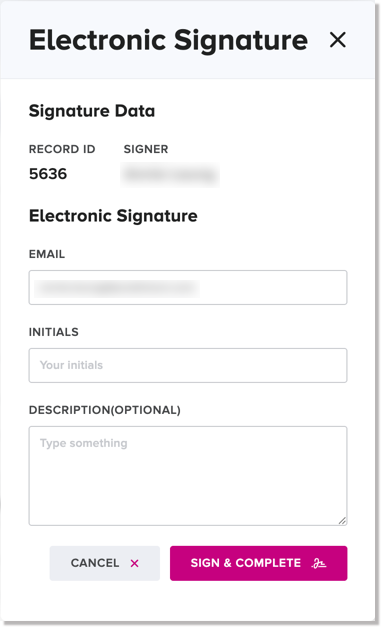
If the electronic signature collection feature has been enabled for your workspace, the button will be labeled Sign & Finish. When you click or tap the button, the Electronic Signature dialog appears. You are required to fill in the input fields and click or tap Sign & Complete in this dialog to confirm that you are an authorized user who is allowed to perform an upload. Once you have input your e-signature details, the system will allow you click or tap Sign & Finish to complete the upload.
A confirmation message is displayed once the selected data file, any supplementary files, relevant metadata, and the record of the upload are saved in the database.
Save a draft record of an incomplete upload
If you have partially completed the steps of an upload, you have the option of saving a draft record of your work and completing the upload at some later time. If you want to save a draft record at any step of an upload, click or tap the Save draft button.
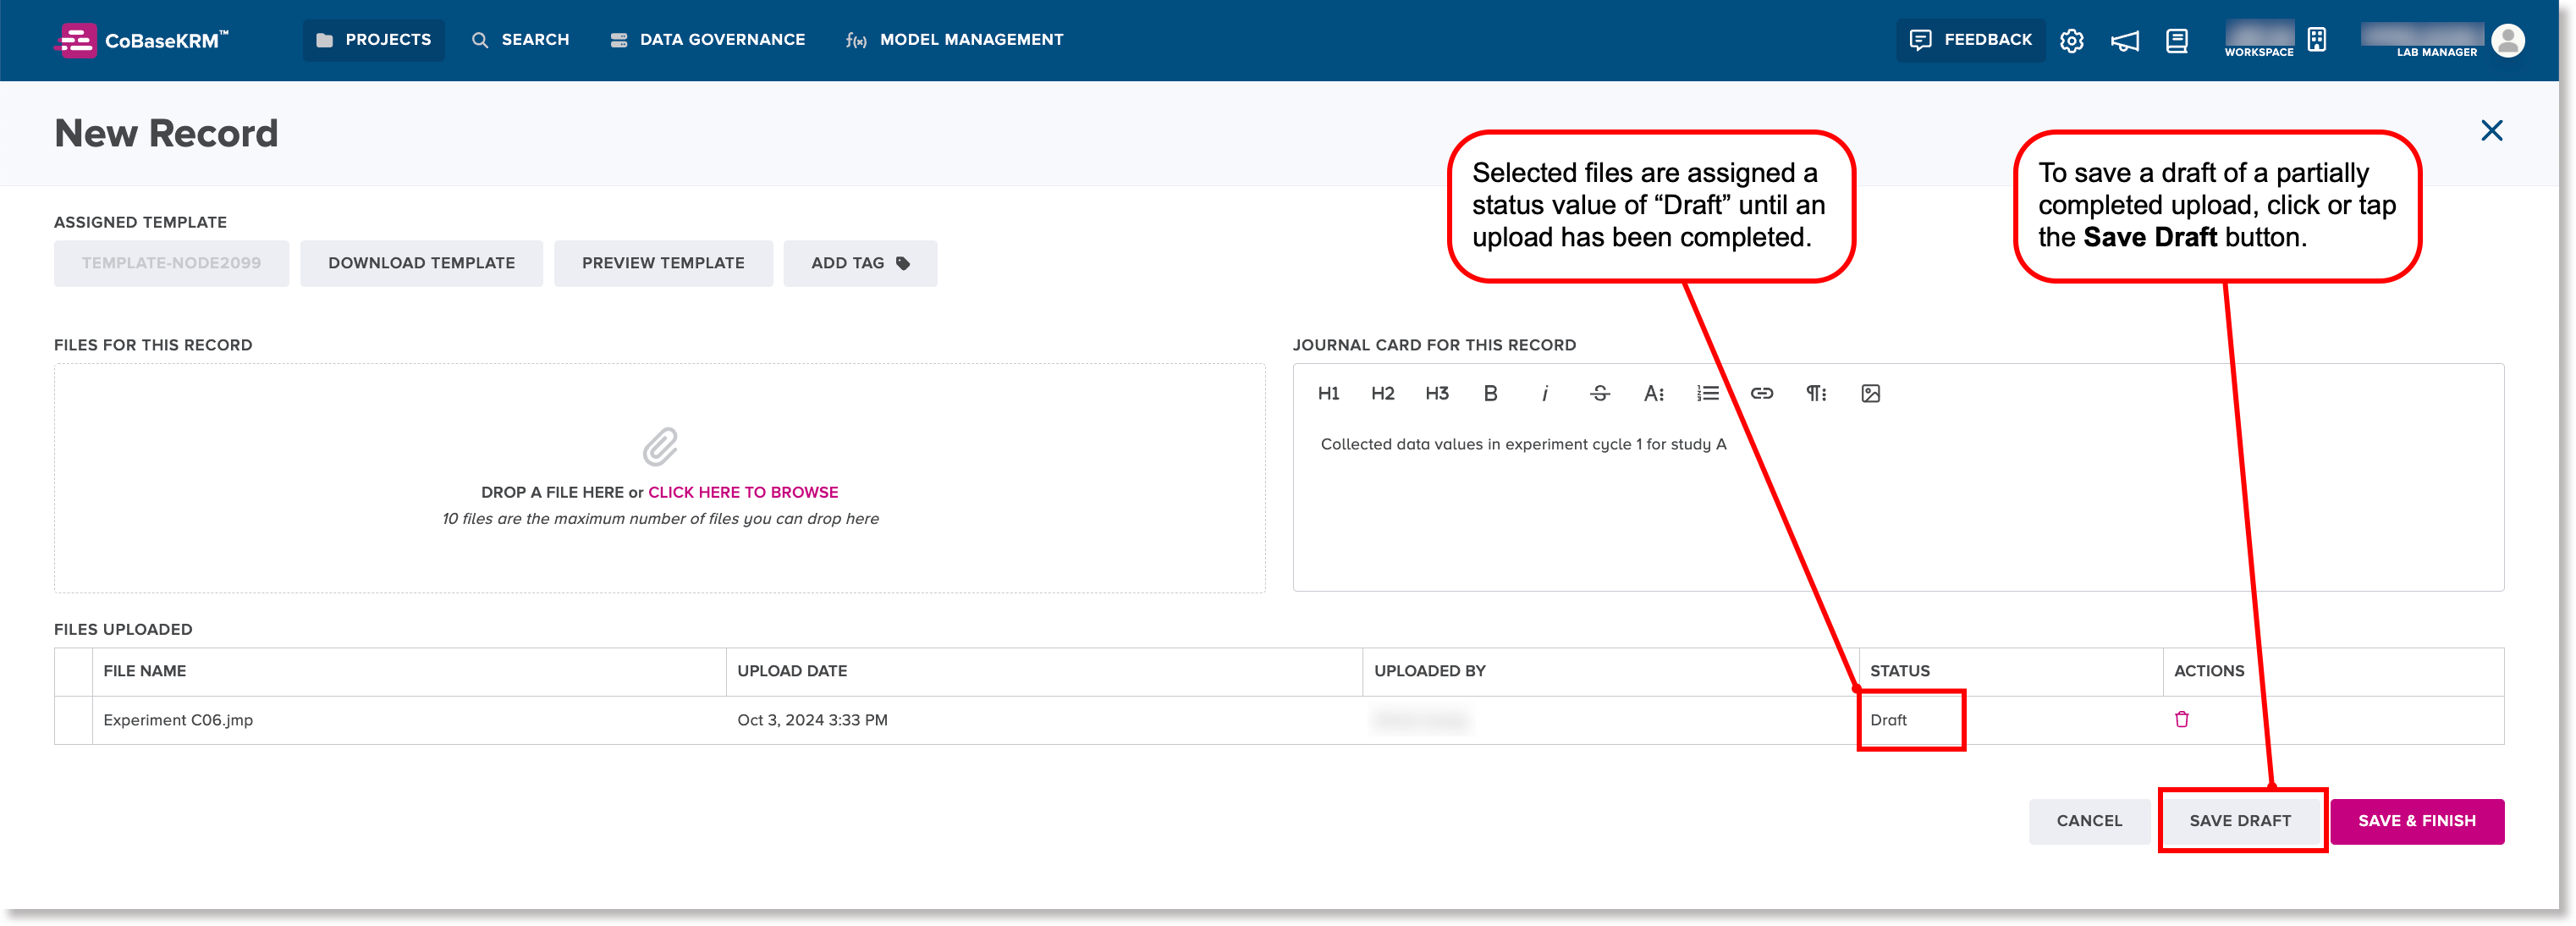
To find and open a draft record to complete an upload, see the following topic.
Open a draft record to complete an upload
Draft records are saved to a related node, but are hidden by default on the Records tab for a node. You need to turn on the display of draft records first so that you can select the draft record for which you want to complete an upload.
To open a draft record to complete an upload:
-
Navigate to the Records tab for a node, where you saved the draft record.
-
In the left panel of the Records tab, click the Show draft records checkbox to show the cards of draft records.
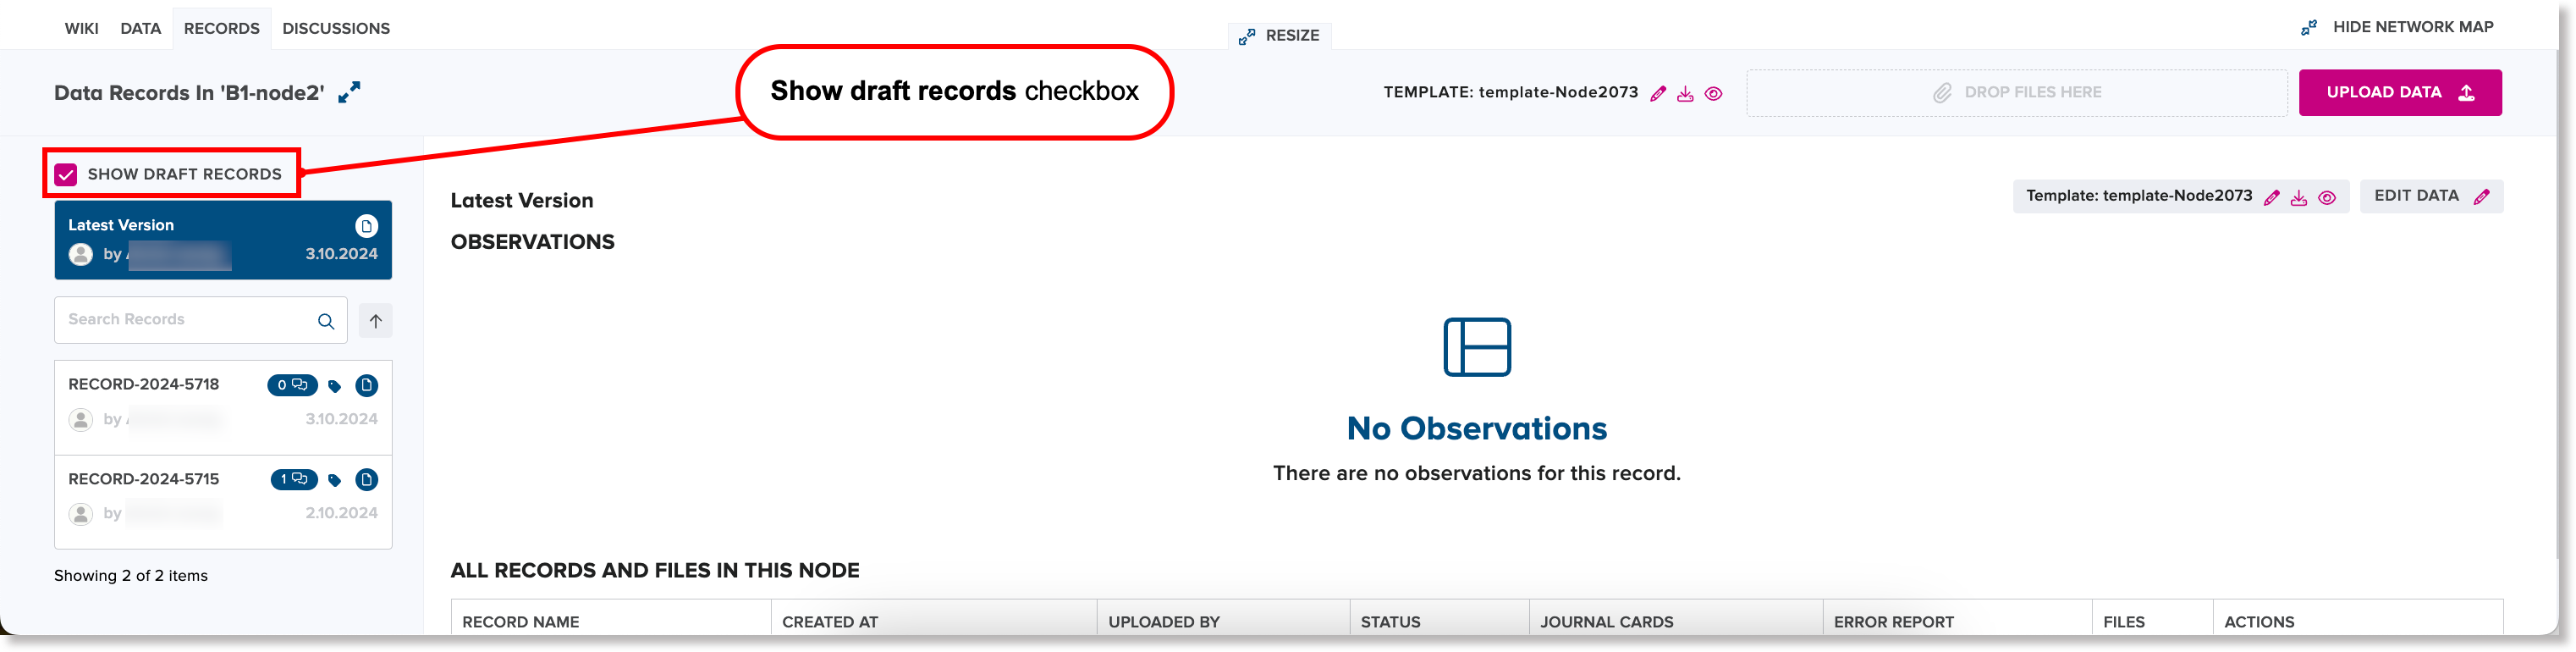
-
From the left panel, click the card of the draft record that you want to open.
The draft record with its details is displayed in the right panel of the Records tab.
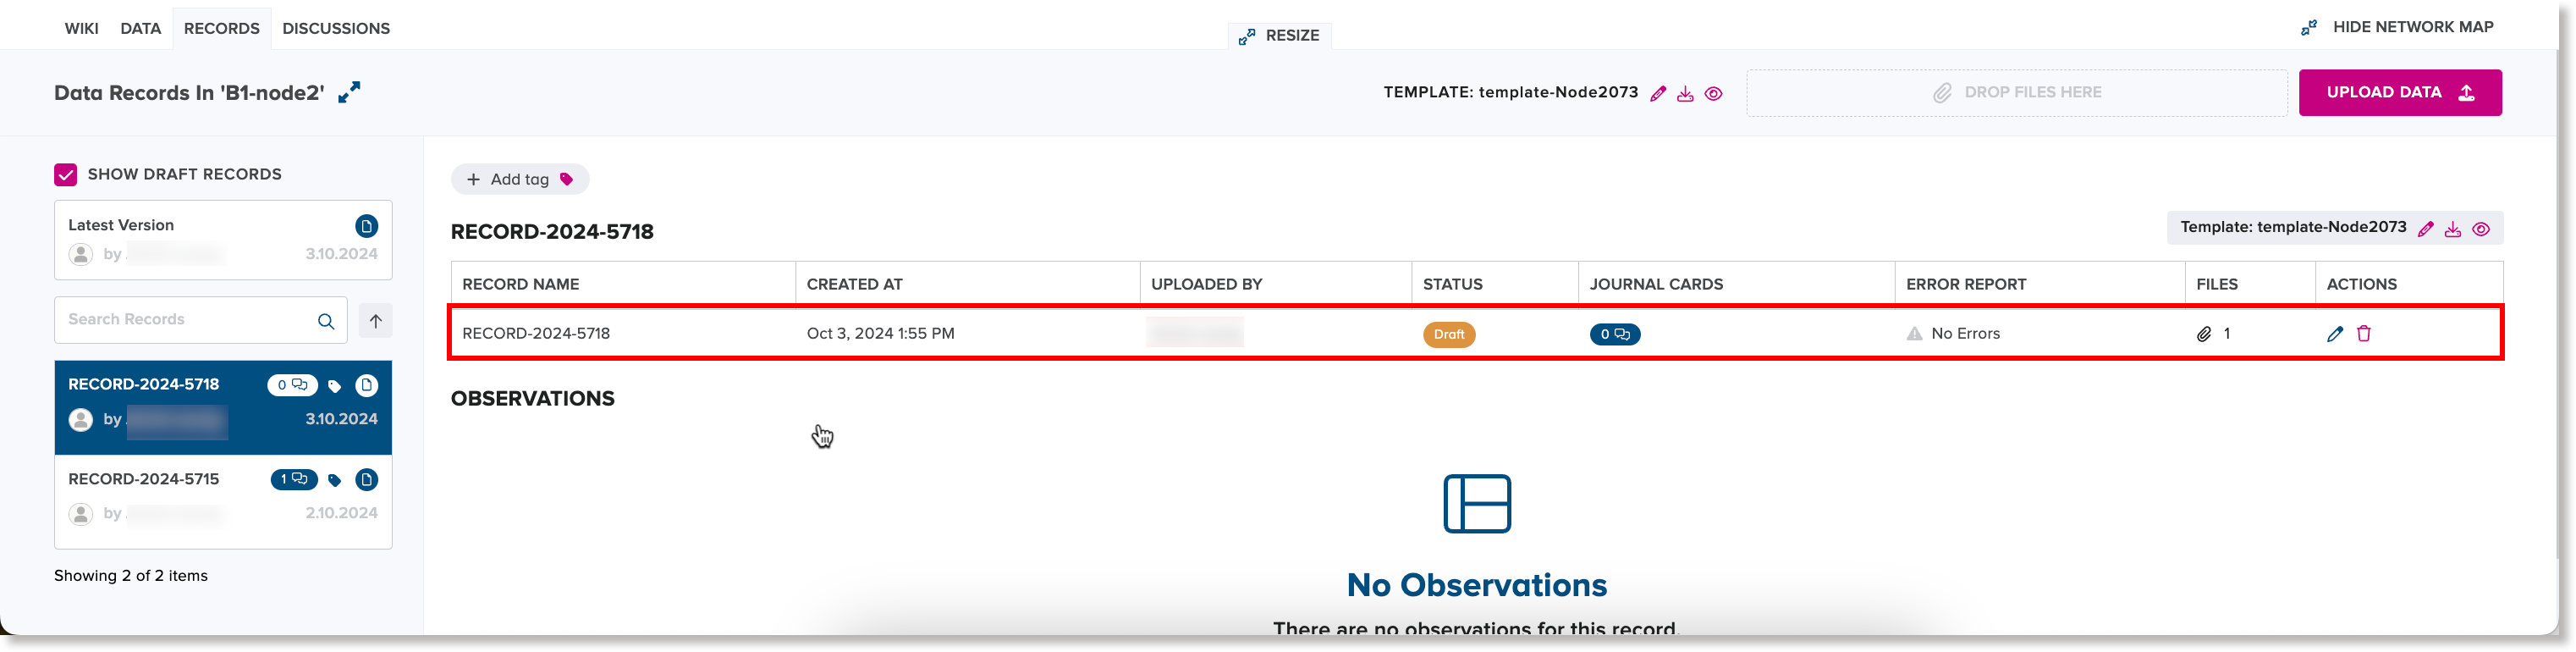
-
Under the Actions column, click the edit (pencil) icon.
The Edit draft dialog appears.
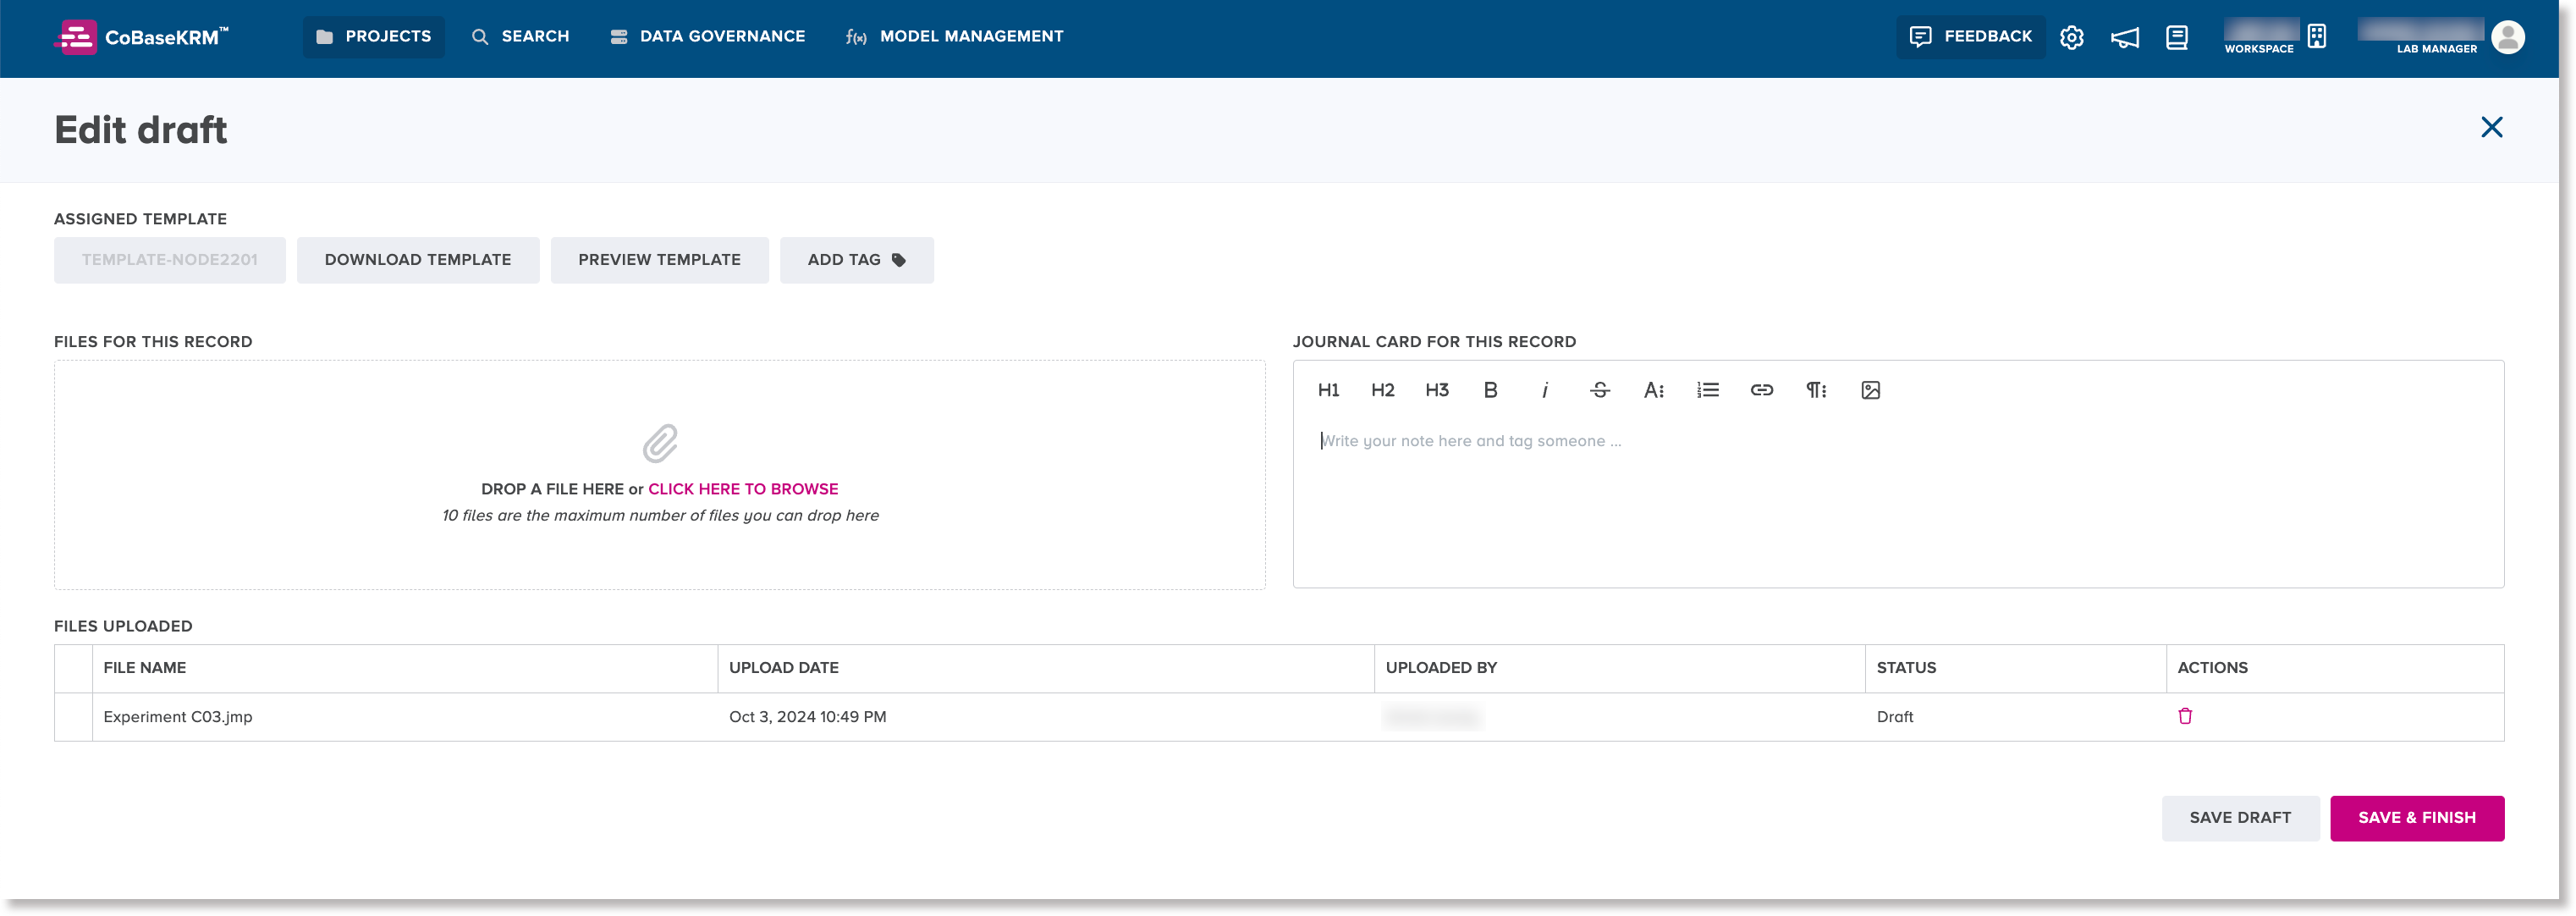
-
Add more files and define a journal card, if desired.
-
Click the Save and Finish button.
An information message appears, advising that the upload is being processed and will be displayed with a status of Finished when it has been completed.